Wednesday, November 8, 2017

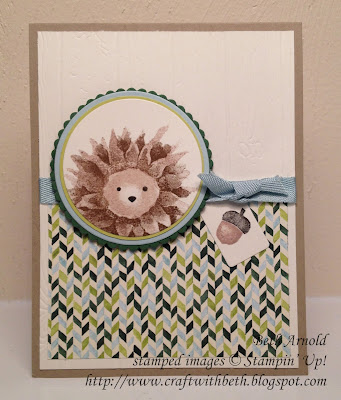
Thankful Hedgehog

The Painted Harvest stamp set is a gorgeous autumnal sunflower set that can be used to create more than just sunflowers. Look at this cutie!
 
Craft with Beth: Painted Harvest Hedgehog Thanksgiving Card Stampin Up Thank Thanks Thankful Layering Circles Framelits Fall Wood Crate Framelits
 
I designed this hedgehog card for my Stamp of the Month class. He was too precious not to share with you!

The hedgehog uses all three of the sunflower stamps. I first stamped the detailed sunflower image with Soft Suede ink on the lower portion of the Very Vanilla Hedgehog circle, so that some of the petals extend beyond the bottom of the circle to make it look like he was peeking over the edge of the circle or sitting on the ground.

Craft with Beth: Painted Harvest Hedgehog Thanksgiving Card Stampin Up Thank Thanks Thankful Layering Circles Framelits Fall Wood Crate Framelits

Next I stamped the larger sunflower image over top of the detailed sunflower image with Crumb Cake ink with some of the petals also extending beyond the bottom of the circle.

Then I inked the center of the sunflower image with Crumb Cake ink, stamped off onto grid paper, and stamped in the center of the sunflower image.

Finally, stamp the small face image from Foxy Friends with Early Espresso ink in the center of the sunflower image.

It may be difficult to see, but the Very Vanilla cardstock in the background is embossed with the Pinewood Planks embossing folder. Embossing folders are a fabulous way of adding texture and detail without adding too much fuss or busyness.

Craft with Beth: Painted Harvest Hedgehog Thanksgiving Card Stampin Up Thank Thanks Thankful Layering Circles Framelits Fall Wood Crate Framelits

The fern leaves are a combination of Garden Green ink and Lemon Lime Twist ink. Because Lemon Lime Twist has a yellower undertone, I think it gives the fern leaves depth and brightness. The fern leaves are easier to line up if you stamp the detailed fern leaf first.

First stamp the detailed fern leaf in Garden Green ink. Then ink the background fern leaf in Lemon Lime Twist. Stamp off onto grid paper. Then stamp over top of the detailed leaf image.

Craft with Beth: Painted Harvest Hedgehog Thanksgiving Card Stampin Up Thank Thanks Thankful Layering Circles Framelits Fall Wood Crate Framelits

These are just the color combinations I used. Experiment with more ink pads to see which color combinations speak to you.

Craft with Beth: Painted Harvest Hedgehog Thanksgiving Card Stampin Up Thank Thanks Thankful Layering Circles Framelits Fall Wood Crate Framelits

Try different colors of card stock too. Very Vanilla cardstock tends to deepen ink colors while Whisper White tends to brighten ink colors. I bet Elegant Eggplant with its rich jewel tone would look divine on Very Vanilla cardstock!

Thanks for stopping by!
Beth


Thanksgiving Hedgehog Card Measurements

Color
Dimensions
Score at
Card Base
Crumb Cake
4-1/4” x 11”
5-1/2”
1st Matte
Very Vanilla
4” x 5-1/4”
-
Designer Series Paper Matte
Painted Autumn Designer Series Paper
2-1/2” x 3-3/4”
-
Hedgehog Circle 1
Very Vanilla
3” x 3”; die cut a 2-1/8” circle
-
Hedgehog Circle 2
Lemon Lime Twist
3” x 3”; punch cut a 2-1/4” circle
-
Hedgehog Circle 3
Soft Sky
3” x 3”; die cut a 2-3/8” circle
-
Hedgehog Circle 4
Garden Green
3” x 3”; die cut a 2-1/2” scalloped circle
-
Inside Matte
Very Vanilla
4” x 5-1/4”
-
Tag
Whisper White
3” x 3”; die cut a tag from the Wood Crate Framelits
-


Thanksgiving Hedgehog Card Materials List
Stamps
#144783 Painted Harvest or #146021 Painted Harvest Bundle
#141549 Foxy Friends
Paper
#120953 Crumb Cake
#101650 Very Vanilla
#144613 Painted Autumn Designer Series Paper
#144245 Lemon Lime Twist
#131203 Soft Sky
#102584 Garden Green
Ink
#126975 Crumb Cake
#126978 Soft Suede
#126973 Garden Green
#144086 Lemon Lime Twist
Embellishments
#104430 Dimensionals
#144160 3/8” Classic Weave Ribbon in Soft Sky
#103683 Glue Dots®
Tools
#143263 Big Shot Machine
#141705 Layering Circles Framelits
#143720 2-1/4” Circle Punch
#143730 Wood Crate Thinlits
#143708 Pinewood Planks Embossing Folder
#130148 Grid Paper
 

Monday, November 6, 2017

Let's Practice with Stampin' Blends

Here are some fantastic videos from Stampin' Up! to help you practice with your new Stampin' Blends Markers. Shading and Blending can be overwhelming when you first start. I hope these videos give you the confidence to dive right in!


The more you practice, the more you will feel comfortable with new techniques. Stamp a few of your favorite images onto Thick Whisper White cardstock and try a variety of colors and shades.

Thanks for stopping by!
Beth

Sunday, November 5, 2017

SOTM RSVP Reminder: Hearts Come Home

Craft with Beth: RSVP Reminder Title Graphic

Tomorrow is the last day to RSVP & prepay for November's Stamp of the Month Class. The class will be held on Tuesday, November 15th & will feature the Hearts Come Home Bundle.
 
Craft with Beth: Hearts Come Home Bundle


We will make four projects using the Hearts Come Home stamp set (available in Wood-Mount Item #145413 or in Clear-Mount Item #145416) and Hometown Greetings Edgelits (Item #144671). I highly recommend ordering the Stamp Set & Edgelit Bundle (Wood-Mount Item #146065 & Clear-Mount Item #146068) for a 10% savings. The Hometown Greetings Edgelits create a cozy winter town scene on the edge of the paper. Please let me know which option (1-4) listed below that you would like to purchase.

Option 1: Item #145413 Hearts Come Home Wood-Mount Stamp Set ONLY - $31.88 + $10.00 class fee ($41.88 total)

Option 2: Item #145416 Hearts Come Home Clear-Mount Stamp Set ONLY - $24.49 + $10.00 class fee (34.49 total)

Option 3: Item #146065 Bundle Wood-Mount (BOTH stamp set and edgelit set) - $63.84 + $10.00 class fee ($73.84 total)

Option 4: Item #146068 Bundle Clear-Mount (BOTH stamp set and edgelit set) - $55.39 + $10.00 class fee ($65.39 total)

The cost includes the product(s), tax, shipping, and the class fee. If you place an order of $25 or more right after the class or bring a new friend to that class, your class fee of $10 is waived.

CLASS TO GO OPTION: If you are not local & would like to attend, place your order online & use hostess code FH6R4C2Q. That way your stamp set & edgelits are mailed directly to your house. I will then mail a priority envelope with the class project cardstock to your house. You will mail me a check for $16.85 for the class fee of $10 plus $6.85 to ship the project cardstock & embellishments. Then we can assemble the cards together over Facetime, Skype, or Facebook Messenger.

You must RSVP & prepay by November 6th, 2017. I will place the order for class on November 7th, 2017. Please let me know if you have any questions. I am happy to assist you. 


I look forward to stamping with you!
Beth

Wednesday, November 1, 2017

Stampin' Blends are here!

I am so excited I can barely contain myself! Stampin' Up! debuted their new alcohol based markers Stampin' Blends today!


Stampin' Blends are a fantastic new line of alcohol based markers to help you add color, shading, depth, and blending to your stamped images.

 Craft with Beth: Stampin' Blends Marker Collection

There will be 12 different colors that coordinate with existing Stampin' Up! colors.

Craft with Beth: Stampin' Blends Alcohol Markers Debut Colors Chart

Each of the 12 colors will have 2 shades - one lighter shade and one darker shade.
 
Craft with Beth: Stampin' Blends Alcohol Markers

In addition, there will be a bronze, an ivory, and a colorlifter marker. In total, there will be 26 markers.

Craft with Beth: Stampin' Blends Alcohol Markers Debut Colors Chart

Stampin' Blends are dual-tipped with a brush on one end and a fine point on the other end.

Craft with Beth: Stampin' Blends Alcohol Markers

They are more square than round and will lay flat on the table instead of rolling. The caps will nest. So, no worries about losing a cap easily.

Craft with Beth: Stampin' Blends Alcohol Markers

The Color Lifter Marker can take some of the saturation away and almost "erase" small mistakes. It reminds me of the sun collages with the special light reactive paper or a slight bleach effect.

Craft with Beth: Stampin' Blends Alcohol Markers

Notice how the two shades of Rich Razzleberry remain distinct even when the darker shade is applied directly on top of the lighter shade.

The bronze and ivory Stampin' Blends are designed to be used to create skin tones. You can combine the two colors together, use them singularly, or with the color lifter. 

Why are alcohol based Stampin' Blends so special?
  • The alcohol base allows for more shading and blending when coloring stamped images. It creates a smoother gradient between the shades to make highlights and shadows without clouding the colors
  • Alcohol based markers also do not react with your paper, avoiding tears and felting you often see with a blender pen.
  • Alcohol based markers on permanent on most surfaces.
  • Alcohol markers have dye-based pigments that have a more vibrant color saturation.
  • Coloring books for adults have become more and more popular over the last few years. Many stamps have also changed to include more opportunities for coloring and shading. Waterbased markers are amazing. I use them quite a bit in my stamping and will continue to do so, for sure. However, they can be limiting when it comes to finer shading and blending. So, the need for a more specialized marker is apparent. If you enjoy coloring with shading and blending, these are definitely markers to have in your craft room.

Here are tips to remember when using and storing your Stampin' Blends markers.
  • Store your Stampin' Blenders markers horizontally so that the ink saturates both ends
  • Place the cap on as soon as you are finished using the marker to avoid evaporation. Push the cap completely down. You should hear a click.
  • Alcohol markers dry quickly, so work in small areas on your stamped image at a time
  • If coloring heat embossed images, avoid coloring over the embossed lines. If you do, wipe quickly with a paper towel or soft cloth.
  • Place the cap on tightly and securely to avoid evaporation
  • Alcohol markers like many other markers are UV light sensitive, so be sure to keep them and your projects out of direct sunlight to avoid fading
  • Use Stampin' Blends Markers with ink pads that will not run or smear such as Tuxedo Black Momento Ink. Tuxedo Black Momento Ink is a quick-drying, combination water and dye based ink pad that is water and light resistant. It is also archival quality. Wait a few moments before coloring to allow the ink to dry.
  • Use thicker paper such as Thick Whisper White cardstock and Watercolor Paper to avoid the markers bleeding through the paper but experiment with vellum, glossy cardstock, and other colors of cardstock to achieve the look you want
  • Stampin' Blends are not refillable
  • Protect your work surface with grid paper or other protective mats

Most of all, have fun. Stamp a bunch of images such as flowers, trees, animals, etc and try out different color combinations and shading angles.

Craft with Beth: Stampin' Blends Alcohol Markers Debut Colors Chart Template

I created a sample chart template to see all of your Stampin' Blends colors at a glance and practice blending. Print out the template with Thick Whisper White cardstock (make sure your printer can accept this weight of paper before printing).

To help you practice using your Stampin' Blends there is a card kit and stamp set called Color Me Happy. It features several of the new Stampin' Blends markers to create 16 gorgeous cards.

Craft with Beth: Color Me Happy Stampin' Blends Project Kit Graphic Stampin Up

Click here to download the Stampin' Blends brochure.

I will have all of the Stampin' Blends markers and the kit samples available to view and try on Saturday, November 4th during my Annual Birthday Sale.

Craft with Beth: Stampin' Blends alcohol markers debut today! stampin' up

Thanks for stopping by!
Beth