Tuesday, October 31, 2017
Say Eek! if You Love Rosettes
I love a rosette! And, I love a rosette banner even more! This frightful little rosette banner is hanging underneath the mantle in my family room. Rosettes are super easy and quick to make using the Simply Scored Board.
The rosettes measure 5" in diameter. So, I cut 2 pieces of Spooky Night Designer Series Paper for each rosette that measured 2-1/2" x 12". I scored each piece of Designer Series Paper every 1/2".
For the embellishment I die cut the largest stitched oval, the second largest oval, and the largest scalloped oval in Very Vanilla, Basic Black, and Cajun Craze cardstock, respectively. I also die cut the word eek plus an exclamation mark from the Large Letters Framelits with Basic Black cardstock.
I attached a small piece of Shimmery Black Ribbon to the back of each rosette. The string to hang each of the rosettes is also Shimmery Black Ribbon. Can I just say I am madly in love with all of the ribbons this year?! I am already on my second spool of Shimmery Black Ribbon, and I plan on ordering more!
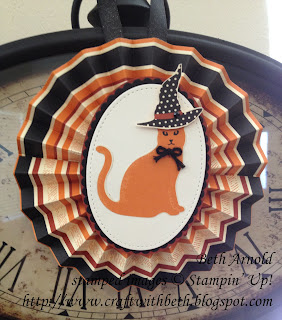
I was having so much fun making rosettes, I couldn't help myself and made this witchy Cat Punch rosette. I added a longer ribbon on the back to drape around a wine bottle or hang as an ornament.
Thanks for stopping by!
Beth
Witch's Hat Treat Tote
Here is a fa-boo-lous variation on the Spooky Cat treat holder I posted last Thursday. I changed the patterned paper to the Pumpkin Pie mosaic pattern and the embellishment in the center to the witch's hat stamp. I think this treat tote would be fantastic in Christmas Designer Series Paper for holding stocking stuffers.
Thanks for stopping by!
Beth
Witch's Hat Envelope Punch Board
Treat Tote Supply List
|
|
Stamps
|
146014 Spooky Cat Bundle
|
Paper
|
144610 Spooky Night Designer Series Paper
101650 Very Vanilla
105117 Pumpkin Pie
|
Ink
|
|
Embellishments
|
104430 Dimensionals
144129 Black Shimmery Ribbon
144639 Black
Rhinestones
|
Tools
|
133774 Envelope Punch Board
143710 Oh My Stars Embossing Folder
141705 Layering Circles Framelits
143263 Big
Shot
141491 Classic Label Punch
138995 Tear &
Tape
|
Eat if You Dare Treat Holder
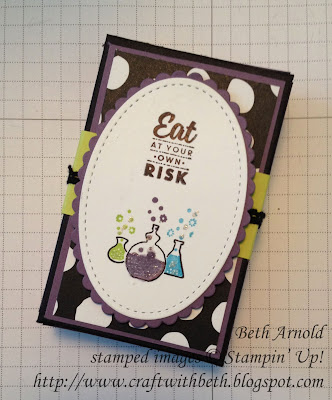
This festive treat holder, made using the Envelope Punch Board, is the perfect size to hold a Reese peanut butter pumpkin.
To determine the box size, I measured the Reese peanut butter pumpkin. I then calculated the width, depth, and height of the finished box. The depth is 3-1/4". The width is 2". The height is 1".
I started with a 6" x 6" piece of Basic Black cardstock. When you make a box with the Envelope Punch Board, you will punch and score twice on each side instead of only once like with an envelope. My first punch on the Envelope Punch Board was 1-7/8". My second punch was 3-1/4". So, start with your cardstock at the 1-7/8" line, punch, and score. Then slide your cardstock to the 3-1/4" line, punch, and score. Rotate 90 degrees to the left and repeat. Repeat for all 4 sides of the cardstock.
Cut your side tabs. Add Tear and Tape to the flaps. Fold up your box, pressing firmly on the Tear and Tape to secure the sides together.
Adhere the side panels. Wrap a 7-1/2" x 1" piece of Lemon Lime Twist cardstock around the center of the box and secure in the front. Wrap a 7-1/2" piece of Basic Black Crochet Trim around the center of the Lemon Lime Twist belly band and secure in the front. The embellishment will hide the seams.
Stamp and adhere the top embellishment. Place the Reese treat inside and close the box. Your treat holder is ready for delivery.
Thanks for stopping by!
Beth
To determine the box size, I measured the Reese peanut butter pumpkin. I then calculated the width, depth, and height of the finished box. The depth is 3-1/4". The width is 2". The height is 1".
I started with a 6" x 6" piece of Basic Black cardstock. When you make a box with the Envelope Punch Board, you will punch and score twice on each side instead of only once like with an envelope. My first punch on the Envelope Punch Board was 1-7/8". My second punch was 3-1/4". So, start with your cardstock at the 1-7/8" line, punch, and score. Then slide your cardstock to the 3-1/4" line, punch, and score. Rotate 90 degrees to the left and repeat. Repeat for all 4 sides of the cardstock.
Cut your side tabs. Add Tear and Tape to the flaps. Fold up your box, pressing firmly on the Tear and Tape to secure the sides together.
Adhere the side panels. Wrap a 7-1/2" x 1" piece of Lemon Lime Twist cardstock around the center of the box and secure in the front. Wrap a 7-1/2" piece of Basic Black Crochet Trim around the center of the Lemon Lime Twist belly band and secure in the front. The embellishment will hide the seams.
Stamp and adhere the top embellishment. Place the Reese treat inside and close the box. Your treat holder is ready for delivery.
Eat If You Dare Treat
Holder Measurements
|
||
Paper
|
Dimensions
|
|
Box Base
|
Basic Black
|
6” x 6”
|
Front Panel
|
Perfect Plum
|
2-1/16” x 3-1/4”
|
Whole Lot of Lovely DSP
|
1-15/16” x 3-1/8”
|
|
Side Panels (2)
|
Perfect Plum
|
3/4" x 3-1/4”
|
Whole Lot of Lovely DSP
|
5/8” x 3-1/8”
|
|
Top & Bottom Panels
(2)
|
Perfect Plum
|
3/4" x 2-1/8”
|
Whole Lot of Lovely DSP
|
5/8” x 2”
|
|
Belly Band
|
Lemon Lime Twist
|
1” x 7-1/2”
|
Scalloped Oval
|
Perfect Plum
|
2” x 3”
|
Stitched Oval
|
Whisper White
|
2-1/2” x 2-1/4”
|
Thanks for stopping by!
Beth
Eat If You Dare Treat Holder
Supply List
|
|
Stamps
|
#144749 Spooky Cat
|
Paper
|
#121045 Basic Black
#101889 Perfect Plum
#144245 Lemon Lime Twist
#100730 Whisper White
#144110 Whole Lot of Lovely Designer Series Paper
|
Ink
|
#140931 Archival Basic Black
#144086 Lemon Lime Twist
#126963 Perfect Plum
#126952 Tempting Turquoise
|
Embellishments
|
#144611 Basic Black Vintage Crocheted Trim
#104430 Stampin’ Dimensionals
#141897 Clear Wink of Stella
|
Tools
|
#141706 Layering Ovals Framelits
#145372 Stitched Shapes Framelits
#133774 Envelope Punch Board
#138995 Tear and Tape
#143263 Big Shot
|
Subscribe to:
Comments (Atom)


