Tuesday, September 6, 2022

September's Newsletter is now available!

Happy September! I just sent my September newsletter to my email list. This month I share how to use the Baby Wipe Technique for fall and beyond cards and projects.


Hello Harvest Pleasant Pheasant Treat Cup 3D box Thanksgiving Baby Wipe Technique


Christmas Lights Baby Wipe Technique Card Snowflakes Lights Aglow Product Suite

Christmas Lights Baby Wipe Technique Card Christmas Tree Lights Aglow Product Suite Peace

I also share tips to care for your Simply Shammy and resize a die to fit your project. These are projects and tips that I only share with my email list. So, you have to be an email list subscriber to receive these project instructions and tips.


sign up for my email list here graphic


September's newsletter is available all September long when you sign up for my email list. If you are not an email list subscriber, you can subscribe today and receive September's newsletter.

I would love to welcome you to my email list! Sign up for my email list by entering your name and email in the sign up form at the top right corner of my blog.


Craft with Beth Card Tracker Chart Graphic
 

And, when you sign up for my email list I will also send you a card tracking chart (as a PDF) to help you keep track of which cards you send to whom. Track cards that you send for birthdays, Christmas, Valentine's Day, Thanksgiving, and more, so you never send the same card twice to the same person. 

I can't wait to see you on my email list! Sign up today in the upper right corner of my blog.

Thanks for stopping by!

Beth

Friday, September 2, 2022

Weekly Deals Week 1: Weekly Deals are Back for September!

Weekly Deals Graphic Banner for September 2022 Week 1


Every week in the month of September Stampin' Up! is offering a selection of discounted products. Weekly Deals start September 1st and end on September 28th, 2022. Discounts and product selection will vary from week to week. So, be sure to check at the start of each week!

The first week is September 1st - September 7th, 2022. Below are the selection of discounted products for Week 1.


Weekly Deals September 2022 Week 1 Graphic


Click HERE or on the graphic above to see the products in my online store.


Promotion Details

  • New products added each week on 1, 8, 15, and 22 September.
  • Promotion ends 28 September.
  • Product options and discounts vary based on inventory availability.
  • All order types qualify for this promotion (customer, demonstrator, workshop, and online).
  • Discounted items can be added to a Starter Kit.
  • Get the most up-to-date product information on the online store.


Each week’s deals end at:

  • Week 1: 1−7 September
    • Phone: Wednesday, 7 September 2022; 6:50 p.m. (MT)
    • OEX/Online: Wednesday, 7 September 2022; 11:50 p.m. (MT)
  • Week 2: 8−14 September
    • Phone: Wednesday, 14 September 2022; 6:50 p.m. (MT)
    • OEX/Online: Wednesday, 14 September 2022; 11:50 p.m. (MT)
  • Week 3: 15−21 September
    • Phone: Wednesday, 21 September 2022; 6:50 p.m. (MT)
    • OEX/Online: Wednesday, 21 September 2022; 11:50 p.m. (MT)
  • Week 4: 22−28 September
    • Phone: Wednesday, 28 September 2022; 6:50 p.m. (MT)
    • OEX/Online: Wednesday, 28 September 2022; 11:50 p.m. (MT)


I am really excited that the Weekly Deals are back for the month of September! We had Weekly Deals a few years ago when I first started as a demonstrator. I really enjoyed seeing which products were discounted each week! 

I have the brushed brass butterflies, the Summer Shadow dies, and the brushed metallic adhesive dots on my order list right now. Which Weekly Deals products are on your to order list?

Click HERE to see the products in my online store.

Happy Shopping!

Beth


Thursday, September 1, 2022

The Perfect Partners Promotion Start Today!

Perfect Partners Promotion Graphic Banner

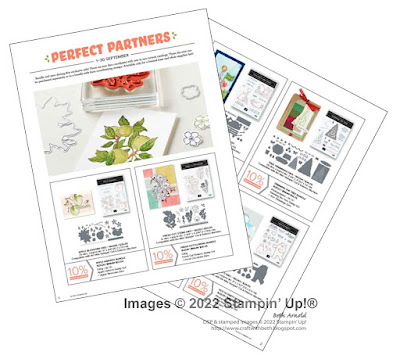
Some things are great on their own but become epic when they are paired with something else: cereal and milk, toast and butter, Fred Astaire and Ginger Rogers. We may be biased, but our favorite combo is our stamp sets and dies—and that’s what the Perfect Partners promotion is all about! 

Stampin' Up! has created six new dies that coordinate with stamp sets in the 2022–2023 Annual Catalog and the July–December 2022 Mini Catalog. These coordinating dies will only be available during this promotion on the Stampin' Up! online store and will not be offered in any catalog.  

These stamp sets and dies are available separately or as a bundle. By buying the bundle, you save 10% off the retail price. 

Click HERE or the graphic below to view the Perfect Partner die sets and their coordinate stamps sets in my online store.


Perfect Partners Promotional Flyer Thumbnail Graphic


Check out this video from Stampin' Up! showcasing the Perfect Partner die sets HERE or click the video below!


Promotion Details

Demonstrator Preorder

  • Promotion starts 12:00 am Midnight, 2–31 August 2022
  • Starting 2 August, demonstrators can preorder individual dies and/or bundles to prepare for this promotion. Limit one each per demonstrator.
  • Preorders are commissionable and must be placed as a demonstrator order.
  • Qualifying orders are eligible for Stampin’ Rewards during the preorder period.
  • Items can be added to a Starter Kit during the preorder period.
  • Demonstrator preorder deadlines
    • Phone: 31 August 2022, 4:50 PM (MT)
    • Online: 31 August 2022, 11:50 PM (MT)


Customer Sales Period

  • 1–30 September 2022
  • Starting 1 September 2022, customers can order these fun and festive dies and/or bundles. Dies coordinate with stamp sets from the 2022–2023 Annual Catalog and the July–December 2022 Mini Catalog. 
  • These six new dies sets are only available for a limited time. 
  • Save 10% off when purchasing the bundle.
  • Items available during this promotion can be added to demonstrator, customer, workshop, and online orders.
  • Dies are exclusive to this promotion and are only available while supplies last. No quantity limits apply during the customer sales period.
  • Qualifying orders qualify for Stampin’ Rewards. Items can be added to a starter kit.
  • Customer Sales Deadline
    • Phone: 30 September 2022, 4:50 PM (MT)
    • Online: 30 September 2022, 11:50 PM (MT)
  • Products are available in all markets while supplies last. Offer may vary from market to market depending on product availability. Please refer to OLO for the most up-to-date product availability information and/or ISR. 


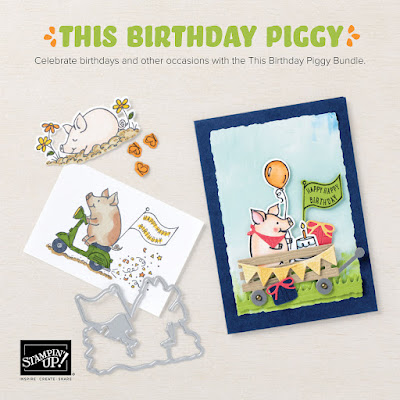
Playful Pigs Die Set Square Graphic
 

My favorite new die set is the Playful Pigs Dies (#160254)! The Playful Pigs Dies not only cut out the adorable pig stamped images but they also cut out a wagon, a bandana, a present, a banner, and more! How could you not love these sweet little pigs!?!?

I hope you add the Playful Pigs Dies (#160254) to your shopping cart today! Click HERE to start shopping!

Thanks for stopping by!

Beth

The Winner of the Second Sunday Sketches #40 is...

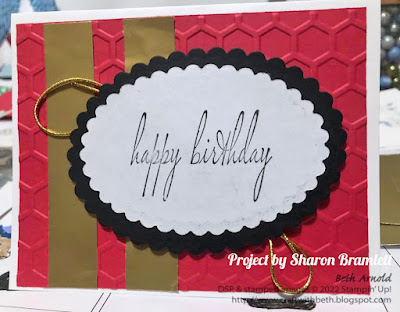
Sharon Bramlett! Congratulations, Sharon! Sharon is the winner of the 40th Second Sunday Sketches card sketch challenge! Your prize, a mystery embellishment pack from my retired product cache and 3 handmade cards, will be in the mail on Tuesday. September 6th, 2022. 


Second Sunday Sketches card entry card sketch challenge with measurements #40 birthday card


I love how Sharon added texture to her birthday card by using the hexagon embossing folder. Her color palette is cheerful and bright! I also like how she used the gold cording behind her layered scalloped oval greeting!

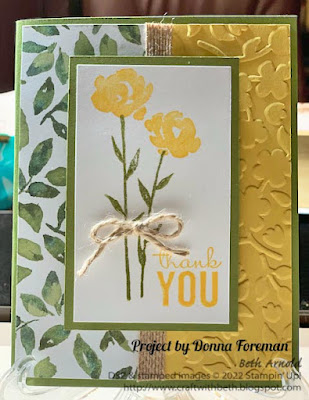
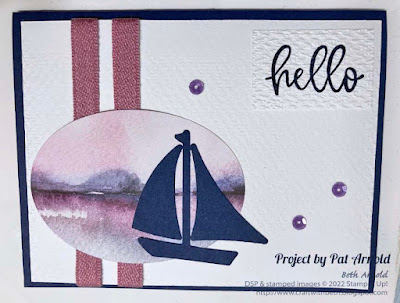
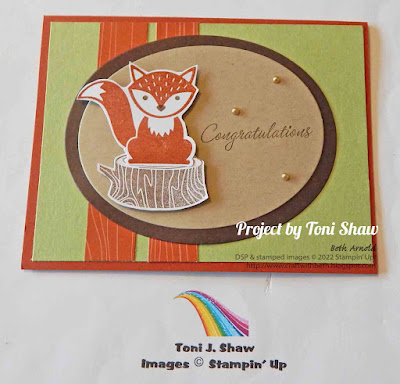
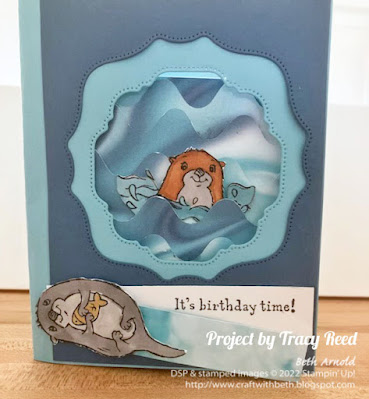
Check out the other entries for the 40th Second Sunday Sketch card challenge. I love how Toni echoed the orange in the fox on her stripes of designer series paper and on her card base. The fox is so cute too! I love how Toni placed the fox to one side and the greeting to the other. How awesome is Tracy's otter card with the layers of waves and hexagon die cut windows?!?! Pat did an amazing job layering the sail boat punch with the water scene designer series paper. The sail boat looks like it is sailing in the designer series paper! I can imagine sailing on the water during sunset. Donna used a combination of designer series paper and embossing folder to create her floral thank you card. One side of her card has flowers and the other has leaves. Donna's color palette is happy and vivid! 

Well done everyone! Thank you so much for participating in August's Second Sunday Sketches! I am blown away by your creativity! 

Second Sunday Sketches card entry card sketch challenge with measurements #40 flowers leaves floral thank you card

Second Sunday Sketches card entry card sketch challenge with measurements #40 thinking of you hello card sail boat

Second Sunday Sketches card entry card sketch challenge with measurements #40 fox card congratulations new baby

Second Sunday Sketches card entry card sketch challenge with measurements #40 otter card birthday

Want More Second Sunday Sketches? 

The next Second Sunday Sketches card challenge starts on September 11th. The prize will be a mystery embellishment package from my retired product cache and 3 handmade cards from me.

Second Sunday Sketches card challenge sketch challenge prize graphic September 2022

Share Second Sunday Sketches with a Friend 

Be sure to join in on the fun and share with a friend! If you enter the Second Sunday Sketches challenge, you can get a bonus surprise prize by sharing this challenge with a friend (for US residents only)! Here's how to get a bonus surprise prize. Limit two bonus surprise prizes per person per month.
  1. Enter into September's Second Sunday Sketches challenge
  2. Share September's Second Sunday Sketches challenge with a friend
  3. Have your friend submit their September's challenge card entry. Email me that your friend has submitted their card entry. Submit your complete mailing address and the name of the friend that you shared with. I will confirm their entry and then send you a bonus surprise prize 1-3 business days after I draw September's winner.


Happy Stamping!
Beth

P.S. Ever wonder how I draw for the Second Sunday Sketches winner? I use an app called Tiny Decisions. I input all of the names of the participants onto the wheel and spin it. The name that the wheel stops on is the winner.

Wednesday, August 24, 2022

Watercolor Pencil Cottage Rose Birthday Card

Today's card features the Abigail Rose product suite. I think it is absolutely beautiful! I couldn't resist purchasing the entire product suite! 

The style of the stamps and the designer series paper reminds me of early 1900's fabric. I would love to make a quilt out of this paper pack! The color palette is a mixture of browns, vanilla, grey, and black with a hint of pale pink. 


birthday card with an old fashioned rose in the lower left corner with the words happy birthday. Cottage Rose stamp set birthday card, Abigail Rose Designer Series Paper, DSP, birthday card, watercolor pencils

I used watercolor pencils in Flirty Flamingo, Early Espresso, Old Olive, and Daffodil Delight to add a soft texture to the stamped rose. 
 
step-by-step watercolor pencil instructions step 1, Cottage Rose stamp set birthday card, Abigail Rose Designer Series Paper, DSP, birthday card, watercolor pencils
 
I first added color to the sketch lines in the stamp to create shadows. Then I filled in each petal and leaf with less pressure to accentuate the shadow areas.
 
step-by-step watercolor pencil instructions step 2, Cottage Rose stamp set birthday card, Abigail Rose Designer Series Paper, DSP, birthday card, watercolor pencils

Inside the card I added a leaf image along side of a strip of the Crumb Cake floral patterned paper for an extra embellishment.

inside of birthday card has leaves on a single stem in the lower right corner with the a vertical piece of light brown and dark brown floral patterened paper along the right edge. Cottage Rose stamp set birthday card, Abigail Rose Designer Series Paper, DSP, birthday card, watercolor pencils

Below are the measurements and supply list to recreate this Cottage Rose birthday card. If you need supplies to recreate this card, please, shop my online store HERE.

Measurements

  • Card Base: 8-1/2" x 5-1/2"; scored at 4-1/4" (Thick Very Vanilla Cardstock)
  • 1st Mat: 3-5/8" x 4-7/8" (Early Espresso Cardstock)
  • 2nd Mat: 3-1/2" x 4-3/4" (Abigail Rose Designer Series Paper (DSP))
  • Rose: 3-1/2" x 3-1/2" (Very Vanilla Cardstock)
  • Greeting: 3/8" x 2-1/2" (Very Vanilla Cardstock)
  • Inside DSP Strip: 1/2" x 5-1/2" (Abigail Rose Designer Series Paper (DSP))

Supply List

Stamps
#159040 Cottage Rose Stamp Set (also available as a bundle with the Cottage Flowers Dies with item #159048 Cottage Rose Bundle)

Paper
#144237 Thick Very Vanilla Cardstock
#101650 Very Vanilla Cardstock
#119686 Early Espresso Cardstock
#159037 Abigail Rose Designer Series Paper (DSP)

Ink
#147114 Early Espresso Ink Pad
#141709 Watercolor Pencil Assortment #1
#149014 Watercolor Pencil Assortment #2

Embellishments
#158136 Brushed Brass Butterflies
#104430 Dimensionals
#144108 Mini Dimensionals

Tools
#159047 Cottage Flowers Dies (also available as a bundle with the Cottage Rose stamp set with item #159048 Cottage Rose Bundle)
#118486 Clear Block C
#118485 Clear Block D
#118489 Clear Block G
#110755 Multipurpose Liquid Glue
#102300 Bone Folder
#103579 Paper Snips
#130148 Grid Paper
#152392 Paper Trimmer
#149653 Stampin' Cut & Emboss Machine
#126200 Stampin' Scrub
#153648 Stampin' Mist Cleaner


close up of the brass butterflies on the card front, Cottage Rose stamp set birthday card, Abigail Rose Designer Series Paper, DSP, birthday card, watercolor pencils

I love these brushed brass butterfly embellishments! The butterflies have a gorgeous, reflective metallic finish that pairs well with every color in the Stampin' Up! catalog. The size is great for a variety of project sizes. I really like how they are dimensional without adding too much bulk or weight to a card! They are flat on the top too, making it less likely that they will tear an envelope in the mail. The brushed brass butterflies are a winner in my book!

I hope you enjoyed today's Cottage Rose birthday card. If you need supplies to make this floral card, please, shop my online store HERE.

If you have any questions about today's project, please, don't hesitate to ask me.

Thanks for stopping by!
Beth

Sunday, August 14, 2022

Second Sunday Sketches #40 Starts Today

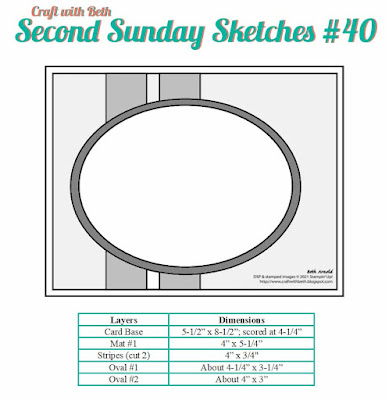
 Craft with Beth Second Sunday Sketches graphic title graphic banner card sketch challenge with measurements


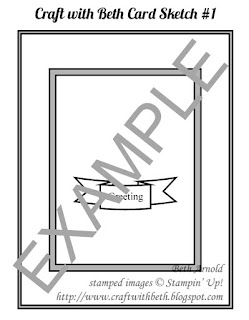
It is time for another Second Sunday Sketches challenge! If you are new to Second Sunday Sketches, please review the rules here or below. Each second Sunday of the month, I will post a card sketch. A sketch is graphic or drawing of how the elements of a card are arranged.

Craft with Beth: Stampin' Up! Second Sunday Sketches sketch card sketch challenge sample graphic

You will then use the sketch as a guide to create your own card. Your card must be a new creation and reflect the challenge guidelines. Your card must include the major elements of the card sketch, such as the number of layers and the general position of the embellishments and/or die cuts. You can rotate the sketch for a top-folding card or for a side-folding card.

You choose the occasion and the color palette as well as the stamp set(s) and the embellishments. I do ask that you use Stampin' Up! products (current or retired).

The measurements will also be included in the blog post for each Second Sunday Sketches sketch challenge. You can use the measurements as given or increase them or decrease them. For example, if a greeting is stamped on a 1" circle on the sketch, but the greeting you choose is 1-3/4", then increase the size of the circle to 1-3/4". You can also change the shape. Instead of a circle, you can use an oval, a square, a daisy punch, a monogram, etc.

The challenge will run from the second Sunday of the month until the last day of that month.

Below is August's card sketch.


Second Sunday Sketches card sketch challenge graphic #40 with measurements


Challenge Dates

August's challenge will run from August 14th, 2022 until August 31st, 2022 at 5pm EDT.

If you would like to participate in the Second Sunday Sketches sketch challenge, please create a card using the sketch above and email me a photo of your card by August 31st, 2022 at 5pm EDT with the subject line Second Sunday Sketches Entry.

Prize Drawing

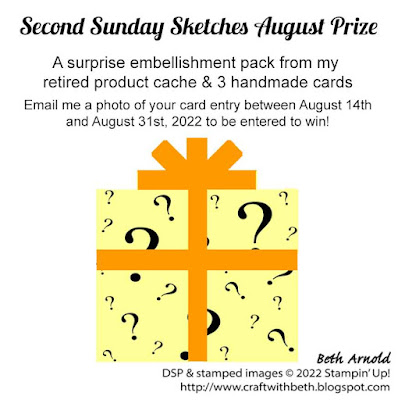
The day after the last day of the month (September 1st), I will place all of the names of the participants in a proverbial hat and randomly draw a winner. The winner will receive a prize (US Residents only)! The prize each month will change and will be announced at the start of each challenge. August's Second Sunday Sketches sketch challenge prize is a surprise embellishment pack from my retired product cache and three hand-made cards from me.


August 2022 Second Sunday Sketches #40 card challenge sketch challenge prize graphic

Winner Announcement

If you are the winner, I will notify you by email. Please respond to my email with your complete mailing address, and I will mail you your prize! If the winner does not respond to my email within 7 days, I will draw another winner.

I will also post all of the entries on my blog (with your names attached to the photos) and the name of the winner.

Some Ideas on How to Make this Card Sketch Your Own

There are many ways to change this card to make it your own! You can rotate the card layout 90 degrees, change the oval to another shape like flowers or pandas, add washi tape for the stripes, use stencils to add more interest to a mat layer, and more!

Share Second Sunday Sketches with a Friend

Be sure to join in on the fun and share with a friend! If you enter the Second Sunday Sketches challenge, you can get a bonus surprise prize by sharing this challenge with a friend (for US residents only)! Here's how to get a bonus surprise prize. Limit two bonus surprise prizes per person per month.
  1. Enter into this month's Second Sunday Sketches challenge
  2. Share this month's Second Sunday Sketches challenge with a friend (that hasn't participated before)
  3. Have your friend submit their this month's challenge card entry
  4. Email me that your friend has submitted their card entry. Submit your complete mailing address and the name of the friend that you shared with. I will confirm their entry and then send you a bonus surprise prize.

I am looking forward to seeing your personal take on the 40th Second Sunday Sketches sketch challenge! If you have any questions about this card sketch challenge, please let me know! I am happy to assist!

Happy Stamping!
Beth

Friday, August 12, 2022

World Card Making Day Creative Event Coming October 1st

World Card Making Day Creative Event October 1st, 2022 Graphic Banner
 

Clear your calendar!! Stampin' Up! is hosting a FREE virtual for all stampers and crafters on October 1st from 2:00pm - 5:00pm MT!! During this free virtual event we will come together as a crafting community to do what we all love—make cards!


World Card Making Day Creative Event at a Glance

  • Who: Anyone!
  • When: 1 October from 2:00–5:00 p.m. (MT)
  • Where: Online
  • Price of Event: Free
  • Registration Dates*: 11 August–1 October
  • Language of Event: The event will be in English with language interpretation voice-over and subtitles in English, French, German, and Dutch
  • *You don’t have to register for this event but registering will keep you informed of all the fun crafting in store!


How to Register

  • Click HERE to register.
  • *You don’t have to register for this event but registering will keep you informed of all the fun crafting in store! 
  • I registered because I want to be kept up-to-date and make sure I get the project measurements and instructions before the event, so I can cut my cardstock and have my materials ready to go.


What is Happening at this Creative Event?

World Card Making Day is all about making beautiful, heartfelt cards. During the event, Stampin' Up! will walk you through several projects, and you’ll create the cards right along with us. You’ll end up with new project ideas and some stunning new cards!


Do I Need to Order Supplies Ahead of Time?

You can use your own supplies or, to make the most of this experience, you can order 

  • the Cottage Rose Bundle from the 2022–2023 Annual Catalog, 
  • the Cottage Wreaths Bundle from the July–December 2022 Mini Catalog, or 
  • the Warm Welcome Bundle, which you can get early from the January–June 2023 Mini Catalog! 

If you want, you could even order all three bundles! The Warm Welcome Bundle will be available for purchase starting 1 September*. 

*This date is subject to change. If you are registered for the event, we’ll automatically notify you by email as soon as it becomes available.


Iridescent Pearls Graphic


When you order any bundle, you’ll get a FREE gift of Iridescent Pearl Basic Jewels! (Note that even if you order all three bundles, you’ll only receive one Iridescent Pearls gift.)

Check out the Product Flyer with all the bundles’ ordering information HERE or click the graphic below. 


World Card Making Day 2022 Customer Flyer Thumbnail Graphic


You can still attend this event without ordering the bundles, but it will be a lot more fun to craft together if you have one or more bundles! Order early to get your products in time for our World Card Making Day Creative Event.
 

World Card Making Day 2022 Square Graphic


Let's celebrate together!

I am hosting an in-person gathering on October 1st from 3:30pm - 7:30pm EST. Bring your bundles, clear blocks, and your class kit (scissors, adhesive, and bone folder). I will supply the cardstock, ink, coloring tools, and die cutting machine. We will connect to the virtual event by computer and broadcast it to the television. The cost is $20 to cover the use of my materials. Snacks and beverages will also be served. Please, RSVP by September 21st at 5pm EST on my event page HERE or by phone.


I can't wait to stamp with you on World Card Making Day!

Beth

Monday, August 1, 2022

The Winner of the 39th Second Sunday Sketches is....

Tracy Reed! Congratulations, Tracy! Tracy is the winner of the 39th Second Sunday Sketches card sketch challenge! Your prize, a mystery embellishment pack from my retired product cache and 3 handmade cards, will be in the mail on August 2nd, 2022.

Craft with Beth Second Sunday Sketches #39 card sketch challenge with measurements


How adorable is this horse peeking over the brick wall?!?! I love how Tracy moved the greeting rectangle to the center area and put it on an angle. What a fun way to add whimsy to a card! Well done, Tracy!

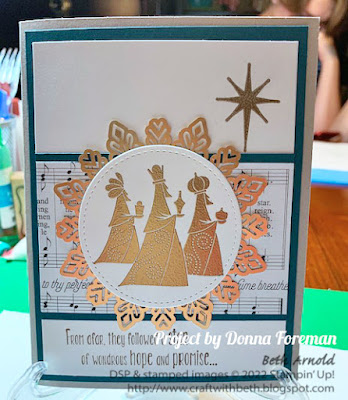
Check out the other entries for the 39th Second Sunday Sketch card challenge. Donna created a focus medallion with a metallic snowflake and a stitched circle die cut with the three wise men embossed in gold. Donna, your card is stunning! I love the added touch of the musical designer series paper. It really emphasizes the Christmas spirit! 

Pat used a scalloped circle punch for her circle on the sketch and added a sweet friendship greeting and flower punch out. I love how she echoed the colors in the Tea Boutique designer series paper in the card base and in the flower. 

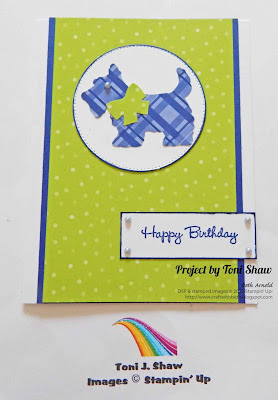
Toni used the scotty dog punch in her circle element. He is so cute! I love how Toni added pearls in the corners on her greeting rectangle! So beautiful! Well done everyone! Thank you so much for participating in the 39th Second Sunday Sketches!


Craft with Beth Second Sunday Sketches #39 card sketch challenge with measurements three wise men


Craft with Beth Second Sunday Sketches #39 card sketch challenge with measurements tea cup

Craft with Beth Second Sunday Sketches #39 card sketch challenge with measurements scotty dog


Want More Second Sunday Sketches? 

The next Second Sunday Sketches card challenge starts on August 14th, 2022. The prize will be a mystery embellishment package from my retired product cache and 3 handmade cards from me.

Craft with Beth: Stampin' Up! August 2022 Second Sunday Sketches #39 card challenge sketch challenge prize graphic

Share Second Sunday Sketches with a Friend

Be sure to join in on the fun and share with a friend! If you enter the Second Sunday Sketches challenge, you can get a bonus surprise prize by sharing this challenge with a friend (for US residents only)! Here's how to get a bonus surprise prize. Limit two bonus surprise prizes per person per month.
  1. Enter into August's Second Sunday Sketches challenge
  2. Share August's Second Sunday Sketches challenge with a friend
  3. Have your friend submit their August challenge card entry. Email me that your friend has submitted their card entry. Submit your complete mailing address and the name of the friend that you shared with. I will confirm their entry and then send you a bonus surprise prize 1-3 business days after I draw August's winner.


Happy Stamping!
Beth

P.S. Ever wonder how I draw for the Second Sunday Sketches winner? I use an app called Tiny Decisions. I input all of the names of the participants onto the wheel and spin it. The name that the wheel stops on is the winner.

Wednesday, July 27, 2022

Hello Harvest Offset Gatefold Card

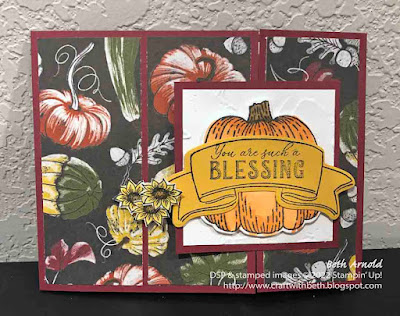
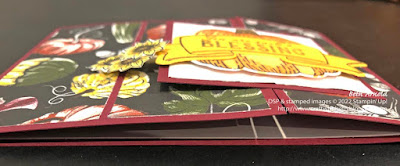
Fun folds, like this offset gate fold card, are a great way to feature designer series papers, especially with larger prints and scenes. The Rustic Harvest Designer Series Paper in the 2022 July-December Mini Catalog is perfectly suited. It has larger patterns with fall squashes and gourds and large chrysanthemums that could almost fill the entire card front. 

 Hello Harvest Offset Gate Fold Thanksgiving card grateful gratitude friendship fun fold card Rustic Harvest DSP

You can cut the designer series paper piece in one continuous scene or cut three individual strips of designer series paper. For today's card, I cut the designer series paper in a large panel and then cut it into three individual l pieces to create continuous scene. 

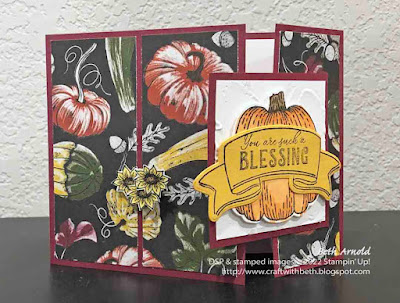
The offset gate fold card is similar to the regular gate fold card. It keeps the same card base, but the front opening is moved to one side. You can move the opening to the right or to the left side of the card. You can hold the card vertically or horizontally, like in today's project.

Hello Harvest Offset Gate Fold Thanksgiving card grateful gratitude friendship fun fold card Rustic Harvest DSP

Below are the measurements and supply list for this Hello Harvest offset gate fold card. 

Measurements

  • Card Base: 4-1/4" x 11"; scored at 1-7/8" & 7-3/8" (Merry Merlot Cardstock)
  • Designer Series Paper (cut 3): 4" x 4-7/8" and then cut into 3 - 1-5/8" x 4" pieces (Rustic Harvest Designer Series Paper)
  • Square Mat: 2-3/4" x 2-3/4" (Merry Merlot Cardstock)
  • Square: 2-1/2" x 2-1/2" (Basic White Cardstock)
  • Pumpkin: 2-1/2" x 2-1/2" (Basic White Cardstock)
  • Banner: 4" x 2" (Crushed Curry Cardstock)
  • Sunflowers (stamp 3): 3" x 1" (Basic White Cardstock)
  • Inside Mat: 4" x 5-1/4" (Basic White Cardstock)
  • Cardstock Scrap to reinforce underneath of the sunflowers: about 1/2" x 1/2"

Supplies:

  • #159634 Hello Harvest Stamp Set
  • #159644 Hello Harvest Bundle
  • #146979 Merry Merlot Cardstock
  • #159276 Basic White Cardstock
  • #131199 Crushed Curry Cardstock
  • #159633 Rustic Harvest Designer Series Paper
  • #132708 Memento Tuxedo Black Ink Pad
  • #147112 Merry Merlot Ink Pad
  • #147111 Mossy Meadow Ink Pad
  • #100082 Basic Black Stampin' Write Marker
  • #154897 Pumpkin Pie Stampin' Blends Combo Pack
  • #154906 Soft Suede Stampin' Blends Combo Pack
  • #154883 Daffodil Delight Stampin' Blends Combo Pack
  • #141897 Clear Wink of Stella
  • #154317 Painted Texture 3D Embossing Folder
  • #118487 Clear Block A
  • #117147 Clear Block B
  • #118485 Clear Block D
  • #118490 Clear Block H
  • #104430 Dimensionals
  • #102300 Bone Folder
  • #103579 Paper Snips
  • #110755 Liquid Glue
  • #130148 Grid Paper
  • #152392 Paper Trimmer
  • #149653 Stampin' Cut & Emboss Machine with the Specialty Plate
  • #159643 Rustic Pumpkin Dies

Hello Harvest Offset Gate Fold Thanksgiving card grateful gratitude friendship fun fold card Rustic Harvest DSP

The card closes by securing the left tail of the banner underneath a grouping of three sunflowers. I adhered the sunflowers in a cluster to a small scrap of cardstock to reinforce the strength of the closure. The card functions without the reinforcement, so the extra cardstock underneath the sunflowers is not essential.
 
Hello Harvest Offset Gate Fold Thanksgiving card grateful gratitude friendship fun fold card Rustic Harvest DSP


I hope you give this offset gate fold card featuring the Hello Harvest Bundle a try! If you need supplies to make this fun fold card, please, shop my online store HERE

If you have any questions about today's project, please, don't hesitate to ask me. I am happy to help you with your stamping questions!


Thanks for stopping by! Have a great day!
Beth
Monday, July 25, 2022

Ringed with Nature Christmas Double Pocket Treat Holders

Today's protect is a double pocket treat holder featuring the Ringed with Nature stamp set and the Boughs of Holly Designer Series Paper. The double pocket treat holder was one of the first treat holders that I learned when I started as a Stampin' Up! Demonstrator. 


Ringed with Nature Christmas Double Pocket Treat Holder

This festive treat holder comes together quickly and easily with minimal supplies. It also uses an entire piece of 6" x 6" designer series paper. 


There are two pockets to contain  a variety of treats. Here I used Ghirardelli chocolate squares. One chocolate square fits in each pocket. 


Below are the measurements and supply list for this festive Christmas double pocket treat holder.

Measurements

  • Treat holder base: 6" x 6"; folded in half diagonally, scored at 2-3/4" & 5-5/8", and then at 1/2"
  • Circle: 2-1/4" x 2-1/4" (die cut the 1-7/8" circle)
  • Greeting: 1" x 3"
  • Ribbon: 6"- long piece

Supplies

  • #159883 Ringed with Nature Stamp Set
  • #159276 Basic White Cardstock
  • #159600 Boughs of Holly Designer Series Paper
  • #159559 Sweetest Christmas Designer Series Paper
  • #155778 Soft Succulent Ink Pad
  • #155576 Evening Evergreen Ink Pad
  • #147084 Real Red Ink Pad
  • #147089 Garden Green Ink Pad
  • #159555 3/8" Gold and Vanilla Satin Edged Ribbon
  • #141705 Layering Circles Dies
  • Paper Trimmer
  • Stampin' Cut & Emboss Machine
  • Bone Folder
  • Paper Snips
  • Dimensionals
  • Mini Dimensionals
  • Liquid Glue
  • Clear Block B
  • Clear Block C
  • #122334 Simply Scored Scoring Tool
  • 1/2" Circle Punch
  • Corner Rounder Punch

You can customize this sweet treat holder by switching the patterned papers and embellishments. I made another version using the Sweetest Christmas Designer Series Paper. I love how the candy cane pattern is perfect for Christmas treats! 


Check out how to make this double pocket teat holder in the video below or on YouTube HERE.


I hope you give the double pocket treat holder a try! If you need supplies to make this knitting mini card, please, shop my online store HERE

If you have any questions about today's project, please, don't hesitate to ask me. I am happy to help you with your stamping questions!


Thanks for stopping by! Have a great day!
Beth

Monday, July 18, 2022

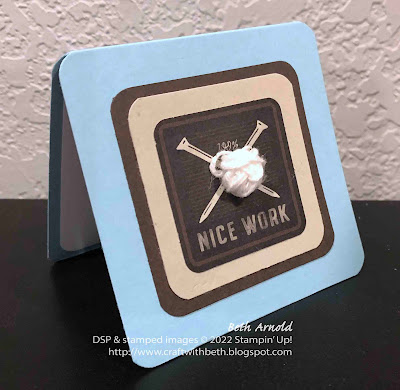
100% Nice Work Mini Knitting Card

I have been working with the He's the Man Designer Series Paper pack often over the last month, especially for Father's Day and cards for my family. I have a lot of relatives that enjoy camping and cooking on the grill too.


He's the Man Designer Series Paper Knitting Yarn Ball Card Mini Card 3" x 3" card

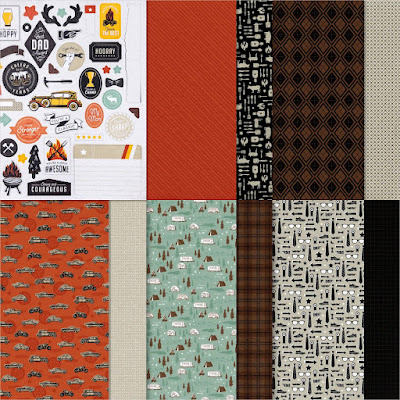
The He's the Man Designer Series Paper pack is a terrific mix of linear patterns like stripes and diamond as well as icon patterns including glasses, cookout supplies, and ties. It also includes two sheets of die cuts.


He's the Man Designer Series Paper Graphic DSP 


The die cut sheets are pre-cut for you and contain a myriad of die cuts ranging from labels with greetings to everyday objects like cars, antlers, and grills.

I am truly enjoying working with the die cuts. They add another dimension to your projects, especially with the fun shapes of the labels and banners. 


He's the Man Designer Series Paper Die Cut Sheet Graphic


Looking at the die cut sheet I noticed that the two crossed nails reminded me of knitting needles and was similar to a merit badge size. I love knitting! I have been knitting and crocheting for over twenty years. Any excuse to incorporate knitting into all areas of my life is a plus!

So, I grabbed a spool of Basic White Baker's twine, wound a little yarn ball, and glued it to the center of the "knitting needles". I backed my little merit badge on Early Espresso and Sahara Sand cardstock before adding it to a Balmy Blue cardstock mini card base.

I may send this little card to a fellow knitter to let them know how much I appreciate their knitting skills!

Below are the measurements and supplies for this cute mini card.

Measurements

  • Card Base: 3" x 6"; scored at 3" (Balmy Blue Cardstock)
  • 1st Mat: 2-1/4" x 2-1/4" (Early Espresso Cardstock)
  • 2nd Mat: 2" x 2" (Sahara Sand Cardstock)
  • Die Cut: 1-1/2" x 1-1/2" (He's the Man Designer Series Paper) - use the 100% nice work die cut
  • Inside Mat: 2-3/4" x 2-3/4" (Basic White Cardstock)


Supplies

#146982 Balmy Blue Cardstock
#119686 Early Espresso Cardstock
#121043 Sahara Sand Cardstock
#159276 Basic White Cardstock
#155475 Baker's Twine Essentials Pack
#110755 Multipurpose Liquid Glue
#102300 Bone Folder
#103579 Paper Snips
#130148 Grid Paper
#152392 Paper Trimmer
Corner Rounder Punch


The He's the Man Designer Series Paper is seemingly a "masculine" theme, but I think everyone can use them. The symbols and patterns, to me, are more universal. Anyone can grill, go camping, wear ties, or like classic cars. I hope the title of the designers series paper does not deter anyone from giving it a try.

I hope you give the He's the Man Designer Series Paper another look! If you need supplies to make this knitting mini card, please, shop my online store HERE.

If you have any questions about today's project, please, don't hesitate to ask me. I am happy to help you with your stamping questions!

Thanks for stopping by! Have a great day!
Beth
Wednesday, July 13, 2022

Whale Done Fish Cracker Snack Tag

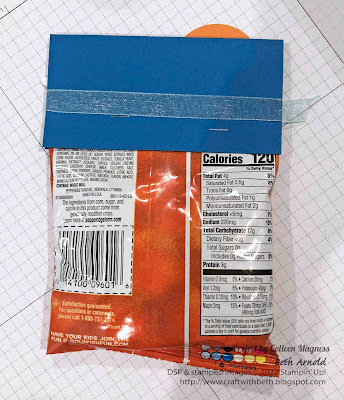
My demonstrator team leader Colleen Magness made this cute Whale Done fish cracker snack bag topper for one of our Better Your Best Demonstrator Team events quite awhile ago. She made everyone little goodie bags with some projects to make, a stamp set, some embellishments, and some snacks to enjoy during our event. The decoration of the snack bag was such a thoughtful touch! I felt so special!

Whale Done Stamp Set Whale Builder Punch Fish Cracker Snack Bag Tag Topper


I had taken pictures of her fish cracker snack decoration and completely forgot to share what an adorable addition this was to our event goodie bags. I was flipping through the photos on my phone and found them. After I shared my s'mores bag topper project on June 13th, I knew Colleen's bag topper would provide you with even more inspiration on how to dress up a snack bag!

I loved how Colleen created an underwater scene with the Whale Done stamp set and how kind it was for her to make our team event that much more special! Plus, the construction of the tag is genius!

Whale Done Stamp Set Whale Builder Punch Fish Cracker Snack Bag Tag Topper


The Pretty Peacock cardstock was folded in half and stapled to the top of the fish cracker bag with the staple prongs showing in the front and the smooth side of the staple showing on the back. Then she stamped and adhered the under the sea scene to the Pretty Peacock cardstock, covering the staple prongs. The ribbon was tied onto the tag next followed by the whale cut out and the layered circles.

Talk about a clever way to hide the sharper edges of the staple!

To make the underwater scene, Colleen stamped a piece of Basic White cardstock with the seaweed and coral stamps along the bottom and stamped the school of fish across the top. She then sponged around the outer edges of the Basic White cardstock to create an underwater look to the tag.

Below are the measurements and supplies to make Colleen's fish cracker snack bag topper. Colleen's bag topper used Pretty Peacock cardstock and ink. However, Pretty Peacock is a retired In Color. You could substitute Pacific Point or your favorite blue or blue green cardstock and ink pad. I have substituted Pacific Point in the measurements and the supply list below.

Measurements

  • Tag Topper Base: 4-1/2" x 4-1/2"; scored at 2-1/4" (Pacific Point Cardstock)
  • 1st Mat: 4-1/2" x 2" (Basic White Cardstock)
  • Circle 1: 2" x 2" (Basic White Cardstock) - use the 1-9/16" diameter circle die
  • Circle 2: 2" x 2" (Pumpkin Pie Cardstock) - use the 1-3/4" diameter circle die
  • Whale: 2-1/2" x 2" (Basic White Cardstock)


Supplies

#158315 Whale Done Stamp Set
#159276 Basic White Cardstock
#11350 Pacific Point Cardstock
#105117 Pumpkin Pie Cardstock
#147098 Pacific Point Ink Pad
#147086 Pumpkin Pie Ink Pad
#102300 Bone Folder
#103579 Paper Snips
#130148 Grid Paper
#152392 Paper Trimmer
#149653 Stampin' Cut & Emboss Machine
#118486 Clear Block C
#118485 Clear Block D
#118490 Clear Block H
#152699 Whale Punch
#151770 Layering Circle Dies
#152462 Pool Party 3/8" Ribbon
Fish Cracker Snack-sized Bags
Stapler
Staples


It is fun to incorporate stamping into everyday items and events! This snack bag topper is such a cute and delightful way to deliver snacks for an event like a birthday party, an aquarium trip, a road trip, a movie night, tailgating, and more!

I hope you try decorating snack bags! If you need supplies to make this Whale Done snack bag topper, please, shop my online store HERE. I can't wait to see how you decorate your snack bag!

If you have any questions about today's project, please, don't hesitate to ask me. I am happy to help you with your stamping questions!

Thanks for stopping by! Have a great day!
Beth
Monday, July 11, 2022

4-in-1 Aromatherapy Inhaler Gift Box

Happy International Essential Oil Day! This international day for essential oils was started in 2018 by Jared Turner the then COO of an essential oil company to celebrate the founder's birthday.


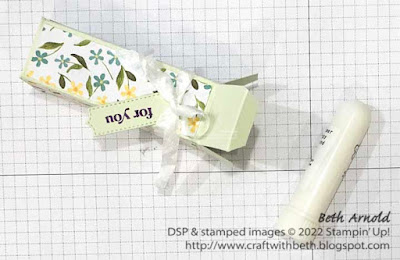
aromatherapy inhaler gift box simply fabulous stamp set potted succulent dies 3D gift box gift packaging


Today I am sharing an aromatherapy inhaler gift box. I love to make different aromatherapy blends for myself, my family, and my friends. I store my most frequently used blends in 15 ml stock bottles. I also add my blends to aromatherapy inhalers, glass and metal roller ball bottles, and to my lip balms and lotions. 

aromatherapy inhaler gift box simply fabulous stamp set potted succulent dies 3D gift box gift packaging
 
So when my mom asked me to make one of her friends an aromatherapy inhaler, I jumped at the chance to make a new blend for her friend. This is her friend's first time using an aromatherapy inhaler. The shape of the aromatherapy inhaler is a little unusual if you have never seen it before, so I created a little gift box for it.

Not only is the gift box a cute way to give an aromatherapy inhaler, but the box also protects the aromatherapy inhaler from dust and dirt.

aromatherapy inhaler gift box simply fabulous stamp set potted succulent dies 3D gift box gift packaging
 
An aromatherapy inhaler is a small tube with holes on the end. Essential oils are applied to a cotton wick and inserted into one end of the tube. Then a cap is placed on the end of the tube to hold the cotton wick inside. Next, a cover is added to the tube to protect it from getting dirty.
To use it, remove the cover and inhale slowly from the end with the holes with one nostril and then repeat on the other nostril. The inhaler comes very close to your nose, so once you use an aromatherapy inhaler that becomes your personal aromatherapy inhaler. 

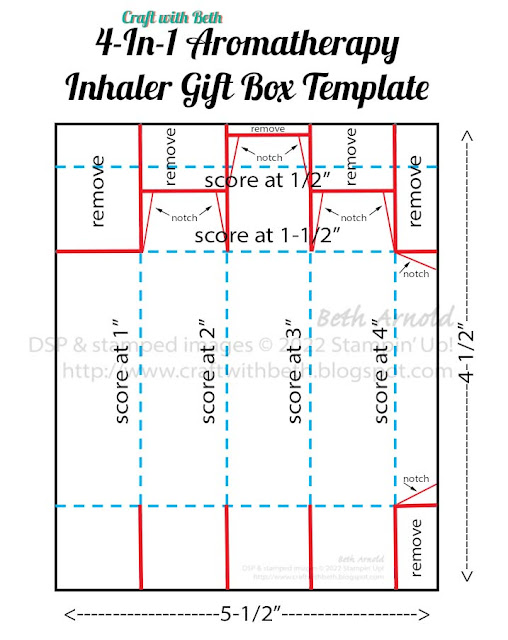
aromatherapy inhaler gift box simply fabulous stamp set potted succulent dies 3D gift box gift packaging template graphic
 
Aromatherapy inhalers can be plastic, metal, or glass. For today's project, I am using a plastic aromatherapy inhaler. All of the gift box's measurements are based on a plastic aromatherapy inhaler.

Measurements

  • Gift Box Base: 4-1/2" x 5-1/2"; scored at 1", 2", 3", & 4" on the 4-1/2" side and at 1/2", 1-1/2", 4-1/2" on the 5-1/2" side (Soft Sea Foam Cardstock)
  • DSP Mats (cut 4): 7/8" x 2-7/8" (Hues of Happiness Designer Series Paper (DSP))
  • Greeting Tag: 1" x 3" (Soft Sea Foam Cardstock)

Supplies

  •  #159133 Simply Fabulous Stamp Set
  • #146988 Soft Sea Foam Cardstock
  • #158822 Hues of Happiness Designer Series Paper (DSP)
  • #147099 Gorgeous Grape Ink Pad
  • #151326 1/4" Basic White Crinkled Ribbon
  • #110755 Multipurpose Liquid Glue
  • #102300 Bone Folder
  • #103579 Paper Snips
  • #130148 Grid Paper
  • #152392 Paper Trimmer
  • #149653 Stampin' Cut & Emboss Machine
  • #118489 Clear Block G
  • #154330 Potted Succulent Dies

Although aromatherapy inhalers can last a long time, they can lose their scent over time. When the cotton wick needs a refresh, carefully remove the cap, take out the wick, and add more essential oils to the wick. Then put the wick back inside tube and replace the cap. You can also use a new wick instead of refreshing the old one.

aromatherapy inhaler gift box simply fabulous stamp set potted succulent dies 3D gift box gift packaging
 
Aromatherapy inhalers can be refreshed using single essential oils or a blend of essential oils. You can swirl the wick in a small bowl with essential oils or drop the essential oil(s) from a bottle directly onto the wick. Making a small 15 ml stock bottle of the inhaler blend would also make a nice pairing with the aromatherapy inhaler.
 
aromatherapy inhaler gift box simply fabulous stamp set potted succulent dies 3D gift box gift packaging
 
Once I made the inhaler gift box, I realized the shape of the box could easily be changed to fit a 15 ml stock bottle, a roller ball bottle, and a lip balm tube! I modified the height and the width of the original inhaler box to make boxes for each of the other 3 containers, making 4 boxes from 1 one box shape.

aromatherapy inhaler gift box simply fabulous stamp set potted succulent dies 3D gift box gift packaging
 
Below is a video showing how to make the aromatherapy inhaler box or watch it on YouTube HERE.


Have you made an aromatherapy inhaler before? Leave me a comment below, I would love to hear what your favorite essential oil blends are! If you need supplies to make this 4-in-1 aromatherapy inhaler gift box, please, shop my online store HERE.

If you have any questions about today's project, please, don't hesitate to ask me. I am happy to help you with your stamping questions!

Thanks for stopping by! Have a great day!
Beth


P.S. This blog post is for educational purposes only and is in no way intended to be advice or a substitution for advice of any kind - medical or otherwise. This blog post makes no claims of any kind - medical or otherwise. This blog post is anecdotal and educational only.