Showing posts with label scoreboard. Show all posts

Wednesday, January 3, 2018

Silly Sweater Matching Game

Craft Beth: Silly Christmas Sweater Memory Matching Game Tacky Sweater 3D gift box stampin up
 
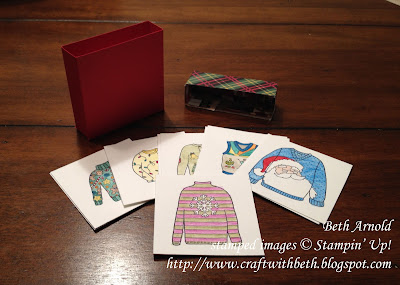
My last Holiday Catalog project featuring the Christmas Sweater stamp set (#144893 Wood-mount / #144896 Clear-mount). I thought this crazy Christmas sweater stamp set would be perfect for a fun memory card matching game for one of my nephews.

Craft Beth: Silly Christmas Sweater Memory Matching Game Tacky Sweater 3D gift box stampin up

It was simple and easy to create. I cut 24 2-1/2" squares of Thick Whisper White cardstock and stamped 4 of each sweater design. Then I pulled out all of my Stampin' Write Markers, Watercolor Pencils, Blender Pens, Stampin' Blends, Ink Pads, and Aquapainters and had a blast coloring the tacky sweaters!

Craft Beth: Silly Christmas Sweater Memory Matching Game Tacky Sweater 3D gift box stampin up

On the back I randomly stamped snowflakes and swirls in Pacific Point, Pool Party, and Smoky Slate ink from the Snowflake Sentiment stamp set.

Craft Beth: Silly Christmas Sweater Memory Matching Game Tacky Sweater 3D gift box stampin up

My nephew absolutely loved the sweater game! We had a great time playing over the Christmas vacations!

Craft Beth: Silly Christmas Sweater Memory Matching Game Tacky Sweater 3D gift box stampin up

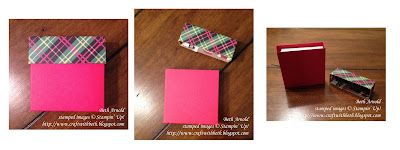
I created the box using Real Red cardstock and Christmas Around the World Designer Series Paper. I cut a 7-1/2" by 3-1/2" piece of Real Red cardstock.

Craft Beth: Silly Christmas Sweater Memory Matching Game Tacky Sweater 3D gift box stampin up

Then I scored it with the 7-1/2" edge along the top of the Simply Scored Board at 2-3/4", 3-1/2", 6-/4", and 7". Next I rotated the cardstock 90 degrees and scored at 3/4". Then I cut the bottom score lines up to the 3/4" score line, added Tear & Tape to the flaps, and folded into a box.

For the lid, I started with a 3-13/16" by 1-13/16" piece of Christmas Around the World Designer Series Paper. Then I scored each side at 1". I cut the score lines up to the 1" score line, added Tear & Tape, and folded into a box.

Craft Beth: Silly Christmas Sweater Memory Matching Game Tacky Sweater 3D gift box stampin up

I can see this stamp set made into a cute garland or a tag to top a gift! What projects would you make with the Christmas Sweater stamp set? I would love to see what you make!

Thanks for stopping by!
Beth
Tuesday, October 31, 2017

Say Eek! if You Love Rosettes

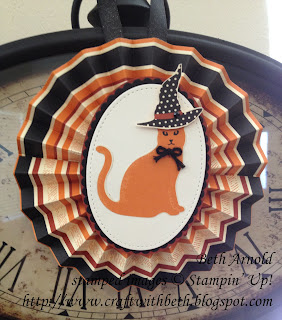
Craft with Beth: Spooky Cat Spooky Night DSP Halloween Garland Banner Rosette Rosettes Stampin Up

I love a rosette! And, I love a rosette banner even more! This frightful little rosette banner is hanging underneath the mantle in my family room. Rosettes are super easy and quick to make using the Simply Scored Board.

The rosettes measure 5" in diameter. So, I cut 2 pieces of Spooky Night Designer Series Paper for each rosette that measured 2-1/2" x 12". I scored each piece of Designer Series Paper every 1/2".

For the embellishment I die cut the largest stitched oval, the second largest oval, and the largest scalloped oval in Very Vanilla, Basic Black, and Cajun Craze cardstock, respectively. I also die cut the word eek plus an exclamation mark from the Large Letters Framelits with Basic Black cardstock.

Craft with Beth: Spooky Cat Spooky Night DSP Halloween Garland Banner Rosette Rosettes Stampin Up

I attached a small piece of Shimmery Black Ribbon to the back of each rosette. The string to hang each of the rosettes is also Shimmery Black Ribbon. Can I just say I am madly in love with all of the ribbons this year?! I am already on my second spool of Shimmery Black Ribbon, and I plan on ordering more!
 
Craft with Beth: Spooky Cat Spooky Night DSP Halloween Garland Banner Rosette Rosettes Stampin Up

I was having so much fun making rosettes, I couldn't help myself and made this witchy Cat Punch rosette. I added a longer ribbon on the back to drape around a wine bottle or hang as an ornament.

Thanks for stopping by!
Beth

Tuesday, September 27, 2016

September 2016 Paper Pumpkin Alternative Project

This month's kit is awesome! Even if you are only a card maker and not a 3D project maker, this kit is still amazing. There are stamps and embellishments for Halloween and Fall. Here is one of the alternative projects that I created.

Craft with Beth: September 2016 Something Good to Eat Paper Pumpkin Alternative Project Halloween Card Spooky Fun

As soon as I saw the striped banner stickers, I saw witchy stockings. I love witch shoes and boots and striped stockings! Check out those shoes! Can you guess what they are made from?!? That's right - the Fox Builder Punch tail! This punch is incredible! Thank you to Melissa Leskovar who taught me how to make the tail into a shoe.

I used the Simply Scoredboard to make the pleats of the witch's skirt. I cut four 12" by 1/2" strips of Halloween Night DSP. Each strip is scored first at 1/4" then at 1/2" more. So, start at 1/4", add 1/2" and score. Then add 1/4" and score. Then add 1/2" and score. That is, score at 1/4", 3/4", 1-1/4", 1-3/4", 2-1/4", and so on until I reached the end of the strip. However, you can create any pleat that is pleasing to you.

Craft with Beth: September 2016 Something Good to Eat Paper Pumpkin Alternative Project Halloween Card Spooky Fun

The inside is stamped with the Something Good to Eat stamp set greeting and the bats from Spooky Fun (another of my favorite Halloween stamp sets). I added two banner stickers to the bottom.

What alternative projects have you made with your September 2016 Something Good to Eat Paper Pumpkin Kit? I would love to see what you make!

Don't forget! World Card Making Day is Saturday, October 1st! Let's celebrate together. I'm holding a FREE Make and Take from 10am to 12pm. Stop on by to make a cute Christmas card and check out some of the Holiday Catalog products in person. I look forward to seeing you!

Thanks for stopping by!
Beth