Thursday, May 12, 2016

Happy Father's Day

As the 2016 Occasions Catalog winds down, I wanted to show another Going Global stamp set card before it retires. You know I love this stamp set! Going Global is definitely at the top of my must haves from the 2016 Occasions Catalog!

Craft with Beth: Going Global Father's Day Card Joy Fold

I have had this card on my desk ready to post for awhile now. I have been trying a few ideas with the Joy Fold. The Joy Fold is similar to the Gate Fold.  Both fun folds have flaps on the outside.

Craft with Beth: Going Global Father's Day Card Joy Fold

To make a Joy Fold Card, start with a piece of  Lost Lagoon cardstock and cut it into an 8-1/2" x 4-1/4" piece. Score at 3". This is your card base.

Cut a 8-1/2" x 3" piece of Lost Lagoon. Score at 4". This is the inside flap.

Let's make the inside base mats. Cut a 4" x 2-3/4" piece of DSP. This is the left inside base mat.

Cut a 4" x 5-1/2" piece of DSP. This is the right inside base mat.

Let's make the inside flap mats. Cut a 3-3/4" x 2-3/4" piece of Very Vanilla cardstock. This is the left inside flap mat. Stamp the You Mean the World to Me sentiment in the center in Archival Basic Black ink. Then stamp the globe image on top of the sentiment in Sahara Sand ink.

Cut a 4-1/4" x 2-3/4" piece of Very Vanilla cardstock. This is the right inside flap mat. Stamp the compass image in Sahara Sand toward the lower right hand corner. I left this mat mostly blank to leave room for a special message.

Now, let's cut the outside flap mat. Cut a 4-1/4" x 2-3/4" piece of DSP. Adhere all of the mats. Adhere the flap in the center and slightly to the right of the base as shown in the photograph above. You want the flap to be centered on the front when the card is closed.

For the Happy Father's Day sentiment, I cut a 1/2" x 8-1/2" strip of Very Vanilla cardstock. I stamped Happy in Archival Basic Black ink and trimmed it. I stamped Father's Day n Archival Basic Black ink and trimmed it. I eyeballed how much space to leave before and after the words.

Stamp the globe image in Mossy Meadow onto scrap Very Vanilla cardstock and cut out using Paper Snips. Adhere the sentiment and the globe using dimensionals to the outside flap mat.

Going Global Father’s Day Card Measurements

Color
Dimensions
Score at
Card Base
Lost Lagoon
4-1/4” x 8-1/2”
3”
Inside Flap
Lost Lagoon
8-1/2” x 3”
4”
Inside Left Base Mat
Going Places DSP
4” x 2-3/4”
-
Inside Right Base Mat
Going Places DSP
4” x 5-1/2”
-
Inside Flap Left Mat
Very Vanilla
3-3/4” x 2-3/4”
-
Inside Flap Right Mat
Very Vanilla
4-1/4” x 2-3/4”
-
Outside Flap Mat
Going Places DSP
4-1/4” x 2-3/4”
-
Sentiment Strip
Very Vanilla
1/2” x 8-1/2”
-
Globe Image
Very Vanilla
Scrap about 3” x 3”
-

The DSP Going Places featured on this card is still order-able, but it is on back order until May 30th. I decided to share this card because it is one of my favorite stamp sets and DSPs. I know you will love it as much as I do!

If you don't want to wait or while you wait, I recommend using any of the following stamps to create your own DSP. Stamp randomly all over a piece of 8-1/2" x 11" cardstock then cut each background piece.
  • The Open Sea - Clear-Mount Item #132032 / Wood-Mount Item #128454
  • Traveler - Clear-Mount Item #134513 / Wood-Mount Item #134510
  • World Map - Clear-Mount Item #130345 / Wood-Mount Item #130342
Typeset Specialty DSP (Item #133704) also has a world map that would be great for this card too!

World Traveler Textured Impressions Embossing Folder (TIEF) (Item #138289) would also be fantastic!

I used Going Places DSP as the inspiration for this card's color scheme. I used Basic Black, Very Vanilla, Lost Lagoon, Mossy Meadow, and Sahara Sand.


I would love to see what you create using the Going Global stamp set!
Thanks for stopping by!
Beth


Father’s Day Going Global Card Project Supply List
Stamps
Crazy About You
Going Global
Paper
Going Places DSP
Very Vanilla Cardstock
Lost Lagoon Cardstock
Ink
Mossy Meadow Ink Pad
Archival Basic Black Ink Pad
Sahara Sand Ink Pad
Embellishments
Stampin’ Dimensionals
Tools
Stampin’ Trimmer
Score Board
Bone Folder
Clear Acrylic Blocks B, C, and D
Grid Paper
Stampin’ Mist Cleaner
Stampin’ Scrub
Stampin’ Pierce Mat
SNAIL Adhesive
Paper Snips
Click here to start shopping!

Friday, May 6, 2016

Color Chip Sample Cards

I made these color chip sample cards to show the wide variety of colors that Stampin' Up! offers. The catalog photographs look amazing! However, seeing the colors in person is ever better!

I hang the color chip sample cards by my desk, so I can refer to them when choosing color combinations for projects. I also take them with me to workshops and demonstrations so that customers can see and feel the quality of the cardstock and the inks.  
Craft with Beth: Color Chip Sample Cards


I created a template to display samples of each of the color collections when I joined in 2013. As I purchased each of the colors, I punched a 1/2" circle from the corresponding cardstock, stamped the ink, and a drew a squiggle with the marker. I punched the corner with a 1/4" hand held circle punch and placed all of the cards on a metal binder ring. Because this was during the color re-do, some of the colors retired and some of the colors switched color collections. My color chip sample cards no longer matched the current color collections.

Craft with Beth: Color Chip Sample Cards


I recently redid all of the color chip sample cards with the current Stampin' Up! colors. I even made sets for my aunts and my mom. I included the 2016-2018 In Colors! Can you see the last card in the photo above? Aren't they bright, summery, fun colors!?! You are going to love them! I can't wait for June's 2016-2017 Annual Catalog Release!!

Download the template here. As your color collection grows, add a sample of each color. Keep your cards handy when creating new color combinations and designing projects.

Thanks for stopping by!
Beth

Wednesday, May 4, 2016

May the Fourth Be with You!

Happy May 4th! I saw this amazing and fantastic card on the card swap board at On Stage 2016. I love Star Wars! I have been trying my best not to share it with you until today in honor of May the Fourth!

Craft with Beth: May the Fourth Be With You Punch Art Birthday Card Star Wars

How stinking adorable is this card!?!? I love it! I think you could recreate this card with the extra-large oval punch and the word window punch. However, if you don't have the word window punch, you could try the corner rounder punch on a 1/4" strip of cardstock.

I apologize that I don't know who made this card. The cards were attached to the display boards and I could not reach high enough to take it down. If this is your card, please let me know. I want to give you credit for this terrific card!

I'm sure all Star Wars fans would love a birthday card like this! I know I would! May the Fourth Be with You!

Thanks for stopping by!
Beth

Tuesday, May 3, 2016

Happy Mother's Day!

I was inspired by Karen Barber's Birthday card to make this Mother's Day card. I love the way Karen made the flowers look like they were growing in front of a wooden fence! This is too sweet!

Craft with Beth: Mother's Day Card 2016 Wild About Flowers

I kept the overall layout and the floral fence theme but changed the colors, the sentiment, the DSP, and the ribbon.

I used Blackberry Bliss, Very Vanilla, Daffodil Delight, Mossy Meadow, and Sahara Sand. The sentiment comes from the April 2016 Paper Pumpkin Kit. Because the DSP Karen used is retired, I substituted the gingham pattern from the Farmer's Market DSP. It appears to be the same pattern but with different colors.

Craft with Beth: Mother's Day 2016 Card Color Scheme

I also removed the lacy butterfly from the Butterfly Basics stamp set. It was placed on the ribbon toward the right side. I may end up adding the butterfly. I haven't decided. What do you think?

Craft with Beth: Mother's Day Card 2016 Wild About Flowers
 
To secure the Daffodil Delight cotton ribbon, I used glue dots. I placed a glue dot on each end, one under the faux bow knot, and one towards the right side. That way, the ribbon stayed flat after the faux bow was tied.

Craft with Beth: Mother's Day Card 2016 Wild About Flowers

I stamped the envelope and the inside of the card with a single stem and two Daffodil Delight flowers.

Mother’s Day Card Measurements

Color
Dimensions
Card Base
Blackberry Bliss
4-1/4” x 11”
1st Mat
Daffodil Delight
3-3/4” x 5-1/4”
2nd Mat
Very Vanilla
3-3/4” x 4”
DSP Strip
Farmer’s Market DSP
3-3/4” x 1”
Inside Mat
Very Vanilla
3-3/4” x 5-1/4”

There were no measurements listed for this card. Some of the measurements were easy to decipher. However, the DSP strip at the bottom was a little tricky. If I were to make this card again, I would increase the DSP strip to 3-3/4" x 1-1/2" and decrease the 2nd Mat to 3-3/4" x 3-1/2".

I hope my mom likes this card and knows how special and loved she is!

Thanks for stopping by!
Beth


Mother’s Day Card Project Supply List
Stamps
Paper Pumpkin April 2016
Wild About Flowers
Hardwood
Paper
Farmer’s Marker DSP
Very Vanilla Cardstock
Daffodil Delight Cardstock
Blackberry Bliss Cardstock
Ink
Mossy Meadow Ink Pad
Blackberry Bliss Ink Pad
Daffodil Delight Ink Pad
Sahara Sand Ink Pad
Embellishments
Daffodil Delight Cotton Ribbon
Tools
Stampin’ Trimmer
Bone Folder
Clear Acrylic Blocks C, D, E, & H
Grid Paper
Stampin’ Mist Cleaner
Stampin’ Scrub
Stampin’ Pierce Mat
Glue Dots
SNAIL Adhesive
Paper Snips
Click here to start shopping!

Sunday, May 1, 2016

Happy Graduation, Cousin Patrick!

My youngest cousin is graduating from high school this June. To celebrate, my aunt Tracy designed this banner to hang up at his graduation party. She did such an amazing job creating this banner that I wanted to share it with you!

Tracy made this banner to match her son's school colors. Pacific Point and Whisper White coordinated fantastically with her son's school colors. 

Craft with Beth: Patrick's Graduation Banner

Tracy started by determining the size of her banner pennants. She has the Layered Alphabet stamp set, the Yay Birthday stamp set, and the 2-1/2" circle punch. To fit the 2-1/2" circle punch, Tracy determined that the top edge of the banner's width should be 5" and that the length of the banner should be 7.5". She found this size by punching out a 2-1/2" circle and cutting out a few test banners to get the spacing she desired.

I created a template using a word processing program by inputting various widths and lengths of isosceles triangles until we had the perfect size. You can download the template here. I printed the template directly onto cardstock. Check your printer to see if it can also print directly onto cardstock. If it cannot, print on regular computer paper, cut out the template, and trace onto cardstock.

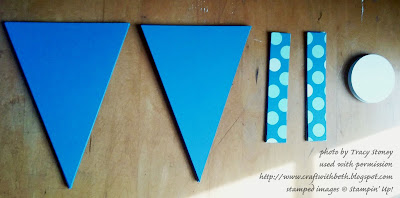
Tracy wanted the banner to say Congratulations 2016 with a pennant on each end and one between congratulations and 2016. This is a total of 22 banner pennants - 19 banner pennants for the letters and the numbers plus three banner pennants for spacing. She cut out all of her banner pennants from Pacific Point Cardstock. Next, she punched nineteen 2-1/2" circle from Whisper White Cardstock. For the top of each pennant Tracy cut twenty-two 1" x 5" strip of Schoolhouse DSP.

Craft with Beth: Patrick's Graduation Banner

Once the pieces were ready, it was time to start stamping! Tracy stamped the 2-1/2" circles with one letter or one number each to spell her sentiment.

Craft with Beth: Patrick's Graduation Banner

Craft with Beth: Patrick's Graduation Banner

While the letters and numbers dried completely, she adhered the Schoolhouse DSP strips to the top edge of each pennant. Once the glue had dried, she flipped the pennant over and trimmed the excess DSP. Cutting the DSP after makes a nice, clean edge without the hassle of trying to cut the perfect angle on your Paper Trimmer!

You can make this banner to coordinate with your school colors too! Or, make this banner for a retirement, job promotion, or even a baby shower! Switch the DSP to match your celebration. You could also emboss the pennants with a TIEF (Texturized Impressions Embossing Folder). How would decorate and embellish a banner? I would love to see what you make!

Thanks for stopping by!
Beth


Graduation Banner Project Supply List
Stamps
Birthday Yay
Layered Letters
Paper
Schoolhouse DSP
Pacific Point Cardstock
Whisper White Cardstock
Ink
Pacific Point Ink Pad
Embellishments
Whisper White Baker’s Twine
Tools
Stampin’ Trimmer
Bone Folder
Clear Acrylic Blocks B & C
Grid Paper
Stampin’ Mist Cleaner
Stampin’ Scrub
Stampin’ Pierce Mat
Multipurpose Liquid Glue
Glue Stick
Paper Snips
Click here to start shopping!