Thursday, July 14, 2016

Seaside Shore Stamp Set: Ahoy There!

I am really loving the new 2016-2017 Annual Catalog! Everything that I have ordered so far, I have absolutely adored! The Seaside Shore stamp set is no exception! Seaside Shore is great for summertime projects.


Craft with Beth: Seaside Shore Ahoy There Card thinking of you birthday Stampin' Up!

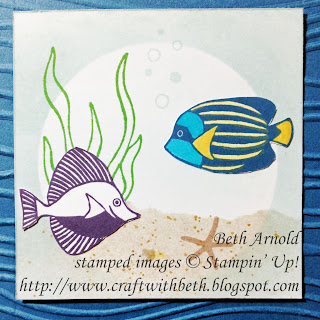
I made this cute porthole card using many of the stamps in this set. I embossed a 5-1/2" x 4-1/4" piece of Dapper Denim cardstock and a 3" x 5-1/2" piece of Whisper White cardstock with the new Seaside Texturized Impressions Embossing Folder (TIEF) to create the front panel. I was trying to capture how the view might be from a ship's porthole!

Craft with Beth: Seaside Shore Ahoy There Card thinking of you birthday Stampin' Up!

The fish scene started as a 3" square piece of Whisper White cardstock. I cut a 2-1/2" circle from scrap Whisper White cardstock to use as a mask to delineate the edges of the porthole and sponged around it with Soft Sky ink. That way I avoided stamping where it wouldn't show through the porthole. Next I sponged the sand with a torn sticky note, Sahara Sand ink, and gold Wink of Stella. Then I carefully swiped a tiny bit of Soft Sky ink across the upper part of the circle to create the illusion of water.

Craft with Beth: Seaside Shore Ahoy There Card thinking of you birthday Stampin' Up!

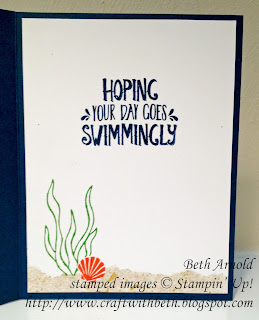
The inside of the card is stamped with the so cute hoping your day goes swimmingly sentiment and more of the sponged sand. I love puns like these!

I think this would be a great thinking of you card. I would even use this card for a child's birthday. My niece right now is head over heels for all things aquatic, especially sting rays! Too adorable!

Thanks for stopping by!
Beth


Seaside Shore Ahoy There Card Project Supply List
Stamps
Seaside Shore
Paper
Dapper Denim
Smoky Slate
Whisper White
Ink
Calypso Coral
Crumb Cake
Cucumber Crush
Daffodil Delight Marker
Dapper Denim
Elegant Eggplant
Sahara Sand
Soft Sky
Tempting Turquoise Marker
Embellishments
Gold Wink of Stella
Rhinestones
Stampin’ Dimensionals
Tools
Stampin’ Trimmer
Bone Folder
Grid Paper
Stampin’ Mist Cleaner
Stampin’ Scrub
Paper Snips
Stampin’ Pierce Mat
Acrylic Blocks A, B, C, and D
SNAIL Adhesive
Big Shot Machine
Layering Circles Framelits
Sponge
Seaside TIEF
Click here to start shopping!
 

Tuesday, July 12, 2016

The Little Moments Emboss Resist

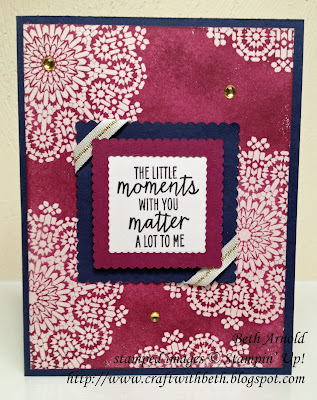
The emboss resist technique is a gorgeous way to highlight the large mosaic image in the Moroccan Nights stamp set! The Rich Razzleberry sponged background really makes the mosaic tiles POP!

Craft with Beth: Moroccan Nights Emboss Resist Thinking of You Card Stampin' Up!

I started with a 4" by 5-1/4" piece of Whisper White. I stamped the large mosaic image using Versamark ink randomly and embossed with clear embossing powder. Next I sponged Rich Razzleberry all over the cardstock. I did a combination of swiping and pouncing to create a varied texture. After sponging, I wiped the embossed mosaic images with a tissue to remove any excess ink.

I used the 2-1/2", 2", and 1-1/2" scalloped squares from the new Layering Squares Framelits to make a little frame around the The Little Moments sentiment. Gold 1/4" trim is wrapped around two corners to add interest and sparkle. The gold enamel circles further enhance the richness of this sweet thinking of you card.


I used the Stamp-A-Ma-Jig to line up the the longer mosaic image on the inside of the card. I used Rich Razzleberry and Night of Navy ink pads.

I hope you give this technique a try! I would love to see what you create!

Thanks for stopping by!
Beth


The Little Moments Emboss Resist Project Supply List
Stamps
Moroccan Nights
Watercolor Wings
Paper
Whisper White
Rich Razzleberry
Night of Navy
Ink
Night of Navy
Rich Razzleberry
Versamark
Basic Black Archival
Embellishments
Metallic Enamel Embellishments
Gold 1/4" Trim
Clear Embossing Powder
Stampin’ Dimensionals
Tools
Stampin’ Trimmer
Bone Folder
Grid Paper
Stampin’ Mist Cleaner
Stampin’ Scrub
Stampin’ Pierce Mat
Acrylic Blocks B, E, and H
SNAIL Adhesive
Big Shot Machine
Layering Squares Framelits
Sponge
Embossing Buddy
Heat Tool
Stamp-A-Ma-Jig
Click here to start shopping!
 

Monday, July 11, 2016

Thoughtful Branches Sneak Peek!


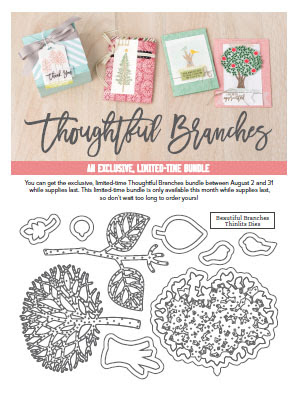
From August 2nd to August 31st (or while supplies last), purchase this exclusive Thoughtful Branches Bundle!

This gorgeous bundle includes 23 photopolymer stamps and 9 thinlit dies to build your own seasonal creations and scenes!

Craft with Beth: Thoughtful Branches Sneak Peek!

Craft with Beth: Thoughtful Branches Sneak Peek!

Item #
Product Name
Retail
144328
Thoughtful Branches Bundle (ENG)
$52.00 USD/$66.50 CAD
144329
Thoughtful Branches Bundle (FR)
$52.00 USD/$66.50 CAD
143539
Thoughtful Branches Photopolymer Stamp Set (ENG)
$27.00 USD/$33.00 CAD
144264
Thoughtful Branches Photopolymer Stamp Set (FR)
$27.00 USD/$33.00 CAD
143538
Beautiful Branches Thinlits Dies
$31.00 USD/$41.00 CAD

This set is fantastic for every season and numerous occasions! Thoughtful Branches is awesome for winter holidays, thinking of you, thank yous, and so much more! You can mix and match stamps and dies to create trees and flowers! You know I love stamp sets that have versatility and longevity!


Plus you can use your Bonus Day coupons that you received in July for the Thoughtful Branches Bundle! This limited time bundle is available for a short time, so don't wait too long to order yours! Ordering starts August 3rd!

In the meantime, download the flyer and check out my Pinterest Board and these amazing samples designed by Stampin' Up!'s Artisan Design Team!

Craft with Beth: Thoughtful Branches Artisan Samples


Craft with Beth: Thoughtful Branches Artisan Samples


Craft with Beth: Thoughtful Branches Artisan Samples

As a demonstrator, I am able to pre-order the Thoughtful Branches Bundle. I am expecting my set to arrive mid next week. If you would like to schedule a class or a make and take to preview this set, please contact me.

Thanks for stopping by!
Beth

Friday, July 8, 2016

Owl Punch Card Stamping Session

My mom and I had an impromptu stamping session to make punch art cats with the Owl Builder Punch after seeing a few examples on Pinterest. The Owl Builder Punch is extraordinarily versatile! I have seen all kinds of animals, people, and shapes made with this punch including moose, deer, bats, Frankenstein's monster, mice, mummies, Dracula, and more! Here are the cards we came up with!

Craft with Beth: Cat Punch Art Owl Builder Punch Mom's Birthday Card

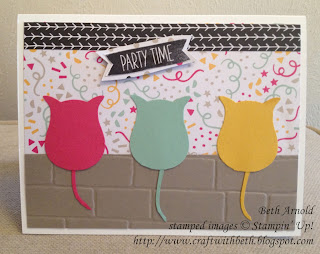
This is my mom's card. She made a birthday card with three cats sitting on a wall. Aren't they darling? We love the Brick Wall Textured Impressions Embossing Folder (TIEF), so we had to include it! The Designer Series Paper (DSP) in the background is It's My Party DSP from the 2016 Occasions catalog. This was an enormous pack of festive DSP! We both have used this DSP for numerous birthday cards and banners throughout the spring and have barely made a dent in it! Love it!

The Party Time sentiment comes from the new Oh, Happy Day! Kit. This is an amazing all inclusive kit the make 20 cards with matching envelopes. This was the kit that I was able to preview at On Stage in April. I love the bright colors and floral images.

Craft with Beth: Cat Punch Art Owl Builder Punch Mom's Birthday Card

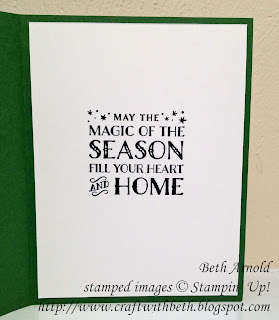
The inside of my mom's card features the Party Wishes stamp set, which sadly, did not carry over into the 2016-2017 Annual Catalog. However, this is one stamp set I am not giving away. I loved the It's My Party product suite!

Craft with Beth: Cat Punch Art Owl Builder Punch My thinking of you Card

This is my first cat card. I liked the idea of the cats sitting on the wall too! I sponged Crumb Cake ink over Sahara Sand cardstock to enhance the mortar. I used the tree top shape from the Tree Builder  Punch to make the cloud masks and then sponged Soft Sky over the background. The sentiment comes from Sheltering Tree. The DSP is Perfectly Artistic from this year's Sale-A-Bration. The marbled effect reminds me of striped fur. I left the inside of the card blank for a handwritten message.

Craft with Beth: Cat Punch Art Owl Builder Punch My Christmas Card

This is my second cat card. It is never too early to start working on Christmas cards! This gray cat reminds me of my own gray tabby! I can imagine her waiting patiently for her presents. I punched a 1-3/4" circle out of sticky notes to create the moon mask. Then I lightly sponged Night of Navy in a circular motion to make the night sky. I cut a triangle and punched flowers from the Tree Builder Punch to create the Santa hat. The stamped images on the front and on the inside come from the Cosy Christmas stamp set from the 2015-2016 Holiday catalog. The DSP is the new This Christmas DSP.

Craft with Beth: Cat Punch Art Owl Builder Punch My Christmas Card

What animals or shapes have you made with the Owl Builder Punch? I would love to see what you make!

Thanks for stopping by!
Beth

Thursday, July 7, 2016

Bonus Days are Here!


Bonus Days Stampin' Up! Graphic


I’m so excited about Stampin' Up!'s July Bonus Days that starts today! This is the first time Stampin’ Up! has offered coupons to customers!

Stampin' Up! is giving $5 coupons for each $50 increment you spend from July 7th to July 31st (11:50PM Mountain Time). For example, if you spend $100, you will receive two $5 coupons.

Stampin’ Up! will email you a $5 coupon for every $50 you spend from July 7th to July 31st!! You must have a valid email to receive your coupon codes. Save these emails and record the coupon codes because they cannot be recovered or resent.

Then from August 2nd to August 31st (11:50PM Mountain Time), you can redeem these coupons for anything you want in the catalog (with the exception of the Starter Kit and Paper Pumpkin Subscriptions). Bonus Day coupon codes will be entered at the checkout process. There is no limit on the number of coupons you can use on an order during the redemption period.

Minimum shipping charges will still apply to Bonus Day Redemption orders.


Shop in July to receive your coupons. Redeem your coupons in August. July is a great time to purchase items on your wish list from the new annual catalog to get Bonus Day Coupons. Then redeem your coupons for more of your wish list or stock on the essentials like cardstock, ink, and adhesives in August. Talk about a win-win!

Download the Bonus Flyer to keep as a reference and to record your email coupon codes.

Please contact if you have any questions about this amazing Bonus Day Deal. 

Thanks for stopping by!
Beth

Paper Pumpkin June 2016 Banner Surprise Alternative Project

We had a great time putting together our Paper Pumpkin Kits at our Club meeting. I try to put together at least one project according to the directions and then come up with a few alternative projects. Below is one example according to the directions. It is really cute! I know this cheerful banner would bright many people's days! I have someone in mind already to send this to.

Craft with Beth: Paper Pumpkin June 2016 Banner Surprise Alternative Project Stampin' Up!

This is an alternative project I shared during Saturday's Paper Pumpkin Club. I used the Jar of Love Bundle. I am thrilled that Stampin' Up! created a new mason jar stamp set and coordinating dies! I joined right as Perfectly Preserved was retiring and missed it. I love jars and canning! They remind me of family times spent together too!

Craft with Beth: Paper Pumpkin June 2016 Banner Surprise Alternative Project Stampin' Up!

I trimmed the striped card base to make a matte. I added gold trim and gold stars for accents. I used the larger jar and lid dies to create a shaker element.

Craft with Beth: Paper Pumpkin June 2016 Banner Surprise Alternative Project Stampin' Up!

To the back of the striped matte, I added foam adhesive strips around the shaker element and around the rest of the matte. Because the shaker element is a part of the matte layer and not an element sitting on top of the card, more stability is needed so the card won't buckle or tear, especially in the mail.

Craft with Beth: Paper Pumpkin June 2016 Banner Surprise Alternative Project Stampin' Up!

After filling the shaker element, I adhered a piece of Whisper White cardstock over the shaker element. This not only contains the sequins but has the sentiment stamped on the front. This photo also shows how I wrapped the gold trim.

Craft with Beth: Paper Pumpkin June 2016 Banner Surprise Alternative Project Stampin' Up!

On the inside I stamped "throw kindness around like confetti" in Basic Black Archival Ink and the dots image from Perpetual Birthday Calendar in Flirty Flamingo, Mint Macaron, and Tip Top Taupe ink.

I hope you will join us at our next Paper Pumpkin Club meeting!

Thanks for stopping by!
Beth