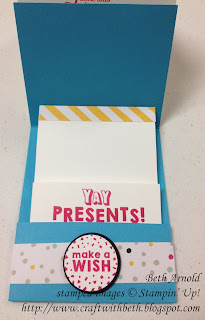
This festive gift card holder features the Party Wishes Bundle from the 2016 Occasions catalog. This bundle was the second top item on my Occasions catalog wish list. The stamps and the punches are fabulous! I also ordered two packs of It's My Party DSP!
Not only does this gift card holder contain a surprise pop up feature, it can hold more than one gift card thanks to the belly band!
Let's make one! You will need Tempting Turquoise, Whisper White, and Basic Black cardstock and It's My Party DSP Stack. You will also need Melon Mambo, Tempting Turquoise, and Daffodil Delight ink pads and Party Wishes stamp set with coordinating punches.
Here are the project pieces' measurements.
Party Wishes Gift Card
Holder Measurements
|
||
Color
|
Dimensions
|
|
Gift Card Holder Base
|
Tempting Turquoise
|
4-1/4” x 11”
|
Inside Gift Card Pouch
|
Whisper White
|
3-3/4” x 6-3/4”
|
Belly Band
|
It’s My Party DSP Stack
|
1” x 9”
|
DSP Strip
|
It’s My Party DSP Stack
|
½” x 3-3/4”
|
Outside Decoration Mat
|
Basic Black
|
3-1/2” x 3”
|
Outside Decoration Center
|
Whisper White
|
3” x 2-1/2”
|
Cupcakes, Balloons, &
Candle
|
Whisper White
|
scrap
|
Make a Wish Circle
|
Whisper White
|
scrap
|
Make a Wish Circle Mat
|
Basic Black
|
scrap
|
Get out your Stampin' Trimmer and your Score Board.
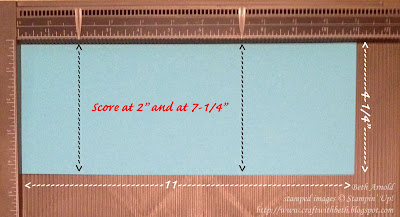
Cut an 11" x 4-1/4" piece of Tempting Turquoise. Place it on your Score Board with the 11" side along the top edge. Score at 2" and at 7-1/4".
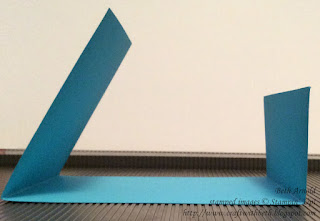
Fold each score line upwards as shown in the photograph above (valley folds). This is the gift card holder base. Put this piece aside for now.
Cut a 6-3/4" by 3-3/4" piece of Whisper White cardstock. Place it on your Score Board with the 6-3/4" side along the top edge. Score at 1-3/4" and at 6".
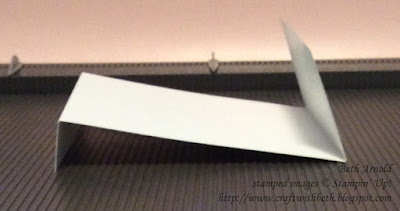
Fold the 1-3/4" score line downwards (mountain fold). Fold the 6" score line upwards (valley fold). This piece forms the pouch the gift card will sit in.
Stamp Yay Presents! in Melon Mambo ink on the front of the 6" score line end. Stamp the sentiment more towards the top edge. The bottom edge will be tucked into the belly band area and not be seen.
Cut a 1/2" x 3-3/4" piece of It's My Party DSP Stack. Here I used the diagonal striped design, but you can use any of the designs in this DSP Stack. Glue the DSP to the top but underneath the score line. The cardstock flap passed the DSP strip is what will make the pop up feature. Put this piece to the side to dry for a few minutes.
Cut a 1" by 9" strip of DSP. I used the polka dot design, but you can use any of the designs in this DSP Stack. This is the belly band that will hold the gift card holder together like a little pocket.
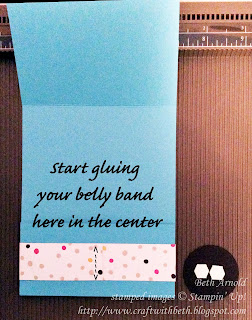
Put liquid glue on the back of the DSP strip. Starting in the center of the gift card holder base, place one end of the DSP strip down, wrap the DSP strip around the back of the gift card holder base, and back around to the center, pressing down along the way. Having the seams meet in the center, will make it easier to hide them later.
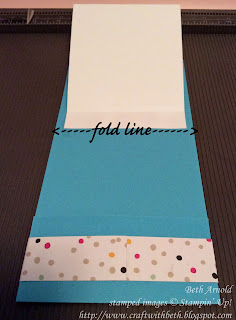
Pick up the Whisper White cardstock pouch. Put some liquid glue on the flap above the DSP strip. Position the flap just above the fold line on the Tempting Turquoise base and adhere. Make sure that the DSP strip and sentiment are facing AWAY from you.
Once the glue is dry, bring the pouch down and tuck it into the belly band pocket. To make the closure, stamp Make a Wish sentiment on scrap Whisper White cardstock using Melon Mambo ink. Punch out the sentiment with a 1-3/8" circle punch. Punch out a 1-1/2" circle from Basic Black cardstock. Put liquid glue on the back of the sentiment and center it on the Basic Black circle. Add some dimensionals to the back of the circle in the center. Place the circle in the center of the belly band. The belly band seams are now hidden!
Now, let's make the outside decoration! Cut a 3-1/2" by 3" piece of Basic Black cardstock. Cut a 3" by 2-1/2" piece of Whisper White cardstock. Stamp Happy Birthday sentiment using Melon Mambo in toward the top of the Whisper White cardstock.
On scrap Whisper White cardstock, stamp the cupcake and the balloon in each of the following colors: Tempting Turquoise, Melon Mambo, and Daffodil Delight. Stamp the candle in Daffodil Delight. Punch out the cupcakes, the balloons, and the candle.
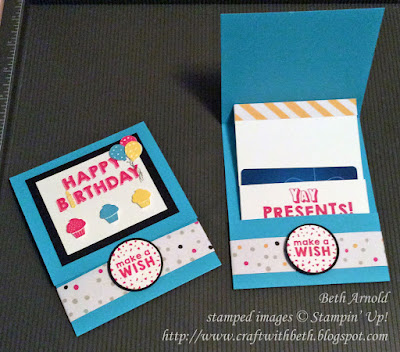
Adhere the candle with liquid glue to the letter I in birthday. Add a dimensional to the back of each cupcake and each balloon. Adhere them to the Whisper White cardstock as shown in the photograph below or as desired.
Add strings to the balloons using a Stampin' Write marker. In the samples, I used two different markers - Basic Black and Sahara Sand.
Adhere the decorated birthday sentiment to the center of the Basic Black rectangle. Then adhere that to the center of the gift card holder front as shown in the photograph below.
Slide your gift card in the pouch, and your gift is ready to give! Please let me know if you have questions about how to make this gift card holder.
I appreciate you stopping by!
Beth
Party Wishes Gift Card
Holder Project Supply List
|
|
Stamps
|
Party Wishes
|
Paper
|
Whisper
White Cardstock
Tempting Turquoise Cardstock
Basic Black Cardstock
It’s My Party DSP Stack
|
Ink
|
Daffodil
Delight Ink Pad
Melon Mambo
Ink Pad
Tempting
Turquoise Ink Pad
Basic Black
Stampin’ Write Marker
Sahara Sand
Stampin’ Write Marker
|
Embellishments
|
Stampin’
Dimensionals
|
Tools
|
Stampin’
Trimmer
Score Board
Bone Folder
Clear
Acrylic Block A, C, D, H
Grid Paper
Stampin’
Mist Cleaner
Stampin’
Scrub
SNAIL
Adhesive
Multipurpose
Liquid Glue
Party Pack
Punch Set
1-3/8”
Circle Punch
1-1/2”
Circle Punch
|
Click here to start
shopping!
|
|






No comments:
Post a Comment