Showing posts with label 3D. Show all posts

Monday, July 11, 2022

4-in-1 Aromatherapy Inhaler Gift Box

Happy International Essential Oil Day! This international day for essential oils was started in 2018 by Jared Turner the then COO of an essential oil company to celebrate the founder's birthday.


aromatherapy inhaler gift box simply fabulous stamp set potted succulent dies 3D gift box gift packaging


Today I am sharing an aromatherapy inhaler gift box. I love to make different aromatherapy blends for myself, my family, and my friends. I store my most frequently used blends in 15 ml stock bottles. I also add my blends to aromatherapy inhalers, glass and metal roller ball bottles, and to my lip balms and lotions. 

aromatherapy inhaler gift box simply fabulous stamp set potted succulent dies 3D gift box gift packaging
 
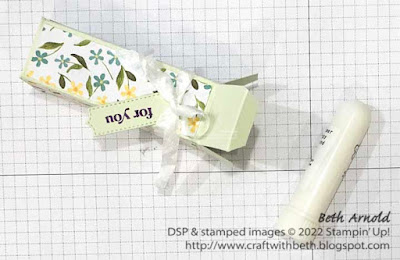
So when my mom asked me to make one of her friends an aromatherapy inhaler, I jumped at the chance to make a new blend for her friend. This is her friend's first time using an aromatherapy inhaler. The shape of the aromatherapy inhaler is a little unusual if you have never seen it before, so I created a little gift box for it.

Not only is the gift box a cute way to give an aromatherapy inhaler, but the box also protects the aromatherapy inhaler from dust and dirt.

aromatherapy inhaler gift box simply fabulous stamp set potted succulent dies 3D gift box gift packaging
 
An aromatherapy inhaler is a small tube with holes on the end. Essential oils are applied to a cotton wick and inserted into one end of the tube. Then a cap is placed on the end of the tube to hold the cotton wick inside. Next, a cover is added to the tube to protect it from getting dirty.

To use it, remove the cover and inhale slowly from the end with the holes with one nostril and then repeat on the other nostril. The inhaler comes very close to your nose, so once you use an aromatherapy inhaler that becomes your personal aromatherapy inhaler. 

aromatherapy inhaler gift box simply fabulous stamp set potted succulent dies 3D gift box gift packaging template graphic
 
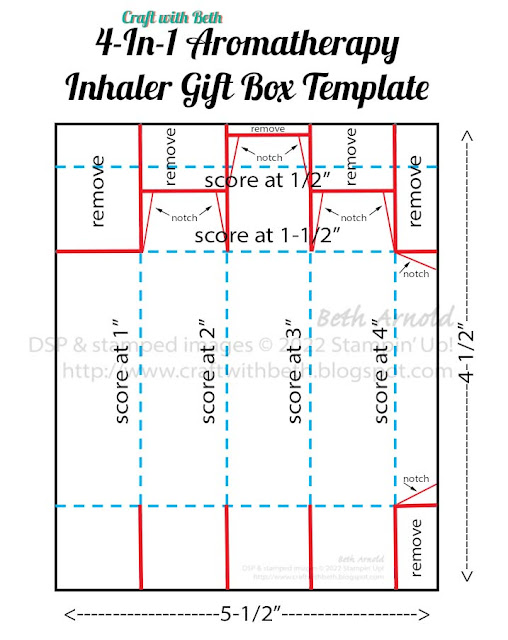
Aromatherapy inhalers can be plastic, metal, or glass. For today's project, I am using a plastic aromatherapy inhaler. All of the gift box's measurements are based on a plastic aromatherapy inhaler.

Measurements

  • Gift Box Base: 4-1/2" x 5-1/2"; scored at 1", 2", 3", & 4" on the 4-1/2" side and at 1/2", 1-1/2", 4-1/2" on the 5-1/2" side (Soft Sea Foam Cardstock)
  • DSP Mats (cut 4): 7/8" x 2-7/8" (Hues of Happiness Designer Series Paper (DSP))
  • Greeting Tag: 1" x 3" (Soft Sea Foam Cardstock)

Supplies

  •  #159133 Simply Fabulous Stamp Set
  • #146988 Soft Sea Foam Cardstock
  • #158822 Hues of Happiness Designer Series Paper (DSP)
  • #147099 Gorgeous Grape Ink Pad
  • #151326 1/4" Basic White Crinkled Ribbon
  • #110755 Multipurpose Liquid Glue
  • #102300 Bone Folder
  • #103579 Paper Snips
  • #130148 Grid Paper
  • #152392 Paper Trimmer
  • #149653 Stampin' Cut & Emboss Machine
  • #118489 Clear Block G
  • #154330 Potted Succulent Dies

Although aromatherapy inhalers can last a long time, they can lose their scent over time. When the cotton wick needs a refresh, carefully remove the cap, take out the wick, and add more essential oils to the wick. Then put the wick back inside tube and replace the cap. You can also use a new wick instead of refreshing the old one.

aromatherapy inhaler gift box simply fabulous stamp set potted succulent dies 3D gift box gift packaging
 
Aromatherapy inhalers can be refreshed using single essential oils or a blend of essential oils. You can swirl the wick in a small bowl with essential oils or drop the essential oil(s) from a bottle directly onto the wick. Making a small 15 ml stock bottle of the inhaler blend would also make a nice pairing with the aromatherapy inhaler.
 
aromatherapy inhaler gift box simply fabulous stamp set potted succulent dies 3D gift box gift packaging
 
Once I made the inhaler gift box, I realized the shape of the box could easily be changed to fit a 15 ml stock bottle, a roller ball bottle, and a lip balm tube! I modified the height and the width of the original inhaler box to make boxes for each of the other 3 containers, making 4 boxes from 1 one box shape.

aromatherapy inhaler gift box simply fabulous stamp set potted succulent dies 3D gift box gift packaging
 
Below is a video showing how to make the aromatherapy inhaler box or watch it on YouTube HERE.


Have you made an aromatherapy inhaler before? Leave me a comment below, I would love to hear what your favorite essential oil blends are! If you need supplies to make this 4-in-1 aromatherapy inhaler gift box, please, shop my online store HERE.

If you have any questions about today's project, please, don't hesitate to ask me. I am happy to help you with your stamping questions!

Thanks for stopping by! Have a great day!
Beth


P.S. This blog post is for educational purposes only and is in no way intended to be advice or a substitution for advice of any kind - medical or otherwise. This blog post makes no claims of any kind - medical or otherwise. This blog post is anecdotal and educational only.


Wednesday, June 29, 2022

Fourth of July Mini Faux Firecracker Treat Holders

You will never guess what today's Fourth of July mini faux firecracker treat holders were inspired by - a toilet paper roll. There are so many great craft ideas that can be made with a toilet paper roll. Don't worry these treat holders were inspired by the shape of them and not don't use actual toilet paper rolls.


Fourth of July 4th of July mini faux firecracker treat holders


I was trying to design a new container shape for a Fourth of July celebration. I have made a lot a boxes, bags, and wrappers over the years. I was really stumped for new ideas.


Fourth of July 4th of July mini faux firecracker treat holders


I brainstormed all of the symbols, colors, traditions, etc. associated with the Fourth of July. I kept coming back to firecrackers. I have made firecracker treat holders before, but not as the container themselves. I kept thinking what shapes do we have that I can make a firecracker shape from. What shape is a firecracker? The same shape as a toilet paper roll, and you can roll designer series paper to make a tube. This treat holder is what I came up with.

Fourth of July 4th of July mini faux firecracker treat holders

I rolled a 3" x 3" piece of Celebrate Everything Designer Series Paper and adhered the ends together with both Tear & Tape Adhesive and liquid glue. I am not good at lining up edges of paper, so I used liquid glue to provide a little more time to work with the Tear & Tape Adhesive.

The scalloped circles are adhered to the top and bottom of the rolled designer series paper. The designer series paper edges are pretty narrow, so I scored 1/2" from each end and snipped every 1/4" or so to make tabs for the scalloped circles to adhere to. The tabs act almost like mini platforms for the scalloped circles to sit on.

Fourth of July 4th of July mini faux firecracker treat holders

Below is my first firecracker treat holder prototype. I used a scalloped circle that was just too small to fit the designer series paper tube onto, and the sparkler is huge. However, there is a better view of the tabs that hold the scalloped circle onto the designer series paper in this photo. Look at the top scalloped circle on the right side.

Fourth of July 4th of July mini faux firecracker treat holders

The sparklers are made with narrow strips of Silver Foil Paper adhered together in an asterisk shape. The bottom of the sparkler stem is scored to create a place to put adhesive and glue it to the top of the treat holder.

Fourth of July 4th of July mini faux firecracker treat holders

Below are the measurements and supplies to recreate these Fourth of July mini firecracker treat holders.

Measurements

  • Designer Series Paper: 3" x 3"; scored at 1/2" & 2-1/2" (Celebrate Everything Designer Series Paper)
  • Scalloped Circles (cut 2): 2-1/2" x 2-1/2" (Pacific Point Cardstock or Sweet Sorbet Cardstock)
  • Greeting Circle: 1-3/4" x 1-3/4" (Celebrate Everything Designer Series Paper) - use the 1-1/2" circle die
  • Greeting: 3" x 1" (Basic White Cardstock)
  • Sparkler: 2" x 1/8" (cut 1) and 1-1/2" x 1/8" (cut 3) (Silver Foil Paper) - score the 2" x 1/8" piece at 1/4"

Supplies

#152517 Celebrate Sunflowers Stamp Set
#159268 Sweet Sorbet Cardstock
#111350 Pacific Point Cardstock
#159276 Basic White Cardstock
#159913 Celebrate Everything Designer Series Paper
#159216 Sweet Sorbet Ink Pad
#147098 Pacific Point Ink Pad
#132708 Memento Tuxedo Black Ink Pad
#104430 Dimensionals
#110755 Multipurpose Liquid Glue
#102300 Bone Folder
#103579 Paper Snips
#130148 Grid Paper
#152392 Paper Trimmer
#149653 Stampin' Cut & Emboss Machine
#118490 Clear Block H
#151770 Layering Circle Dies

The Celebrate Everything Designer Series Paper pack is a 48-sheet pack of patterned paper that will be a HOST special in the upcoming July-December Mini Catalog. The July-December Mini Catalog will debut on July 1st. I know that is not a lot of time to place a qualifying order for this designer series paper. However, I wanted to share with you the versatility of this paper pack not only for fall and winter holidays but for summer holidays too. I know you are going to love the Celebrate Everything Designer Series Paper.


Celebrate Everything Designer Series Paper DSP Graphic


For today's faux firecracker treat holders, I recommend substituting with another designer series paper or stamping a 6" x 6" piece of Basic White cardstock with the solid flower image from the Color and Contour stamp set (#154994) to create a firework pattern.  

I hope you enjoyed today's mini faux firecracker treat holders and make them for your Fourth of July celebration! If you would like to recreate this treat holders and need some supplies, please, shop my online store HERE

If you have any questions about today's project, please, don't hesitate to ask me. I am happy to help you with your stamping questions!

Thanks for stopping by! Have a great day!
Beth

Monday, June 27, 2022

Fourth of July Mini Cupcake Sparkler Decorations

My family and I are having a get together on the Fourth of July. I wanted to bring something for dessert that would be fun and festive. I saw these patriotic mini cupcakes at the grocery store and could not resist! To make these even more celebratory, I created sparkler cupcake toppers with Real Red and Pacific Point cardstock and toothpicks to decorate each of the mini cupcakes.

Fourth of July 4th of July mini cupcake sparkler toppers decorations cupcake decorations


Two types of mini cupcakes came in the package - chocolate cake with marshmellow icing and vanilla cake with blue tinted vanilla frosting. Both varieties are topped with red, white, and blue sprinkle stars. Could they not get cuter than that?

Fourth of July 4th of July mini cupcake sparkler toppers decorations cupcake decorations


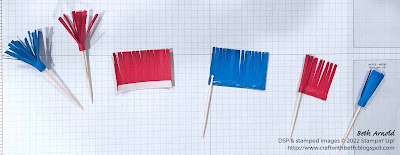
These sparklers came together quickly and easily. I made about twenty in less than 15 minutes, including preparation time. To make more use of my cardstock scraps, I used long strips of scraps. I cut them to a 1-1/4" width and followed the steps 1-6 below. Then I cut the strips into 2" long pieces.

Fourth of July 4th of July mini cupcake sparkler toppers decorations cupcake decorations


To make the sparkler cupcake decorations:

  1. First, gather your supplies and cut your cardstock.
  2. Then with the 1-1/2" side parallel to the paper trimmer's bottom ruler, score the cardstock at 1/4".
  3. Fold and burnish the score line. This score line is to help the sparkler ends to puff out into a ball shape and to also know where to stop cutting the sparkler ends.
  4. Curl the cardstock with a bone folder. This will help you roll the sparkler more easily.
  5. Cut fringe along the 2" side, stopping at the score line.
  6. Place Tear and Tape Adhesive along the scored area on the back of the sparkler.
  7. Remove the adhesive backing and add a line of liquid glue. This will help the wooden toothpick stick better and give you more maneuverability to roll up the cardstock.
  8. Let the toothpick sit in the liquid glue for a few seconds. Then roll up the cardstock. Hold the end of the cardstock for a few seconds to help the cardstock adhere in place.
  9. Shape the sparkler by bringing the fringed ends of the cardstock down and out in a semi-spherical shape.
  10. Add the sparkler decoration to your mini cupcake.


Fourth of July 4th of July mini cupcake sparkler toppers decorations cupcake decorations


Because I used mainly long scraps for these sparkler decorations, there would be some cardstock left over that was not quite 2" long. One strip of cardstock only had about 1-1/4" left. So, I thought why not try it and see how full and puffy a 1-1/4" strip of cardstock would be. You can see in the photo below that the 1-1/4" strip of cardstock is not as full or as puffy as the 2" strips of cardstock, but it still looks really cute!

Fourth of July 4th of July mini cupcake sparkler toppers decorations cupcake decorations


It would be fun to experiment with different lengths of cardstock to see which length makes the sparkler size and shape that you like the best!

Fourth of July 4th of July mini cupcake sparkler toppers decorations cupcake decorations


Below are the measurements and supply list to make these Fourth of July sparkler cupcake decorations.

Measurements

  • Sparkler: 1-1/2" x 2"; scored at 1/4" (Real Red and Pacific Point Cardstock)


Supplies

#102482 Real Red Cardstock
#111350 Pacific Point Cardstock
#102300 Bone Folder
#103579 Paper Snips
#130148 Grid Paper
#152392 Paper Trimmer
#154031 Tear & Tape Adhesive
#110755 Multipurpose Liquid Glue
Toothpicks
Mini Cupcakes

Fourth of July 4th of July mini cupcake sparkler toppers decorations cupcake decorations


I would love to hear about your Fourth of July celebrations! Leave a comment below telling me how you are celebrating the Fourth of July.

If you would like to recreate these treat holders and need some supplies, please, shop my online store HERE.

If you have any questions about today's project, please, don't hesitate to ask me. I am happy to help you with your stamping questions!

Thanks for stopping by! Have a great day!
Beth

Wednesday, June 15, 2022

Sneak Peek: Scary Cute Luminaries

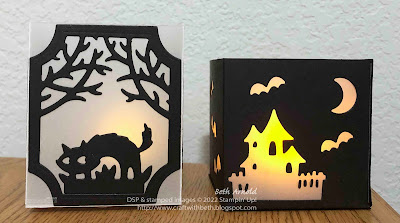
I am so excited to share with you a sneak peek from the upcoming 2022 July-December Mini Catalog! Today's projects are a pair of Halloween tea light luminaries features the Scary Silhouette Dies.


Scary Silhouettes Dies Halloween Luminary Tea Light Candle Home Decor decoration 3D

There are so many wonderful new products in the 2022 July-December Mini Catalog that I know you are going to love! It was so hard to choose what to share first! I am starting with Halloween because it is one of my favorite holidays and because it is one of the first holidays in fall.


Scary Silhouettes Dies Halloween Luminary Tea Light Candle Home Decor decoration 3D

I created these luminaries to highlight the Scary Silhouettes Dies versatility and to display on my mantle in my family room for the Halloween season. Luminaries were the first idea that I had when I saw these dies! I noticed how the tree label shaped die could be used to cut a window out of the center of the solid label shaped die and thought how fun that would be to be a panel on a luminary!


Scary Silhouettes Dies Halloween Luminary Tea Light Candle Home Decor decoration 3D


I was determined to make luminaries this year even before I saw the July-December Mini Catalog. I have been sitting on this idea since early January when I made treat bags for Valentine's Day with hearts die cut around the tops of the bags. I thought they would be a perfect shape for a luminary!


Scary Silhouettes Dies Halloween Luminary Tea Light Candle Home Decor decoration 3D


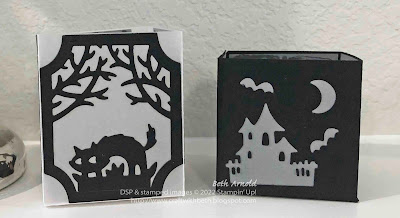
The size and shape of my luminary was determined by the size of the solid label die. I measured the solid label die and drew up a template on my grid paper. The Basic Black cardstock luminary was my first prototype. I was really happy with my first attempt, but I quickly realized that I was a half an inch short for the solid label die. So, I used the other dies in the Scary Silhouettes Dies to cut bats, haunted houses, and moons out of the Basic Black cardstock. I adhered squares of vellum to the inside of the luminary and added a tea light candle inside.


Scary Silhouettes Dies Halloween Luminary Tea Light Candle Home Decor decoration 3D

I adjusted my measurements and cut a second luminary with vellum cardstock. My second attempt was a success! The solid label die cuts fit perfectly on each of the four sides of the luminary.


I die cut four solid labels and then cut the tree label from the center of each solid label to make each of the four side panels. Then I die cut cats, haunted houses, and bats to decorate each panel and placed a tea light candle inside.


Scary Silhouettes Dies Halloween Luminary Tea Light Candle Home Decor decoration 3D

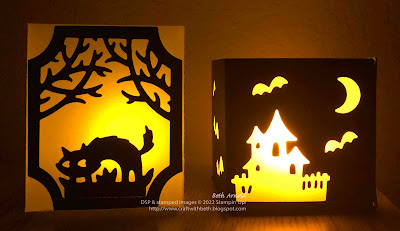
Look at beautiful they look at night! You can really see how the vellum intensifies the light from the candle through the die cut areas!


Scary Silhouettes Dies Halloween Luminary Tea Light Candle Home Decor decoration 3D


I hope you enjoyed today's projects! How would you decorate your own luminaries? Below are the measurements and the supply lists for both versions of the Scary Silhouettes Halloween luminaries.


Vellum Luminary Measurements

  • Luminary Base: 5-1/2" x 10-1/2"; scored at 2-1/2", 5", 7-1/2", and 10" then rotate 90 degrees and score at 2-1/2"
  • Cardstock Side Pieces (cut 4): 3-1/2" x 3" (Basic Black Cardstock)
  • Cat: 2-1/2" x 2" (Basic Black Cardstock)
  • Haunted House (cut 2): 3" x 3" (Basic Black Cardstock)
  • Bats: 2" x 2" (Basic Black Cardstock)

Cardstock Luminary Measurements

  • Luminary Base: 5" x 10-1/2"; scored at 2-1/2", 5", 7-1/2", and 10" then rotate 90 degrees and score at 2-1/2"
  • Vellum Pieces (cut 4): 2-3/8" x 2-3/8" (Vellum Cardstock)


Supplies

  • #101856 Vellum Cardstock
  • #121045 Basic Black Cardstock
  • #110755 Multipurpose Liquid Glue
  • #102300 Bone Folder
  • #103579 Paper Snips
  • #130148 Grid Paper
  • #152392 Paper Trimmer
  • #149653 Stampin' Cut & Emboss Machine
  • #159851 Scary Silhouettes Dies 
  • Tea light battery-operated candles


EDITED: Below is a template for the vellum luminary. 

Scary Cute Vellum Halloween Luminary Template


The July-December Mini Catalog is coming July 1st! The Scary Silhouettes Dies will become available starting July 1st which is only a few weeks away. I hope you add the Scary Silhouette Dies to the top of your wish list!

Starting July 1st, if you would like to recreate these luminaries and need some supplies, please, shop my online store HERE. If you have any stamping questions, I am happy to help!

Thanks for stopping by!

Beth

Monday, June 13, 2022

Lakeside Father's Day S'mores Treat Cups and Bag Topper

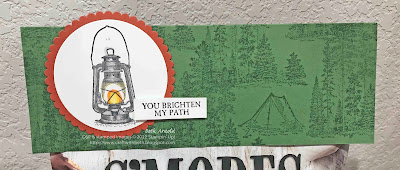
My older brother inspired me to create today's projects - a bag topper tag and s'mores treat cups featuring the Campology stamp set (#152553). He and his family live by a lake in New Hampshire. They love to hike the trails, take bike rides, and kayak on the lake.


S'mores Snack Mix Treat Bag Topper and S'mores Treat Cups for Father's Day Lakeside Cookout Party Favor

With Father's Day fast approaching, I knew some last minute treat holders would perfect for a lakeside cookout. I created a treat bag topper to decorate a host gift - a bag of s'mores snack mix.


S'mores Snack Mix Treat Bag Topper and S'mores Treat Cups for Father's Day Lakeside Cookout Party Favor Campology Stamp Set

The s'mores snack mix is made of chocolate covered mini graham crackers and mini marshmallows. It is delicious and surprisingly difficult to put down! When I found it at one of our local grocery stores, I immediately thought of sitting around the fire pit with my brothers and our families last summer. It was nice to all be together!


S'mores Snack Mix Treat Bag Topper and S'mores Treat Cups for Father's Day Lakeside Cookout Party Favor Campology Stamp Set

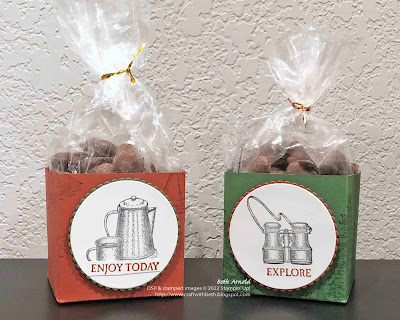
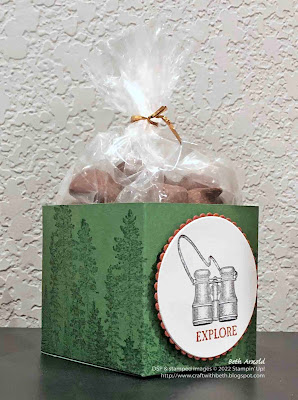
I also created some 2-1/2" cubed treat cups filled with a bag of s'more mix for immediate enjoyment around the lake and by the campfire. The treat cups are stamped with the tent, binoculars, trees, and coffee pot with a cup images as well as two of the greetings on a simple open-topped box.


S'mores Snack Mix Treat Bag Topper and S'mores Treat Cups for Father's Day Lakeside Cookout Party Favor Campology Stamp Set

I used gusseted cellophane bags and the gold twist ties that come with the cellophane bags. If the treat cups were for party favors to take home instead of enjoying during the cookout, I would have used a ribbon to close the bags. I recommend placing the cellophane bag in the treat cup first to make it easier to fill.


Below are the measurements and the supply lists for both the bag topper and the treat cups.


Bag Topper Measurements

  • Tag Topper: 8-1/2" x 6"; scored at 3" (Garden Green Cardstock)
  • Scalloped Circle: 3-1/2" x 3-1/2" (Cajun Craze Cardstock) - use the 3-1/16" diameter scalloped circle die
  • Circle: 3-1/2" x 3-1/2" (Basic White Cardstock) - use the 2-5/8" diameter circle die
  • Greeting: 1/2" x 1-3/4" (Basic White Cardstock)


Treat Cup Measurements

  • Treat Cup Base: 5" x 10-1/2"; scored at 2-1/2", 5", 7-1/2", and 10" then rotate 90 degrees and score at 2-1/2" (Garden Green and Cajun Craze Cardstock)
  • Scalloped Circle: 2-1/2" x 2-1/2" (Garden Green and Cajun Craze Cardstock) - use the 2-1/4" scalloped circle die
  • Circle: 2-1/2" x 2-1/2" (Basic White Cardstock) - use the 2-1/8" diameter circle die


Supplies

  • #152553 Campology Stamp Set
  • #102584 Garden Green Cardstock
  • #119684 Cajun Craze Cardstock
  • #159276 Basic White Cardstock
  • #147089 Garden Green Ink Pad
  • #147085 Cajun Craze Ink Pad
  • #132708 Momento Tuxedo Black Ink Pad
  • #154904 Smokey Slate Stampin' Blends Combo Pack
  • #154883 Daffodil Delight Stampin' Blends Combo Pack
  • #154897 Pumpkin Pie Stampin' Blends Combo Pack
  • #110755 Multipurpose Liquid Glue
  • #118486 Clear Block C
  • #118485 Clear Block D
  • #118489 Clear Block G
  • #118490 Clear Block H
  • #104430 Dimensionals
  • #102300 Bone Folder
  • #103579 Paper Snips
  • #130148 Grid Paper
  • #152392 Paper Trimmer
  • #149653 Stampin' Cut & Emboss Machine
  • #151770 Layering Circle Dies
  • 3-1/4" x 11" Gusseted Cellophane Bags with Twist Ties 
  • S'more Snack Mix


I hope you enjoyed today's projects and make them for Father's Day or your next get together! If you would like to recreate this treat holders and need some supplies, please, shop my online store HERE. If you have any stamping questions, I am happy to help!

Thanks for stopping by!

Beth

Wednesday, April 27, 2022

Sneak Peek: Tea Boutique Tea Boxes

Tea Boutique Designer Series Paper Tea Bag Box


One of my favorite things that I look forward to in each new Annual Catalog are the new In Colors! It is fun to see what new and trendy colors Stampin' Up! will offer! The 2022-2024 are bold, vibrant, and beautiful! The five new colors are Parakeet Party, Tahitian Tide, Sweet Sorbet, Starry Sky, and Orchid Oasis.

2022-2024 In Colors graphic

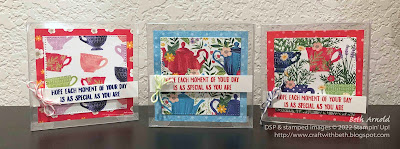
Today's tea box project was inspired by the 2022-2024 In Colors and my love of tea. I love how they are featured in the Tea Boutique Designer Series Paper (#158659). Tea cups and tea pots are paired with flowers, leaves, and stems.


Tea Boutique Designer Series Paper Graphic


It is a sweet, well done designers series paper! The scale of each pattern is perfect and easy to use on a variety of smaller and larger projects without losing the detail of the overall pattern, which can be difficult with the smaller 6" x 6" designer series paper packs. I love the paper with the flowers inside of the envelopes!


Tea Boutique Designer Series Paper Tea Bag Box


The 3-1/8" Acetate Card Boxes can hold 4-5 tea bags, depending on their size and how much tea is in each bag. You can also add 3" x 3" cards and envelopes, chocolates, or small gifts instead of tea.


Measurements

  • Treat Box Base - 3-1/8" x 3-1/8" Ace Card Boxes (#150428 - retiring)
  • 1st Mat - 2-3/4" x 2-3/4" (Tea Boutique Designer Series Paper)
  • 2nd Mat - 2-3/4" x 2-3/4" (Tea Boutique Designer Series Paper) - die cut with the 2-3/8" x 2-3/8" Stylish Shapes square die
  • Greeting - 1/2" x 3" (Basic White cardstock)


Materials

  • #155090 Garden Birdhouses Stamp Set
  • #158659 Tea Boutique Designer Series Paper
  • #159276 Basic White Cardstock
  • #159216 Sweet Sorbet Ink Pad
  • #159212 Starry Sky Ink Pad
  • #154031 Tear and Tape Adhesive
  • #104430 Dimensionals
  • #159195 2022-2024 In Color Baker's Twine Pack
  • #150428 3-1/8" x 3-1/8" Acetate Card Boxes (retiring)
  • Teabags


I can imagine bringing a few of these tea boxes to a friend's house for an afternoon cuppa! I hope you enjoyed today's Tea Boutique Tea Boxes and create your own tea boxes! You can customize your tea boxes with any of the papers in the Tea Boutique Designer Series Paper pack or use your favorite designer series papers. 


If you would like to purchase the supplies used for today's project, please call me to place an order or you can shop my online store HERE.


Thanks for stopping by!

Beth

Friday, April 22, 2022

Q & A: How I Make Large Amounts of Treat Holders

One of my favorite types of papercrafting projects is a treat holder. I enjoy making treat holders for different holidays and occasions. I try to make a variety of treat containers, including boxes, bags, and pockets, that fit specific types of treats. Most often the treat is candy! 


May Day Flower Peanut Butter Treats Daiy Punch Treat Holder


And, of course, you can't just make one treat holder. I make quite a large number of treat holders for each holiday and occasion and give them to family, friends, customers, and community members. 


I get a lot of questions from my family, friends, and customers about how I make my treat holders. One of the most frequent questions I get is "how do I make so many treat holders all at once?". The answer is organized batching. I make a prototype, break it down into basic components, and make a plan for each step. Let's look at my thought process further.


Make a Treat Holder Prototype

The first step is to design the treat holder itself. Determine what kind of shape you would like the treat holder to be. Use grid paper to make a to-scale drawing or sketch it on a piece of paper. Once you are happy with your design, make a treat holder prototype. The prototype should be the actual size of your treat holder designer.

Tip: Write down your measurements for each part of the treat holder. Keep those measurements handy to refer to when cutting cardstock and designer series paper.


Break Down the Steps to Make the Treat Holder

Next, think about the steps it took to create your treat holder. Did you cut cardstock? Did you score or die cut? Make a list of each step. It is ok to have simple steps, such as place the candy in the box or score at 2". 

Tip: Breaking down the steps makes your preparation and assembly more efficient and less overwhelming.


Prepare One Step at a Time

Once you have your list of steps to prepare and make your treat holder, it is time to cut your materials and gather your supplies. Cut one step at a time. For example, if you have 3 parts to your treat holder, cut all of part 1, then all of part 2, and finally all of part 3. Keep your measurements close by to refer to.

Tip: If the treat holder has both scoring and cutting, I will score all of the pieces and then cut all of the pieces instead of scoring and cutting one piece at a time. 


May Day Flower Peanut Butter Treats Daiy Punch


Assemble One Step at a Time

Clear your workspace or table before beginning the preparation. Be sure to have plenty of room for each step's pieces, punches, die cuts, etc. Complete one step for each of the treat holders. Then move on to the next step and so on.

Tip: Have a landing area ready to hold completed treat holders such as a tray, a large bowl, or a platter to keep the clutter down and to avoid knocking a treat holder on the floor.


Sometimes, I will put on music, a podcast, or the tv. I catch up the latest episodes of my favorite shows while I assemble treat holders.


I hope this post helps you to see how I make large numbers of treat holders. What stamping questions do you have? Email your stamping questions. I would love to help answer your stamping questions in a future blog post!

Thanks for stopping by!

Beth

Monday, February 21, 2022

St. Patrick's Day Delightful Tag Topper Treat Holder

I love the tag topper punches! They are easy to use, look fabulous, and can make a variety of projects from cards to boxes to treat holders! Today I am sharing a quick Delightful Tag Topper Punch treat holder just in time for St. Patrick's Day.


St. Patrick's Day Saint Patrick's Day Delicate Tag Topper Andes Mints Treat Holder


I created a small treat envelope that can hold two Andes chocolate mint candy pieces. These treat holders come together quickly with a few supplies. Score a piece of cardstock twice towards the middle to made room for the mint candy pieces to sit, punch both ends of the cardstock, decorate, and close with a ribbon.


St. Patrick's Day Saint Patrick's Day Delicate Tag Topper Andes Mints Treat Holder


I enjoyed creating this treat holders so much that I made them in three different color palettes - Soft Sea Foam, Old Olive, and Thick Basic White! Which one is your favorite?


St. Patrick's Day Saint Patrick's Day Delicate Tag Topper Andes Mints Treat Holder


Below are the measurements and supply list to recreate these St. Patrick's Day Treat Holders. You can make this treat holder as simple or as elaborate as you would like!  If you would like to recreate this card and need any of the supplies, please, visit my online store


Measurements

  • Treat Holder Base: 2" x 5-1/2"; scored at 2-5/8" & 2-7/8" (Old Olive, Soft Sea Foam, or Thick Basic White Cardstock)
  • Circle: 1-1/2" x 1-1/2" (Basic White Cardstock) - use the smallest circle die
  • Scalloped Circle: 1-3/4" x 1-3/4" (Garden Green Cardstock) - use the 1-1/2" diameter scalloped circle die
  • Hearts for Shamrocks: 2-1/2" x 1" (Garden Green Cardstock) - use the row of 3 hearts die


Materials

  • #157618 Sweet Conversations Stamp Set 
  • #158081 Special Moments Stamp Set (Sale-A-Bration)
  • #159276 Basic White Cardstock
  • #159229 Thick Basic White Cardstock
  • #100702 Old Olive Cardstock
  • #102584 Garden Green Cardstock
  • #131201 Pear Pizzazz Cardstock
  • #146988 Soft Sea Foam Cardstock
  • #147089 Garden Green Ink Pad
  • #151770 Layering Circles Dies
  • #157623 Sweet Heart Dies
  • #149518 Delightful Tag Topper Punch
  • #110755 Multipurpose Liquid Glue
  • #102300 Bone Folder
  • #103579 Paper Snips
  • #130148 Grid Paper
  • #152392 Paper Trimmer
  • #149653 Stampin' Cut & Emboss Machine 
  • #118489 Clear Block G
  • #152156 Gold 1/4" Shimmer Ribbon
  • 1/4" Circle Hole Punch
  • Andes chocolate mint candy


Need more tag topper punch project inspiration? Take a look at some more of my projects that feature tag topper punches!


Check out the video below to see how I put these fun shamrock treat holders together! I keep calling the punch Delicate Tag Topper, but I meant to say Delightful Tag Topper.


You can make this treat holder as simple or as elaborate as you would like!  If you would like to recreate this card and need any of the supplies, please, visit my online store.

Send me a photo of your completed St. Patrick's Day treat holder. I would love to feature you in an upcoming newsletter! Or, tag me on social media with #craftwithbeth. I can't wait to see what tag topper treat holders you create!


Thanks for stopping by!

Beth

Friday, January 31, 2020

Valentine’s Day Sticky Note Holders with Mini Pens

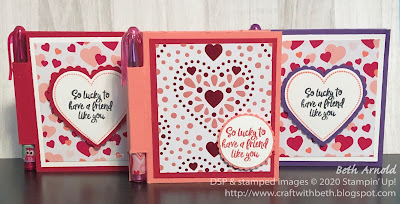
I love giving out candy and treats on Valentine's Day to my family, friends, and community members. But, Valentine's Day can be more than candy and chocolate. There are great non-food treats to share on Valentine's Day! Today's project is one of them, for sure! This is an updated version of my sticky note holders with mini pens from last Halloween.

Craft with Beth: Stampin' Up! St Valentine's Day St. Valentine's Day Valentine 3D sticky note holder with mini pen pocket Heartfelt Stamp Set Heart Punch Pack From My Heart Specialty Designer Series Paper DSP SDSP

These sticky note holders with mini pens are perfect for teachers, office staff, students, and anyone needing to jot down a quick note. Count me in too!

Craft with Beth: Stampin' Up! St Valentine's Day St. Valentine's Day Valentine 3D sticky note holder with mini pen pocket Heartfelt Stamp Set Heart Punch Pack From My Heart Specialty Designer Series Paper DSP SDSP

These Valentine mini pens came from my local pharmacy. The mini pens have owls, hearts, llamas, and unicorns printed on them. Too cute to resist!

When I went in the pharmacy, Valentine's treats were not on my radar yet. I happened to pass by them on my way to the register. Isn't that always the way?!

Craft with Beth: Stampin' Up! St Valentine's Day St. Valentine's Day Valentine 3D sticky note holder with mini pen pocket Heartfelt Stamp Set Heart Punch Pack From My Heart Specialty Designer Series Paper DSP SDSP

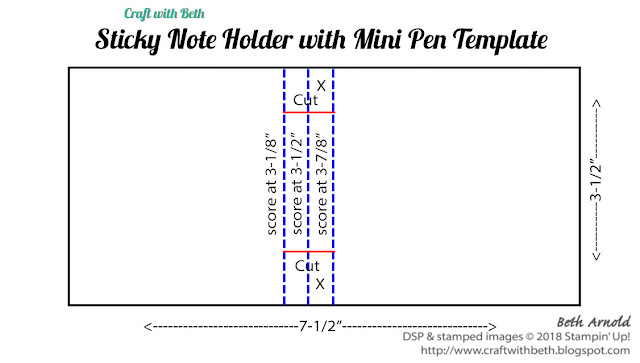
I have included my graphic template for the sticky note holder base below.

You can also check out my video showing how to assemble the sticky note holders in my blog post here.

Craft with Beth: Stampin' Up! St Valentine's Day St. Valentine's Day Valentine 3D sticky note holder with mini pen pocket Heartfelt Stamp Set Heart Punch Pack From My Heart Specialty Designer Series Paper DSP SDSP Template Graphic

How will you decorate your sticky note holders? I would love to see what you create! Post a project photo on my Facebook Page today!

You can find the measurements and a supply list for this project at the end of the post. I hope you enjoyed this project! Please leave a comment below after the post! I would love to hear from you!

Thanks for stopping by!
Beth

++++++++++++++++++
Shop Online 24/7 in my Online Store
Check out the Clearance Rack
Sign up for Classes, Events, and Retreat Days
Sign up for my newsletter and mailing list or request a catalog
Sign up for Paper Pumpkin
Join my Stampin' Team - the Purrfect Stampers!
Visit my YouTube Channel
Follow me Social Media! I post on Pinterest, Twitter and Facebook
Follow me on Instagram

Host Codes & Current Promotions:
January Host Code - GKCKC3MP
When placing an order, please use host code GKCKC3MP for orders under $150 USD. Please don't use the host code if your order is more than $150. Use Host Code GKCKC3MP if you are attending the Stamp of the Month Class long distance to have your Stamp of the Month Bundle mailed directly to you.

Craft with Beth: Stampin' Up! 2020 January-June Mini Catalog Graphic Banner

The January-June Mini Catalog is now the new name for the Occasions Catalog. The January-June Mini Catalog will run from January 3rd, 2020 through June 2nd, 2020. It is filled to the brim with a multitude of stamping goodies for all kinds of spring and early summer holidays and occasions, including weddings, Easter, Valentine's Day, anniversaries, Mother's Day, Father's Day, and more! Visit my online store to see all of the January-June Mini Catalog products!

Craft with Beth: Stampin' Up! 2020 Sale-A-Bration SAB Banner Graphic

Sale-A-Bration is a three month long special promotion that for each qualifying purchase you can earn FREE products from the Sale-A-Bration Catalog! From January 3rd, 2020 through March 31st, 2020 for every $50 you spend before tax and shipping, you can earn a Level 1 product from the Sale-A-Bration Catalog. For every $100 you spend before tax and shipping, you earn a Level 2 product from the Sale-A-Bration Catalog. For more details and information, check out my blog post HERE. View the Sale-a-Bration products in my online store HERE.

Craft with Beth: Stampin' Up! Little Ladybug Stamp Set Sale-A-Bration 2020 Host Special Promotion Stamp Set Banner Graphic

 When you host a workshop or place a single order of $300 USD or more during Sale-A-Bration 2020, you earn a FREE Little Lady Bug Stamp Set (Item #152384). This is an adorable lady bug stamp set that is sure to bring cheer to every project! The Little Lady Bug stamp set is not for purchase and can only be earned on qualifying orders during Sale-A-Bration 2020. For more details and information, check out my blog post HERE.


During Sale-A-Bration 2020 (January 3rd, 2020 through March 31st, 2020), when you join Stampin' Up! as a new demonstrator you also receive a Mini Paper Cutter, a sampler pack of 6" x 6" Designer Series Paper, and the stamp set of your choice (excluding host sets and Sale-A-Bration sets) in addition to the $125 USD in product for $99 USD, free shipping, a free Paper Pumpkin Kit, and free business supplies! This is one of the best joining specials that I have seen since I became a demonstrator!  For more information, check out my blog post here or contact me today. I would love for you to join my team the Purrfect Stampers!

Craft with Beth: Stampin Up! 2020 Coordination Product Release Sale-A-Bration 2020 January-June Mini Catalog Promotion Graphic Banner

Coordination Products are coming soon! There will be 5 die sets and 1 Designer Series Paper Sampler Pack that coordinate with Sale-A-Bration and January-June Mini Catalog stamp sets and punches! The Little Ladybug Stamp Set will also have coordinating dies! No more fussy cutting! Woohoo! These coordinating products are only available while supplies last. The customer launch will be on February 4th, 2020 and will continue through March 31st, 2020 or while supplies last. Please, review the products below, make your wish lists, and set a reminder on your calendar for February 4th! I don't want you to miss out! For more information, click here to see my blog post.

Craft with Beth: Stampin' Up! Paper Pumpkin Kit card Graphic Banner 2020 02 February A Lovely Day subscription kit

Get a sneak peek of February's Paper Pumpkin Kit! February's kit theme is A Lovely Day. This month's kit is all about celebrating! It will make 9 cards and 9 coordinating envelopes. February's kit also coordinates with the Happy Birthday to You Stamp Set (Item 152308) in the Sale-A-Bration Catalog, providing even more versatility! Sign up for Paper Pumpkin by February 10th to receive February's Kit! Click here for more information about February's Paper Pumpkin kit!

Craft with Beth: Stampin' Up! 2019-2020 Annual Catalog Graphic Banner

June 4th, 2019 - June 2nd, 2020 - Shop from the 2019-2020 Annual Catalog for all of your stamping needs! This catalog is bursting with must have stamp sets, dies, embossing folders, ribbons, rhinestones, and more! I love the entire catalog! I think you will too! Check out all of the new products today!

http://www.stampinup.com/ecweb/category/110090/experience-creativity-projects?dbwsdemoid=2123316

Are you new to stamping? The Beginner Brochure may be the right place to start! The Beginner Brochure features a collection of stamp sets, kits, and bundles that are specifically designed to help you build your stamping skills! Check out our Beginner Brochure today! View the Beginner Brochure products in my online store. Download the Beginner Brochure here.

P.S. If you are a Magnolia Lane Product Suite Fan, there is a companion stamp set Magnolia Blooms (Item #152729) in the Beginner Brochure!


Valentine Sticky Note Holder with Mini Pen Supply List
Stamps
#153775 Heartfelt Bundle
#151417 Heartfelt Stamp Set (Photopolymer)
Paper
#100730 Whisper White Cardstock
#102482 Real Red Cardstock
#151189 From My Heart Specialty Designer Series Paper
#146987 Gorgeous Grape Cardstock
#141416 Flirty Flamingo Cardstock
Ink
#147052 Flirty Flamingo Ink Pad
#147084 Real Red Ink Pad
Embellishments
#104430 Dimensionals
Tools
#152392 Stampin’ Trimmer
#102300 Bone Folder
#126200 Stampin’ Scrub
#102394 Stampin’ Mist
#103579 Paper Snips
#110755 Tombow Mono Multi Liquid Glue
#138995 Tear & Tape Adhesive
Corresponding Clear Acrylic Blocks
#119861 1-1/4” Circle Punch
#146139 1-3/8” Scalloped Circle Punch
#151292 Heart Punch Pack
Mini Pens
3” x 3” Sticky Notes

Valentine Sticky Note Holder with Mini Pen Measurements

Paper
Dimensions
Sticky Note Holder Base
Real Red Cardstock
3-1/2” x 7-1/2”; scored at 3-1/8”, 3-1/2”, & 3-7/8”
Flirty Flamingo Cardstock
Gorgeous Grape Cardstock
1st Mat
Whisper White Cardstock
2-7/8” x 3-1/4”
Real Red Cardstock
2nd Mat
From My Heart SDSP
2-5/8” x 3”
Scalloped Circle
Flirty Flamingo Cardstock
2-1/4” x 2-1/4”
Circle
Whisper White Cardstock
2” x 2”
Scalloped Heart
Flirty Flamingo Cardstock
3-1/2” x 3-1/2”
Real Red Cardstock
Gorgeous Grape Cardstock
Heart
Whisper White Cardstock
3” x 3”