Showing posts with label Daisy Delight. Show all posts

Friday, November 24, 2017

Give Thanks Daisy Centerpiece

Fall is my favorite season, for sure. I love banners, candle holders, ceramic pumpkins, wreaths, and more. So, when I find a cute fall home decor piece, you know I can't resist!

Craft with Beth: Daisy Punch Daisy Delight Floral Arrangement home decor stampin up thanksgiving faceted gems

I filled this divided wooden box, found at a local craft store, with an autumnal daisy floral arrangement featuring the Daisy Delight Bundle.

Craft with Beth: Daisy Punch Daisy Delight Floral Arrangement home decor stampin up thanksgiving faceted gems

Into each of the 6 compartments I placed a floral foam block and 12 daisies - 2 each in 5 colors: Cajun Craze, Crushed Curry, Elegant Eggplant, Tangerine Tango, and Very Vanilla. All but the Very Vanilla daisies are stamped with the same color ink as the cardstock to create a tone on tone look to add a subtle textured-look.

Craft with Beth: Daisy Punch Daisy Delight Floral Arrangement home decor stampin up thanksgiving faceted gems

I used a variety of embellishments in the centers of the daisies - the daisy center stamp, sponge daubers, and gold faceted gems to decorate the centers of the daisies.
  • Cajun Craze and Crushed Curry Daisies - Crumb Cake cardstock stamped with Chocolate Chip ink for centers
  • Very Vanilla Daisies - Crumb Cake ink sponged in the center
  • Tangerine Tango Daisies - Tangerine Tango cardstock stamped with Tangerine Tango ink topped with a gold faceted gem
  • Elegant Eggplant Daisy - gold heat embossed center. I didn't use the embossing buddy here because I wanted extra little splashes of gold embossing powder for an added shine.

Craft with Beth: Daisy Punch Daisy Delight Floral Arrangement home decor stampin up thanksgiving faceted gems how to fit 12 stamped daisies on one sheet of cardstock

To maximum each sheet of cardstock, I tried to fit as many stamped daisies as I could on each sheet of cardstock. One 8-1/2" x 11" sheet of cardstock can fit 12 stamped daisies. I first stamped the top row. Then I stamped the bottom row. Lastly, I stamped the center row.

Craft with Beth: Daisy Punch Daisy Delight Floral Arrangement home decor stampin up thanksgiving faceted gems

All of the daisies were put together and attached to floral wire the same way the Halloween wiggle eye floral bouquet was.

Have you created an arrangement with the Daisy Delight Bundle? What color palette did you choose? I would love to see what you make!

Craft with Beth: Online Extravaganza Title Graphic

Don't forget. Online Extravaganza is going on now with stamping deals through November 26th, 2017. To closeout Online Extravaganza 2017 there will be a second 24-flash sale on November 27th, 2017 with extra special savings. Click here for more details.

Thanks for stopping by!
Beth


Daisy Thanksgiving Floral Arrangement Supply List
Stamps
#145361 Daisy Delight Bundle
Paper
#120953 Crumb Cake
#111349 Tangerine Tango
#101650 Very Vanilla
#105126 Elegant Eggplant
#131199 Crushed Curry
#119684 Cajun Craze
Ink
#126979 Chocolate Chip
#126946 Tangerine Tango
#101650 Very Vanilla
#131173 Crushed Curry
#126965 Cajun Craze
#126975 Crumb Cake
#102283 Versamark
Embellishments
#104430 Dimensionals
#109129 Gold Embossing Powder
#144141 Gold Faceted Gems
Tools
#141337 Sponges
#129053 Heat Tool
#119869 1/2" Circle Punch
#134363 1/16” Handheld Circle Punch
Wire Cutters
Round-Nosed Pliers
22-Gauge Floral Wire
6 Floral Foam Blocks
Wooden Box with Handles
 

Monday, November 13, 2017

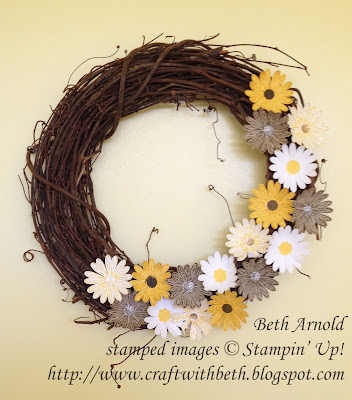
Sentimental Delightful Daisy Grapevine Wreath

One of my favorite bundles in the 2017-2018 Annual Catalog is the Daisy Delight Bundle. Not only is this an adorable, versatile bundle, but it is also one of my favorites because it reminds me of my grandmother. Her nickname was Daisy because she was always fresh as a daisy. She enjoyed getting ready and dressed up for all kinds of occasions and parties.

Craft with Beth: Daisy Delight Bundle Wreath Daisy Punch Stampin Up Home Decor 3D Grape Vine Wreath

I created this wreath for my catalog launch party in the summer. Wreaths are a huge part of the decor in my home. They add a lot of color, texture, and dimension. I also like that they convey the time of the year. Don't tell my husband, but I think I have about fifteen wreaths that I rotate throughout the seasons. Mums the word!

I think of my grandmother whenever I plan my catalog launch parties and luncheons. She would have loved a good menu planing, decorating the house, and spending time with her guests!

What better way to honor and to remember her than with a daisy wreath that I can see each day.

Craft with Beth: Daisy Delight Bundle Wreath Daisy Punch Stampin Up Home Decor 3D Grape Vine Wreath

The base is a grape vine wreath from a local craft store. My wreath came with a lot of dried grape leaves intertwined with the vines. I had bits of leaves falling everywhere when I brought it home, so I went outside and removed as many of the leaves as I could by hand and with a chop stick.

I chose a grape vine as the base because I like the texture and it reminds me of my grandfather. He used to have an enormous garden in their backyard that included grapes. He would make his own grape vine wreaths from his own grape vines after the harvest season.

To maximum each sheet of cardstock, I tried to fit as many stamped daisies as I could on each sheet of cardstock. One 8-1/2" x 11" sheet of cardstock can fit 12 stamped daisies. I first stamped the top row. Then I stamped the bottom row. Lastly, I stamped the center row.

Craft with Beth: Daisy Delight Bundle Wreath Daisy Punch Stampin Up Home Decor 3D Grape Vine Wreath how to fit 12 stamped daisies on one sheet of cardstock

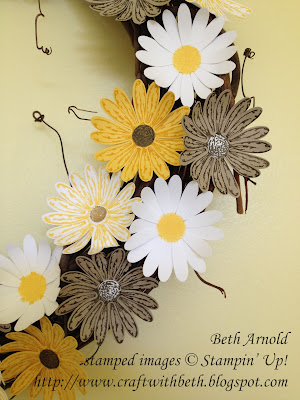
The daisies are attached using a low temperature glue gun.

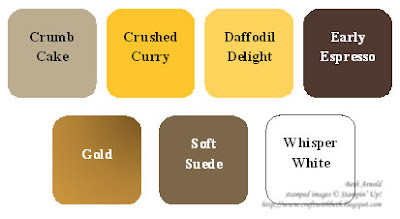
The color palette is summery yet transitional to fall. The flowers are made with Whisper White, Crushed Curry, and Crumb Cake cardstock. The centers are Gold Faceted Gems, Early Espresso ink on Whisper White cardstock, Early Espresso ink on Soft Suede cardstock, or Daffodil Delight ink sponged in the daisy's center.

Craft with Beth: Daisy Delight Bundle Wreath Daisy Punch Stampin Up Home Decor 3D Grape Vine Wreath

This wreath came together in about an hour. This would be a great afternoon project to spruce up any space. I think this wreath would look amazing in purples, oranges, and reds for a late autumn look or even pastels for Easter. I hung my wreath with a removable hook, but you could hang it with a wide ribbon and a bow. The burlap ribbon would be gorgeous or even the navy gingham ribbon!

I hope you give this sweet daisy wreath a try. How would you decorate your wreath? I would love to see what you create!

Thanks for stopping by!
Beth


Sentimental Delightful Daisy Wreath Project Supply List
Stamps
#145361 Daisy Delight Bundle
Paper
#131199 Crushed Curry
#120953 Crumb Cake
#115318 Soft Suede
#100730 Whisper White
Ink
#126974 Early Espresso
#126944 Daffodil Delight
Embellishments
#144141 Gold Faceted Gems
Tools
#133773 Sponge Dauber
Low Temperature Glue Gun
Low Temperature Glue Sticks for the Glue Gun
Grape Vine Wreath
Chop Stick
 

Tuesday, October 31, 2017

I've Got My Eye on You Halloween Daisy Bouquet

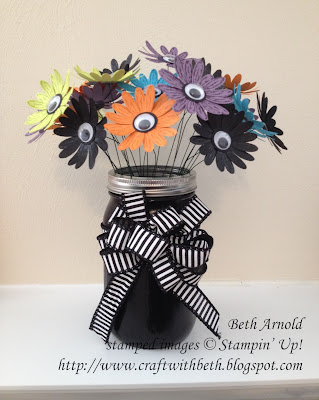
This creepy daisy bouquet is sure got its eyes on you this Halloween! I got the idea while trying to think of ways to create the daisy center without using the stamp. The center is made up of a 3/4" Basic Black circle and a 15mm wiggle eye glued in the center of 2 offset daisies.

Craft with Beth: Halloween Daisy Delight Delightful Daisy Bouquet 3D floral arrangement wiggle eyes googley googly daisy punch heat embossing versamark stampin up loopy bow mason jar craft vase eyeballs

I used traditional as well as newer Halloween colors - Basic Black, Pumpkin Pie, Tempting Turquoise, Perfect Plum, and Lemon Lime Twist - for the daisies. There are 5 daisies in each color for a total of 25 daisies.

Craft with Beth: Halloween Daisy Delight Delightful Daisy Bouquet 3D floral arrangement wiggle eyes googley googly daisy punch heat embossing versamark stampin up loopy bow mason jar craft vase eyeballs
 
The daisies are stamped with the same color ink as the corresponding cardstock except for the Basic Black cardstock. I used Versamark and clear embossing powder on the Basic Black cardstock daisies. Not only did the clear embossing powder give a shine to the Basic Black cardstock, but the tone on tone look was not lost.

Craft with Beth: Halloween Daisy Delight Delightful Daisy Bouquet 3D floral arrangement wiggle eyes googley googly daisy punch heat embossing versamark stampin up loopy bow mason jar craft vase eyeballs

To attach the daisy to the stems, I used 22 gauge floral wire stems cut to 10" long, dimensionals, and 1/2" circles of cardstock.

Craft with Beth: Halloween Daisy Delight Delightful Daisy Bouquet 3D floral arrangement wiggle eyes googley googly daisy punch heat embossing versamark stampin up loopy bow mason jar craft vase eyeballs

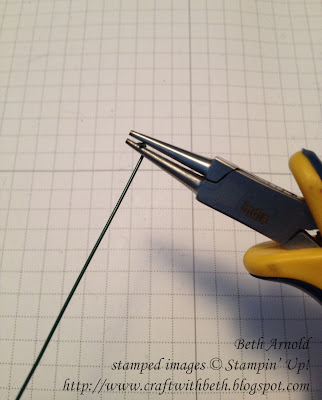
First create a loop by holding one end of the floral wire stem with round nosed pliers and rotate towards you.

Craft with Beth: Halloween Daisy Delight Delightful Daisy Bouquet 3D floral arrangement wiggle eyes googley googly daisy punch heat embossing versamark stampin up loopy bow mason jar craft vase eyeballs

Continue rotating the round nosed pliers toward you to close the wire into a circle.

Craft with Beth: Halloween Daisy Delight Delightful Daisy Bouquet 3D floral arrangement wiggle eyes googley googly daisy punch heat embossing versamark stampin up loopy bow mason jar craft vase eyeballs

Bend the wire close to the loop at a 90 degree angle. This will form the base which the daisy will sit on.

Craft with Beth: Halloween Daisy Delight Delightful Daisy Bouquet 3D floral arrangement wiggle eyes googley googly daisy punch heat embossing versamark stampin up loopy bow mason jar craft vase eyeballs

You need something to connect the wire to the daisy. You could use a low temperature glue gun, E6000 glue, or a dimensional and a circle of cardstock. The easiest, quickest, yet still very effective way to connect the wire to the cardstock is with a dimensional.

First cut a cover for the wire. That way the wire is hidden underneath the daisy and no adhesive is exposed. Cut a 3/4" x 8-1/2" strip of Basic Black cardstock.

Craft with Beth: Halloween Daisy Delight Delightful Daisy Bouquet 3D floral arrangement wiggle eyes googley googly daisy punch heat embossing versamark stampin up loopy bow mason jar craft vase eyeballs

Punch a 1/16" hole in the center of the strip.

Craft with Beth: Halloween Daisy Delight Delightful Daisy Bouquet 3D floral arrangement wiggle eyes googley googly daisy punch heat embossing versamark stampin up loopy bow mason jar craft vase eyeballs

Position a 1/2" circle punch over the center of 1/16" inch hole and punch.

Craft with Beth: Halloween Daisy Delight Delightful Daisy Bouquet 3D floral arrangement wiggle eyes googley googly daisy punch heat embossing versamark stampin up loopy bow mason jar craft vase eyeballs

This circle will cover the wire and the adhesive (from the dimensional). Punching the 1/16" hole first is easier than trying to get 1/2" centered underneath the 1/16" hand held circle punch.

Craft with Beth: Halloween Daisy Delight Delightful Daisy Bouquet 3D floral arrangement wiggle eyes googley googly daisy punch heat embossing versamark stampin up loopy bow mason jar craft vase eyeballs

Thread the circle up the floral wire stem so that it is right up to the wire loop.

Craft with Beth: Halloween Daisy Delight Delightful Daisy Bouquet 3D floral arrangement wiggle eyes googley googly daisy punch heat embossing versamark stampin up loopy bow mason jar craft vase eyeballs

Place a dimensional on top of the wire loop. Press the dimensional firmly in place. Building the connection between the floral wire stem and the daisy is like a sandwich. The dimensional is on the top. The wire loop is in the middle. The circle cover is on the bottom.

Craft with Beth: Halloween Daisy Delight Delightful Daisy Bouquet 3D floral arrangement wiggle eyes googley googly daisy punch heat embossing versamark stampin up loopy bow mason jar craft vase eyeballs

Remove the dimensional backing and adhere to the back center of the daisy. Press the dimensional firmly in place.

Craft with Beth: Halloween Daisy Delight Delightful Daisy Bouquet 3D floral arrangement wiggle eyes googley googly daisy punch heat embossing versamark stampin up loopy bow mason jar craft vase eyeballs

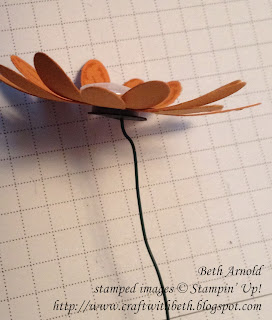
This is how your daisy will look once the wire is adhered.

Craft with Beth: Halloween Daisy Delight Delightful Daisy Bouquet 3D floral arrangement wiggle eyes googley googly daisy punch heat embossing versamark stampin up loopy bow mason jar craft vase eyeballs

Repeat for each of the daisies and place them in a container. I painted a mason jar with acrylic paint for glassware.

Craft with Beth: Halloween Daisy Delight Delightful Daisy Bouquet 3D floral arrangement wiggle eyes googley googly daisy punch heat embossing versamark stampin up loopy bow mason jar craft vase eyeballs

For added decoration I tied a loopy bow with 6 loops on each side using 7/8" Striped Ribbon. Then I wrapped a separate piece of the ribbon around the jar and secured it with Tear and Tape. I secured the bow to the center of the ribbon around the jar using the floral wire used to make the bow.

Currently, this watchful bouquet gives a whimsical touch to the fireplace mantle in my family room. I am thoroughly enjoying stamping and playing with the Daisy Delight Bundle. I have some seasonal ideas for Thanksgiving to post soon as well as for Winter.

I hope you give this bouquet a try. What holiday or theme would you use the Daisy Delight Bundle for? I would love to see what you create!

Thanks for stopping by!
Beth


I’ve Got My Eyes on You Halloween Daisy Bouquet Project Supply List
Stamps
#145361 Daisy Delight Bundle
Paper
#101889 Perfect Plum
#102067 Tempting Turquoise
#105117 Pumpkin Pie
#121045 Basic Black
#144245 Lemon Lime Twist
Ink
#102283 Versamark
#126963 Perfect Plum
#126952 Tempting Turquoise
#126945 Pumpkin Pie
#144086 Lemon Lime Twist
Embellishments
#104430 Dimensionals
#144624 7/8” Striped Ribbon
15mm Wiggle Eyes
Tools
#103083 Embossing Buddy
#129053 Heat Tool
#134363 1/16” Handheld Circle Punch
#119869 1/2" Circle Punch
22 Gauge Floral Stem Wire (27 – 25 for daisies & 2 for the bow)
Round Nosed Pliers
Wire Cutters
Mason Jar
Black Acrylic Paint for Glassware
Paint Brush