There are only a few days left for the Special Offers Sales! This Special Offers ends on Wednesday, September 21st! Don't miss out on these fabulous products at a discounted price!
My favorite is the Layering Ovals Framelits. They are incredibly versatile and fit almost any occasion, including Thanksgiving!
Doesn't this basket layer beautifully on a Cajun Craze scalloped oval? I sure think so! Don't miss out on these spectacular offers while they last!
Thanks for stopping by!
Beth
Tuesday, September 20, 2016
Monday, September 19, 2016
Paper Pumpkin:Something Good to Eat
I'm so excited that my September Paper Pumpkin Kit arrived in the mail! I've been looking forward to this month's kit in hopes that it would be Halloween or Fall themed. And, it is! Hooray!
How cute are these test tubes!?! These are the perfect size for a little treat! This kit is packed with labels and banner stickers! The printed labels with the cats and the cauldron are my favorite! The stamp set would be great for a one-sheet wonder card set!
The test tubes can be filled with all kinds of goodies, such as
I have some alternative project ideas brewing! Stay tuned!
What do you think of this month's Paper Pumpkin Kit? How will you use your kit supplies? I would love to see what you make!
Thanks for stopping by!
Beth
How cute are these test tubes!?! These are the perfect size for a little treat! This kit is packed with labels and banner stickers! The printed labels with the cats and the cauldron are my favorite! The stamp set would be great for a one-sheet wonder card set!
The test tubes can be filled with all kinds of goodies, such as
- sunflower seeds
- candy-coated sunflower seeds
- spice or dip mixes
- flowers
- pen or pencil
- jelly beans, candy corn, or other candy
- cocoa mix
- marshmallows
- pet treats
- bird seed
- bath salts
I have some alternative project ideas brewing! Stay tuned!
What do you think of this month's Paper Pumpkin Kit? How will you use your kit supplies? I would love to see what you make!
Thanks for stopping by!
Beth
Sunday, September 18, 2016
Hauntly Good Halloween Card
Our theme for this month's demonstrator meeting was a Fall or Halloween card using products from the Holiday Catalog. Halloween is definitely one of my favorite holidays!
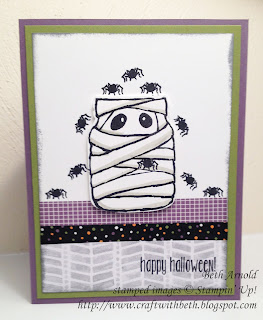
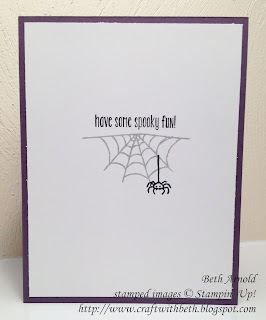
The Halloween collections in the Holiday Catalog are amazing! It was hard to choose just one stamp set! I used Jar of Haunts and Spooky Fun to create this creepy card. The spiders crawling out of the mummy jar make this card extra hair-raising! To make the mummy's bandages look old, I ran the brush tip of a Sahara Sand along the bottom of each bandage.
The spider web also adds to the creepy crawly-ness! Love it!
This card comes together in a snap. I hope you give it a try!
We had a fantastic time at the Holiday Kickoff Party yesterday! The food was delicious, especially the sugar and spice mini doughnuts! It was wonderful to spend time with everyone! You all are the best customers! Thank you so much for coming! I'm looking forward to the next party!
Thanks for stopping by!
Beth
The Halloween collections in the Holiday Catalog are amazing! It was hard to choose just one stamp set! I used Jar of Haunts and Spooky Fun to create this creepy card. The spiders crawling out of the mummy jar make this card extra hair-raising! To make the mummy's bandages look old, I ran the brush tip of a Sahara Sand along the bottom of each bandage.
The spider web also adds to the creepy crawly-ness! Love it!
Jar of Haunts Halloween
Card Measurements
|
||
Color
|
Dimensions
|
|
Card Base
|
Perfect Plum
|
4-1/4” x 11”
|
1st Mat
|
Old Olive
|
3-3/4” x 5-1/4”
|
2nd Mat
|
Whisper White
|
3-3/4” x 4”
|
DSP Strip
|
Halloween Night Specialty DSP
|
3-3/4” x 1-1/2”
|
Washi Tape
|
Halloween Night Washi Tape
|
|
Inside Mat
|
Whisper White
|
3-3/4” x 5-1/4”
|
This card comes together in a snap. I hope you give it a try!
We had a fantastic time at the Holiday Kickoff Party yesterday! The food was delicious, especially the sugar and spice mini doughnuts! It was wonderful to spend time with everyone! You all are the best customers! Thank you so much for coming! I'm looking forward to the next party!
Thanks for stopping by!
Beth
Jar of Haunts Halloween Card Project Supply List
|
|
Stamps
|
#142247 Jar of Haunts
#142236 Spooky Fun
|
Paper
|
#100730 Whisper White
#100702 Old Olive
#101889 Perfect Plum
#142022 Halloween Night Specialty DSP
|
Ink
|
#140931 Basic Black Archival
#140932 Basic Gray Archival
#131179 Smoky Slate
#131261 Neutrals Stampin’ Write Markers
|
Embellishments
|
#142026 Halloween Night Designer Washi Tape
#104430 Stampin’ Dimensionals
|
Tools
|
#143263 Big Shot Machine
#141490 Everyday Jar Framelits
#141337 Sponge
|
Thursday, September 15, 2016
Sponge Dauber Organization
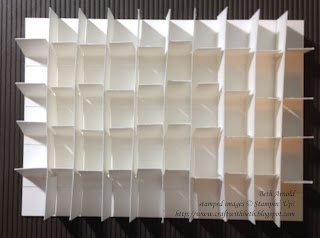
I was inspired to make this sponge dauber organizer by amazing fellow Stampin' Up demonstrator Sam Hammond. Sam created a fabulous sponge dauber organizer using cardstock and a full wood-mount stamp clear case.
I loved her design, but made a few modifications. I frequently drop fully inked stamps or sponges accidentally onto my projects. To reduce these occurrences, I added a bottom and secured one set of dividers to the bottom. This would not only make the organizer more stable but also absorb some of the ink. I also made a tray to hold the organizer. This closed all of the sides and holds the daubers more securely. You can lift the entire tray of daubers without toppling it onto your work surface.
Here's what I did.
Cut nine 5" by 3/4" strips of Thick Whisper White cardstock. With the 5" side along the top of your score board, score every inch. Notch your score lines. Set them aside.
Cut four 7" by 1" strips of Thick Whisper White cardstock. With the 1" side along the top of your score board, score at 3/4". This score line will form the tab that will later be secured to the bottom piece. Rotate your cardstock so that the 7" is along the top of the score board and score at 11/16" intervals. Notch your 11/16" score lines up to the 1/4" score line. Side them aside.
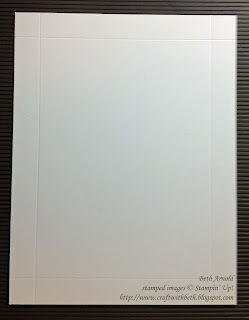
Cut a 6-9/16" by 8-9/16" piece of Thick Whisper White cardstock. This will be your tray. With the 6-9/16" side along the top of your score board, score at 3/4". Rotate your cardstock 9o degrees and score again at 3/4". Repeat for the 2 remaining sides. You should now have a score line around the entire piece.
Cut and notch the top two and bottom two inside tabs as shown in the photograph below. Add Fast Fuse tape or Tear and Tape Adhesive to the tabs.
Fold up the sides of the tray and secure in place.
Set the tray aside.
Next cut a 5" by 7" piece of Thick Whisper White cardstock. This will be the bottom of the organizer. With the 5" side along the top of the score board, score every inch.
Put a thin line of liquid glue along the back of each 7" by 1" strip only on the 1/4" score line side. Adhere each strip on the bottom, matching the 1/4" score line on the strip to each 1" score line on the bottom. Make sure that all the strips face the same way.
Once the glue is dry, fold up each tab. Slide each 5" by 3/4" strip into the notches of the 7" by 1" strips to form the organizer grid.
Place the completed grid inside the tray.
Then place the tray into the full wood-mount stamp case.
Lastly, fill your organizer with sponge daubers.
Here is the case closed.
I hope you give this sponge dauber organizer a try. I would love to see what you make!
Thanks for stopping by!
Beth
Tuesday, September 13, 2016
New Products Added!
New products have been added to the Clearance Rack! Discounts are up to 60%! There are a ton of - 107 - amazing papers, stamps, and embellishments available again for as long as they are in supply.
Holy cow! This selection is awesome! This may be the best Clearance Rack ever! Blackberry Bliss cardstock is back! Winter Wonderland Vellum DSP stack is back! Love! I cannot foresee these goodies being in stock for very long!
I am ecstatic that the Gift Bow Bigz Die, the Banner Punch, and the 7-8" Scalloped Circle Punch are back while supplies last! These are three of my favorite must have tools that retired in June. I recommend snatching them up while you can, especially with the holidays coming soon! They are perfect for gift wrapping.
I made a sweet gift basket using the Gift Bow Bigz Die and the 7-8" Scalloped Circle Punch. Look how fluffy this bow is! I know for a fact that the recipient of this gift basket still has this bow and will not part with it! It is that fabulous!
This DSP is called Merry Moments and is also available on the Clearance Rack! So are the Iced Rhinestones! Score!
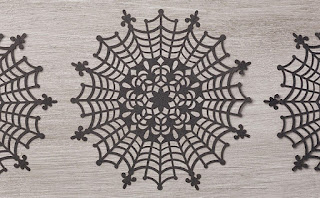
Spider Web Doilies are back too! I can't believe it! Just in time for Halloween! I loved these doilies! You can cut them out, sponge them, add glitter or embossing powder to them!
If you would like to place an order for any of these fantastic products, please contact me today or shop in my online store! Clearance items as fabulous as these will NOT last long. Please don't miss out!
Thanks for stopping by!
Beth
Monday, September 12, 2016
A Bushel Full of Blessings
Fall is my favorite season! I love the crisp autumn air, the cozy sweaters, and the crackle of the leaves underfoot! The Basket of Wishes stamp set invokes all of these memories and feelings!
Here is another Thanksgiving card with similar materials to Friday's post. It is fun to try the same materials but in a different arrangement! It's almost like being on Chopped but without being sent home!
The Blender Pens are used again to color in the vegetables and the basket. I used Crumb Cake, Daffodil Delight, Garden Green, Always Artichoke, and Pumpkin Pie.
I stamped the sentiment and three little pumpkins on the inside. You can substitute another sentiment on the inside, such as one from Suite Seasons or leave it blank for a hand written sentiment.
But, that's not all you can use Basket of Wishes for! There are two more baskets, more sentiments, and more goodies to fill the basket with. I look forward to creating even more Basket of Wishes projects!
How would you rearrange this layout? What colors would you use? I would love to see what you make!
Thanks for stopping by!
Saturday, September 10, 2016
Updated: Designer Series Paper Coordination Chart
I have updated the Designer Series Paper Coordination Chart to include all of the currently available Designer Series Paper (DSP) stacks. These charts help you to identify and to coordinate the colors in each DSP stack with your project.
Thanks for stopping by!
Beth
Friday, September 9, 2016
Thanksgiving Basket of Wishes
I can also see the baskets to hold little balls of yarn made from Baker's Twine. How about putting a few of the smallest sock image from Hang Your Stocking to make it a laundry basket?!
Here I used the pumpkins and gourds image to make a Thanksgiving card. I stamped the basket image first onto Very Vanilla cardstock and then the pumpkins and gourds image on top. Because these stamps are photopolymer, it was very easy to align them! I did not even use a mask!
I colored the basket and vegetables using the Blender Pen and ink pads for a softer look. The ink colors are Daffodil Delight, Pumpkin Pie, Cajun Craze, Garden Green, Soft Suede, and Crumb Cake.
I stamped Happy Thanksgiving with Early Espresso ink onto Very Vanilla cardstock. I punched it out with the Word Window Punch. This punch is now retired. However, I recommend using the new Classic Label Punch. I do not have the Classic Label Punch yet. It is on my list, for sure!
The inside of the card has my favorite sentiment from Basket of Wishes. It truly expresses my gratitude for all of my loved ones!
Thanks for stopping by!
Beth
Thanksgiving Basket of Wishes 01 Card Project
Supply List
|
|
Stamps
|
#144328 Thoughtful Branches Bundle
#142200 Basket of Wishes
#127802 Teeny Tiny Wishes (Clear Mount)
#128748 Teeny Tiny Wishes (Wood Mount)
|
Paper
|
#101650 Very Vanilla
#119684 Cajun Craze
|
Ink
|
#126974 Early Espresso
#126965 Cajun Craze
#126973 Garden Green
#126944 Daffodil Delight
#126945 Pumpkin Pie
|
Embellishments
|
#104199 Linen Thread
#104430 Stampin’ Dimensionals
|
Tools
|
#143263 Big Shot Machine
#141706 Layering Ovals Framelits
#138287 Elegant Dots TIEF
#102845 Blender Pens
|
Subscribe to:
Comments (Atom)


