Friday, October 7, 2016

Floral Boutique Birthday Wishes

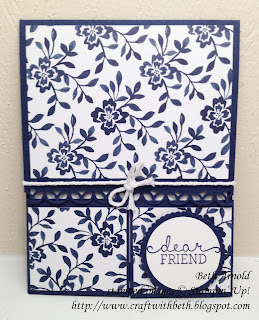
Today's card features a fun fold called Double Dutch. This card opens like a Dutch door but with two bottom doors instead of one. So cute!

Craft with Beth: Floral Boutique Designer Series Paper Birthday Card Double Dutch Gate Fold Birthday Blooms   #imbringingbirthdaysback

The Floral Boutique Designer Series Paper (DSP) is definitely the focus here! This is my Mom's favorite DSP. Floral Boutique DSP reminds me of a floral quilt she made a few years ago with the same navy and white color palette. It has such a sweet pattern!

Floral Boutique DSP is also part of the Designer Series Paper Sale! What a great time to give this fun fold a try!

Craft with Beth: Floral Boutique Designer Series Paper Birthday Card Double Dutch Gate Fold Birthday Blooms   #imbringingbirthdaysback

The Double Dutch Fold was quick and easy to put together. Below are the measurements for each of the pieces. Cut each of the pieces before you assemble the base of the card.

Floral Boutique Birthday Card Measurements

Color
Dimensions
Card Base
Night of Navy
4-3/16” x 9-1/4”; scored at 5-1/2”
Double Doors
Night of Navy
2” x 8-1/2”; scored at 2-1/8” & 6-3/8”
Front Top DSP Rectangle
Floral Boutique DSP
2-15/16” x 3-15/16”
Front Bottom DSP Squares (2)
Floral Boutique DSP
2” x 2”
Sentiment Circle
Whisper White
1-1/2” Circle
Sentiment Circle Mat
Night of Navy
1-3/4” Scalloped Circle
Inside Layer
Whisper White
5-1/4” x 4”

After your pieces are cut, it's time to create the detailed edge on the bottom of the top fold. I wanted a scalloped edge but didn't have a punch or an edgelit die. I created one by using the circular motif strip from the Flourish Thinlits. By partially die-cutting the circular motif strip, I created a decorative edge that was still attached to the card base. Talk about double duty for your thinlits!

Partially die-cutting is not as difficult as it sounds. Place the card base on the Big Shot Precision Base Plate with the top flap up. Place the entire circular motif die just above the edge of the top flap of the card base. Secure the die and card base with washi tape.

Craft with Beth: Floral Boutique Designer Series Paper Birthday Card Double Dutch Gate Fold Birthday Blooms   #imbringingbirthdaysback

Position the clear plate halfway on the circular motif die. Slowly crank the platform through the Big Shot twice, keeping the clear plate partially on the circular motif die. Take your time.

How pretty does this decorative edge look!? I think it gives a delicate detail that is certainly a wow factor.

Craft with Beth: Floral Boutique Designer Series Paper Birthday Card Double Dutch Gate Fold Birthday Blooms   #imbringingbirthdaysback

Next take the 2" by 8-1/2" piece of Night of Navy cardstock, center it with the bottom of your card base and adhere it.

Add the DSP rectangle and squares to the front of the card. Tie a bow with the Whisper White Thick Baker's Twine.

Stamp the dear friend sentiment onto Whisper White cardstock. Punch out with a 1-1/2" circle. Die cut a 1-3/4" scalloped circle from Night of Navy cardstock. Adhere the sentiment circle to the scalloped circle. Add dimensionals to the back and adhere to the lower right square on the card front.

Stamp the happiest of birthday wishes sentiment and the small flowers on the inside layer and attach to the inside of the card.

Have you tried the Double Dutch Fun Fold? I would love to see how you would recreate this card!

Thanks for stopping by!
Beth


Floral Boutique Birthday Card Project Supply List
Stamps
#140658 Birthday Blooms Clear-Mount
#140655 Birthday Blooms Wood-Mount
Paper
#100867 Night of Night CS
#100730 Whisper White CS
#141663 Floral Boutique DSP
Ink
#126970 Night of Navy
Embellishments
#141688 Whisper White Thick Baker's Twine
#104430 Stampin’ Dimensionals
Tools
#138299 1-1/2" Circle Punch
#141705 Layering Circles Framelits
#141478 Flourish Thinlits 
#143263 Big Shot Machine
#139684 Precision Base Plate

Wednesday, October 5, 2016

Copper Foil Paper Update

Craft with Beth: Copper Foil Paper is Amazing!

Stampin' Up! announced that sales for the absolutely gorgeous Copper Foil Paper (Item #142020) was so popular that it is now out of stock and on backorder.

It may take some time for the Copper Foil Paper to return to stock.The expected return date of the Copper Foil Paper (as of this post) is October 24th, 2016.

However, this date may change. I am keeping an eye on the order status and will update as I know more.

Craft with Beth: World Card Making Day Sale Graphic

Today is also the last day for the World Card Making Day Sale. Please don't miss out on this fantastic savings! I have my eye on the Fast Fuse Adhesive!

Craft with Beth: World Card Making Day Sale Chart Graphic


Thanks for stopping by!
Beth

Saturday, October 1, 2016

Designer Series Paper Sale: Buy 3 Get 1 FREE!

Craft with Beth: Designer Series Paper Sale!!

From October 1st to October 31st, eight great designs of Designer Series Paper (DSP) is on sale! This is fabulous news because I know you love Designer Series Paper as much as I do!

For every three packages of participating Designer Series Paper you purchase, you get a fourth participating Designer Series Paper Pack for FREE! What a fantastic time to stock up on your favorites or try something new! Below are the 8 designs that are participating in the sale.


Craft with Beth: Designer Series Paper Sale Chart

Plus, there is no limit on how many times you can purchase three packages of Designer Series Paper. However, Designer Series Paper purchased with Stampin' Rewards or with Stampin' Rewards 50% does not qualify for this sale. Specialty Designer Series Paper and Designer Series Paper Stacks do not qualify for this promotion and cannot be redeemed through this offer. Designer Series Paper purchased as part of a Starter Kit does not qualify for this promotion.

Honestly, I love all of the Designer Series Paper package! Which Designer Series Paper packs are your favorites?

Try incorporating your favorite Designer Series Paper into these fabulous card sketches!


Craft with Beth: Designer Series Paper Sale Sketch Graphic

I would love to see what you create with your favorite Designer Series Paper!  I think it would be great fun to have a card swap get together! What do you think? If you are interested, please let me know so we can organize a swap get together!

Thanks for stopping by!
Beth  

Happy World Card Making Day!

World Card Making Day Title Graphic

Today - Saturday, October 1st - is World Card Making Day! Let's celebrate together! Stop by on from 9am to 12pm for a FREE Make and Take!

Stampin' Up! is also having a sale in honor of World Card Making Day! Select products will be on sale for 15% to 25% off the retail price! Woohoo! Below are the products on sale. This sale only lasts from October 1st to October 5th. Don't miss these amazing deals!


World Card Making Day Sale Chart


These fantastic deals are only available for a few days - October 1st to October 5th. Place your order soon!

Come on over from 9am to 12pm to make a free card to celebrate! I look forward to creating fabulous cards with you!

Thanks for stopping by!
Beth 

Thursday, September 29, 2016

CASE-ing the Catty: Gingerbread Christmas

The project samples in the Holiday Catalog are fabulous! I could not help but recreate this sweet gingerbread man Christmas card from page 4. Isn't he adorable?!?

Craft with Beth: CASE-ing the Catty Cookie Cutter Christmas Card Candy Cane Lane Baker's Twine Candy Cane Lane Designer Series Paper DSP

This card was quick and easy to make. Here's how I did it. You will need Crumb Cake, Real Red,  and Whisper White cardstock and Candy Cane Lane Designer Series Paper (DSP). Cut the paper to size according to the chart below.

Gingerbread Cookie Christmas Card Measurements

Color
Dimensions
Card Base
Crumb Cake
5-1/2” x 8-1/2”
1st Layer
Candy Cane Lane DSP
3-3/4” x 5-1/4”
Greeting Rectangle
Whisper White
1-1/2” x 4”
Gingerbread Man
Whisper White
3” x 2”
Heart Buttons
Real Red
2” x 2”
Inside Layer
Whisper White
4” x 5-1/4”

Adhere the Candy Cane Lane DSP to the Crumb Cake cardbase.

Then stamp your greeting with Early Espresso ink on the Whisper White rectangle. Stamp the gingerbread man with Crumb Cake ink on a scrap of Whisper White cardstock and punch him out.

Punch two hearts from Real Red cardstock and glue over the gingerbread man's buttons. Add dimensionals to the back of the gingerbread man.

Adhere the gingerbread man and the greeting rectangle to the card base.

Finally, tie a piece of Candy Cane Lane Baker's Twine around the left side of the card base. Your card is ready for giving!

Thanks for stopping by!
Beth


Gingerbread Cookie Christmas Card Project Supply List
Stamps
#143493 Cookie Cutter Christmas Bundle (Photopolymer Stamp Set & Punch)
Paper
#102482 Real Red
#120953 Crumb Cake
#100730 Whisper White
#141981 Candy Cane Lane DSP
Ink
#126974 Early Espresso
#126975 Crumb Cake
Embellishments
#141983 Candy Cane Lane Baker’s Twine
#104430 Stampin’ Dimensionals
Tools
#126199 Stampin’ Pierce Mat