Wednesday, November 9, 2022

Make a Sweet Gift with this Turkey Punch Art Treat Holder

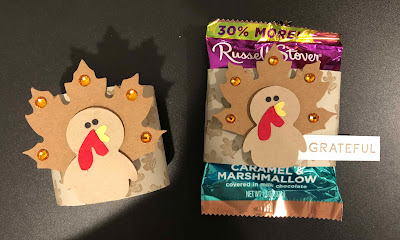
I am back with a second way to use Libby Fen's amazing turkey punch art! Today's project is a sweet chocolate marshmallow punch candy treat wrapper featuring Libby's turkey punch art.

turkey punch art candy wrapper. cardstock candy wrapper is wrapped around a chocolate marshmallow pumpkin candy. Thanksgiving, punch art, penguin builder punch, Painted Pheasant, 3D, treat holder


The candy wrapper starts off the same way the turkey punch art napkin ring on Monday did. Stamp the leaves image with Crumb Cake ink all over the Sahara Sand wrapper base.

stamp the leaves on the candy wrapper base. Thanksgiving, punch art, penguin builder punch, Painted Pheasant, 3D, treat holder

Curl the wrapper base with a bone folder to help wrap it around the candy. Wrap the wrapper base around the candy starting in the center of the front. Wrap the cardstock around the candy, so that the ends meet in the center of the front of the candy. Adhere the ends together with liquid glue or tear and Tape Adhesive.


adhere the turkey punch art candy wrapper ends together. cardstock candy wrapper is wrapped around a chocolate marshmallow pumpkin candy. Thanksgiving, punch art, penguin builder punch, Painted Pheasant, 3D, treat holder

Stamp the grateful greeting with Crumb Cake ink onto a Basic White cardstock rectangle. Stamp the greeting toward the right side, so that you can tuck the left side of the greeting underneath of the turkey punch art.

Adhere the greeting to candy wrapper on the right side and slightly to the right of the center.


turkey punch art candy wrapper. cardstock candy wrapper is wrapped around a chocolate marshmallow pumpkin candy. Thanksgiving, punch art, penguin builder punch, Painted Pheasant, 3D, treat holder

Build the turkey punch art. Punch the body of the turkey using the Penguin Builder Punch and Crumb Cake cardstock. Punch the eyes from the Whale Builder Punch and Basic Black cardstock. Punch the wattle from the Whale Builder Punch spout and Real Red cardstock. Punch the beak from the Song Bird Punch and Daffodil Delight cardstock. Adhere the eyes, wattle, and beak to the turkey's body.


add dimensionals to the punch art. Thanksgiving, punch art, penguin builder punch, Painted Pheasant, 3D, treat holder

Add three dimensionals vertically down the center of the back of the turkey's body. Attach a maple leaf die cut from the Leaf Label and Amber Gems Combo Pack to the back of the turkey's body. Add amber gems to each of the ends of the feathers.

Then add 4 dimensionals vertically down the center of the back of the maple leaf. In the photo above, you will see 3 dimensionals on the leaf. Add 1 more dimensional right on top of the dimensional at the bottom of the turkey body. This will form a double layer of dimensionals to evenly support and level the punch art on the candy wrapper.


side view of add dimensionals to the punch art. Thanksgiving, punch art, penguin builder punch, Painted Pheasant, 3D, treat holder

Below are the measurements and the supply list for my Thanksgiving turkey candy wrapper. If you need supplies to recreate this project, please, shop my online store HERE.

Measurements

  • Candy Wrapper: 2" x 7-1/2" (Sahara Sand Cardstock)
  • Greeting: 1/2" x 2-1/4" (Basic White Cardstock)
  • Turkey: 2" x 2-1/4" (Crumb Cake Cardstock)
  • Turkey Beak: 1" x 2" (Daffodil Delight Cardstock)
  • Turkey Wattle: 1" x 2" (Real Red Cardstock)
  • Turkey Eyes: 1" x 2" (Basic Black Cardstock)
  • Feathers: use a leaf from the Leaf Label and Amber Gems Combo Pack


Supplies

Stamps
#159846 Painted Pheasant

Ink
#147116 Crumb Cake Ink Pad

Paper
#121043 Sahara Sand Cardstock
#120953 Crumb Cake Cardstock
#119683 Daffodil Delight Cardstock
#102482 Real Red Cardstock
#121045 Basic Black Cardstock

Embellishments
#159969 Leaf Label and Amber Gems Combo Pack
#104430 Dimensionals

Tools
#152699 Whale Builder Punch
#158726 Song Bird Punch
#156452 Penguin Builder Punch
#154031 Tear and Tape Adhesive
#117147 Clear Block B
#118489 Clear Block G
#110755 Multipurpose Liquid Glue
#102300 Bone Folder
#103579 Paper Snips
#130148 Grid Paper
#152392 Paper Trimmer
#126200 Stampin' Scrub
#153648 Stampin' Mist Cleaner


turkey punch art candy wrapper and turkey punch art napkin ring. cardstock candy wrapper is wrapped around a chocolate marshmallow pumpkin candy. Thanksgiving, punch art, penguin builder punch, Painted Pheasant, 3D, treat holder
 
There are so many more ways to decorate for Thanksgiving with this delightful turkey punch art! I would love to see how you use this turkey punch art for your Thanksgiving celebration! Post a photo of your turkey punch art project and tag me on social media with #craftwithbeth. I can't wait to see what you create!

I hope you enjoyed today's turkey punch art candy wrapper. If you need supplies to make this project, please, shop my online store HERE.

Thanks for stopping by!
Beth

Monday, November 7, 2022

Set Your Thanksgiving Table with Turkey Punch Art Decor!

When I saw Libby Fen's punch art turkey card using the Penguin Builder Punch, I just had to create a project using her punch art design! Libby's turkey punch art is so perfect, festive, and adorable! It is great for your Thanksgiving guests of all ages! Today's project is a custom napkin ring for your Thanksgiving table.

Thanksgiving napkin ring with a punch art turkey on the front. A maple leaf die cut is used for the turkey's feathers. Thanksgiving, punch art, penguin builder punch, Painted Pheasant, 3D, table setting, home decor


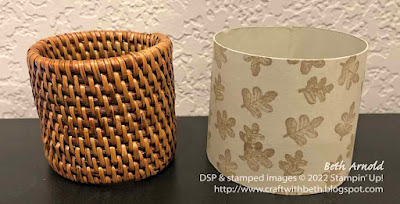
I made a napkin ring for the Thanksgiving table featuring Libby's punch art turkey. The napkin ring base is Sahara Sanda cardstock stamped with the leaves from Painted Pheasant. Attached to the front is the turkey punch art. I love the addition of the amber gems to the ends of the turkey's "feathers"! How clever and beautiful!

Thanksgiving napkin ring with a punch art turkey on the front. A maple leaf die cut is used for the turkey's feathers. Thanksgiving, punch art, penguin builder punch, Painted Pheasant, 3D, table setting, home decor
 

First, I stamped the leaves image with Crumb Cake ink on a 2" x 7-3/4" piece of Sahara Sand cardstock. Then I added a piece of Tear and Tape Adhesive vertically to the left edge of the cardstock.

Stamp the leaves on the napkin ring base, add adhesive, and curl. Thanksgiving, punch art, penguin builder punch, Painted Pheasant, 3D, table setting, home decor


Next I curled the cardstock with a bone folder to  help the cardstock become a cylinder shape.

Form the napkin ring shape around a store bought napkin ring. Thanksgiving, punch art, penguin builder punch, Painted Pheasant, 3D, table setting, home decor

I used a napkin ring that I had to help shape the cardstock napkin ring. This is not necessary, but it was helpful for me to form the napkin ring cyclinder shape. Remove the Tear and Tape Adhesive and adhere the cardstock ends together to complete the napkin ring base.

cardstock napkin ring wrapped around the store bought napkin ring to help make the cylindrical shape. Thanksgiving, punch art, penguin builder punch, Painted Pheasant, 3D, table setting, home decor


If you are using a store bought napkin ring as a form, you can now remove it from the cardstock napkin ring base.

cardstock napkin ring wrapped around the store bought napkin ring to help make the cylindrical shape. Thanksgiving, punch art, penguin builder punch, Painted Pheasant, 3D, table setting, home decor

Build the turkey punch art. Punch the body of the turkey using the Penguin Builder Punch and Crumb Cake cardstock. Punch the eyes from the Whale Builder Punch and Basic Black cardstock. Punch the wattle from the Whale Builder Punch spout and Real Red cardstock. Punch the beak from the Song Bird Punch and Daffodil Delight cardstock. Adhere the eyes, wattle, and beak to the turkey's body.
 

Thanksgiving, punch art, penguin builder punch, Painted Pheasant, 3D, table setting, home decor

Add 3 dimensionals vertically down the center of the back of the turkey's body. Attach a maple leaf die cut from the Leaf Label and Amber Gems Combo Pack to the back of the turkey's body. Add amber gems to each of the ends of the feathers.

Then add 4 dimensionals vertically down the center of the back of the maple leaf. In the photo below, you will see 3 dimensionals on the leaf. Add 1 more dimensional right on top of the dimensional at the bottom of the turkey body. This will form a double layer of dimensionals to evenly support and level the punch art on the napkin ring.

add dimensionals to the back of the punch art and the leaf to attach it to the napkin ring base. Thanksgiving, punch art, penguin builder punch, Painted Pheasant, 3D, table setting, home decor

Adding dimensionals down the center of the punch art enables the cardstock to move and bend when being used without tearing or being too fragile.

Below are the measurements and the supply list for my Thanksgiving napkin ring. If you need supplies to recreate this project, please, shop my online store HERE.

Measurements

  • Napkin Ring Base: 2" x 7-3/4" (Sahara Sand Cardstock)
  • Turkey: 2" x 2-1/4" (Crumb Cake Cardstock)
  • Turkey Beak: 1" x 2" (Daffodil Delight Cardstock)
  • Turkey Wattle: 1" x 2" (Real Red Cardstock)
  • Turkey Eyes: 1" x 2" (Basic Black Cardstock)
  • Feathers: use a leaf from the Leaf Label and Amber Gems Combo Pack


Supplies

Stamps
#159846 Painted Pheasant

Ink
#147116 Crumb Cake Ink Pad

Paper
#121043 Sahara Sand Cardstock
#120953 Crumb Cake Cardstock
#119683 Daffodil Delight Cardstock
#102482 Real Red Cardstock
#121045 Basic Black Cardstock

Embellishments
#159969 Leaf Label and Amber Gems Combo Pack
#104430 Dimensionals

Tools
#152699 Whale Builder Punch
#158726 Song Bird Punch
#156452 Penguin Builder Punch
#154031 Tear and Tape Adhesive
#117147 Clear Block B
#110755 Multipurpose Liquid Glue
#102300 Bone Folder
#103579 Paper Snips
#130148 Grid Paper
#152392 Paper Trimmer
#126200 Stampin' Scrub
#153648 Stampin' Mist Cleaner
Napin Ring (optional)


For today's project I used a cloth napkin. However, A paper napkin would be just as festive too! There are so many beautiful, seasonal paper napkins available too.

Not a fan of napkin rings? Check back here on my blog on Wednesday, I will show you how to turn this turkey punch art into something sweet!

I hope you enjoyed today's fun Penguin Builder Punch Thanksgiving napkin ring. If you need supplies to make this project, please, shop my online store HERE.

If you have any questions about today's project, please, don't hesitate to ask me.

Thanks for stopping by!
Beth

Friday, November 4, 2022

Make your Thanksgiving Extra Special with these Festive Treat Boxes

Today's Thanksgiving treat boxes were inspired by a project shared by fellow demonstrator Julie DeMatteo. Julie shared a treat box that she modified from fellow demonstrator Katja Hamann. Julie resized Katja's original box to fit a Reese's peanut butter egg. I am using Julie's resized box measurements for my Thanksgiving treat box.

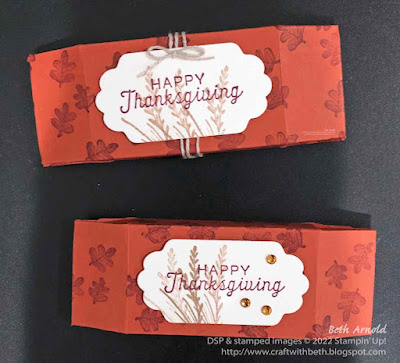
Thanksgiving rectangular treat boxes. the ends of the boxes are bent at slight angles to give a cinched appearance. Thanksgiving, treat holder, box, gift packaging, Painted Pheasant, 3D


I enjoy creating and making different shaped treat holders. When I saw both Julie's and Katja's boxes, I thought that the shape and construction was very intriguing. I had to try it!

I made two treat boxes right away! I decorated both treat boxes with the leaves stamp from the Painted Pheasant stamp set and Rich Razzleberry ink.

I die cut the small label from the Seasonal Dies and a piece of Very Vanilla cardstock. The Happy Thanksgiving greeting is stamped in the center with Rich Razzleberry ink. The grassy reeds are stamped with Crumb Cake ink with full strength ink and stamped off strength ink.

On one of the boxes I wrapped linen thread and added a box to the top of the greeting. On the other box I added 3 amber gems to the right of the greeting and the grassy reeds.


Thanksgiving rectangular treat boxes. the ends of the boxes are bent at slight angles to give a cinched appearance. Thanksgiving, treat holder, box, gift packaging, Painted Pheasant, 3D


Below are the measurements and the supply list for my Thankgiving treat boxes. If you need supplies to recreate these treat boxes, please, shop my online store HERE.


Measurements

  • Treat Holder Base: 6-1/4" x 5-3/8"; scored on the 6-1/4" side at 5/8", 1-5/8", 4-5/8"; scored on the 5-3/8" side at 3/4", 2-1/2", 3-1/4", and 5"; scored on the 5-3/8" side only down to the 1st horizontal score line at 3/8" and 2-7/8" (flip the cardstock to score on the opposite side)
  • Greeting Label: 2" x 3" (Very Vanilla Cardstock)


Supplies

Stamps
#159846 Painted Pheasant Stamp Set

Paper
#119684 Cajun Craze Cardstock
#101650 Very Vanilla Cardstock

Ink
#147091 Rich Razzleberry Ink Pad
#147116 Crumb Cake Ink Pad

Embellishments
#159969 Leaf Label and Amber Gems Combo Pack
#104199 Linen Thread
#104430 Dimensionals

Tools
#156299 Seasonal Label Dies
#122334 Simply Scored Scoring Tool
#110755 Multipurpose Liquid Glue
#102300 Bone Folder
#103579 Paper Snips
#130148 Grid Paper
#152392 Paper Trimmer
#149653 Stampin' Cut & Emboss Machine
#126200 Stampin' Scrub
#153648 Stampin' Mist Cleaner
#117147 Clear Block B
#118490 Clear Block H
1/2" Circle Punch
Corner Rounder Punch


I hope you enjoyed today's Thanksgiving treat boxes and give them a try! You can also put other treats in this box, including other types of chocolate or candy, small gifts, puzzle pieces, and more! What will you put in your treat boxes?

I would love to see what treat boxes you make! Post your treat box photos on social media and be sure to tag me with #craftwithbeth. I can't wait to see what you create!

If you need supplies to make these boxes, please, shop my online store HERE.

If you have any questions about today's project, please, don't hesitate to ask me.

Thanks for stopping by!
Beth

Thursday, November 3, 2022

Use Stencils to Create a Cozy Thanksgiving Card

Each Tuesday I send out my stamping newsletter to my email list. On November 8th, I will be sharing a Thanksgiving card and how to make a stenciled background with harvest colors.

Thanksgiving card with a pumpkin and a maple leaf with a plaid pattern in the background, Thanksgiving, stenciling, Painted Pheasant, stencil, technique


This Thanksgiving card is only available to my email list subscribers. If you are already on my email list, you will automatically receive the project supply list, measurements, and instructions for this card.

If you are not on my email list and would like to receive the project supply list, measurements, and instructions for this harvest card, please, sign up for my email list by November 7th, 2022.

Sign up for my mailing list today HERE or in the bright blue sign up box in the upper right corner of my blog. 

I can't wait to welcome you as a subscriber!
Beth

Wednesday, November 2, 2022

Happy Place Floral Center Easel Card

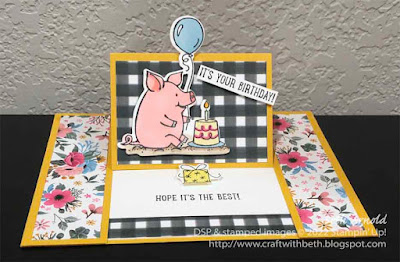
Happy Birthday! For today's project, I created a center easel fun fold card using the This Birthday Piggy stamp set. This Birthday Piggy features 3 adorable pigs celebrating their and your birthday.

center easel card, birthday, fun fold, Birthday Piggies, Fitting Florets DSP

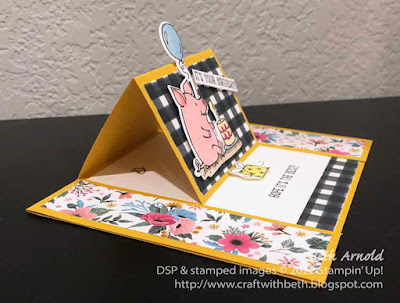
The center panel, decorated with a piggy about to blow out a birthday candle, sits up and is held in place by a stamped present stopper. This fun fold makes for a great display card for all ages!

side view of the center easel card, birthday, fun fold, Birthday Piggies, Fitting Florets DSP


I like this fun fold because it is easy to cut the card base, it is customizable to any occasion, holiday, recipient, and color palette, the card folds flat for mailing, and it can fit inside of a A2 envelope.

center easel card, birthday, fun fold, Birthday Piggies, Fitting Florets DSP


I had so much fun with the Fitting Florets and This Birthday Piggy stamp set that I made another center easel card! This time I used the pig relaxing in the mud. This sweet piggy reminded me of relaxing at the salt cave! What a wonderful way to spend a birthday!

center easel card, birthday, fun fold, Birthday Piggies, Fitting Florets DSP


center easel card, birthday, fun fold, Birthday Piggies, Fitting Florets DSP
 

Below are the measurements and supply list to recreate this center easel birthday card. If you need supplies to recreate this fun fold card, please, shop my online store HERE.


Measurements

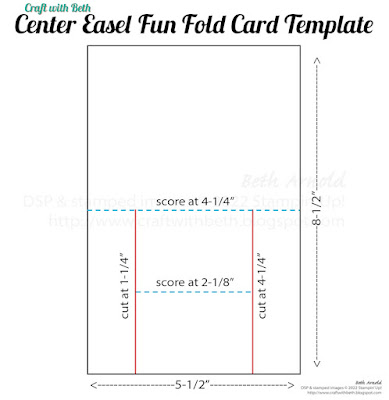
  • Card Base: 8-1/2" x 5-1/2"; scored at 4-1/4" and then cut at 1-1/4" & 4-1/4" only on the card front; score the center front panel at 2-1/8" (see the center easel fun fold card template below)
  • DSP Side Panels (cut 2): 1" x 4" (Fitting Florets Designer Series Paper (DSP))
  • DSP Center Panels (cut 2): 2-3/4" x 1-7/8" (Fitting Florets Designer Series Paper (DSP))
  • Inside Mat: 3-1/2" x 4" (Basic White Cardstock)
  • Inside DSP Strip: 1/2" x 3-1/2" (Fitting Florets Designer Series Paper (DSP))
  • Stopper: 1" x 1" (Basic White Cardstock)
  • Piggy: 3" x 2-1/2" (Basic White Cardstock)


Supply List

Stamps
#159107 This Birthday Piggy Stamp Set
#160698 Warm Welcome Stamp Set


Paper
#131199 Crushed Curry Cardstock
#146982 Balmy Blue Cardstock
#159276 Basic White Cardstock
#161814 Fitting Florets Designer Series Paper (DSP)


Ink
#132708 Memento Tuxedo Black Ink Pad
#154830 Balmy Blue Stampin' Blends Combo Pack (both)
#154884 Flirty Flamingo Stampin' Blends Combo Pack (both)
#154904 Smoky Slate Stampin' Blends Combo Pack (light)
#154902 Soft Sea Foam Stampin' Blends Combo Pack (dark)
#154897 Pumpkin Pie Stampin' Blends Combo Pack (both)
#154882 Crumb Cake Stampin' Blends Combo Pack (both)
#154905 So Saffron Stampin' Blends Combo Pack (both)
#153112 Melon Mambo Stampin' Blends Combo Pack (dark)
#155517 Evening Evergreen Stampin' Blends Combo Pack (light)


Embellishments
#104430 Dimensionals


Tools
#160254 Birthday Piggies Dies (retired) - these dies are optional; you can fussy cut the pig images or die cut them with an oval
#110755 Multipurpose Liquid Glue
#102300 Bone Folder
#103579 Paper Snips
#130148 Grid Paper
#152392 Paper Trimmer
#126200 Stampin' Scrub
#153648 Stampin' Mist Cleaner
#118487 Clear Block A
#118486 Clear Block C
#118485 Clear Block D
#118489 Clear Block G
#118490 Clear Block H


I created a template showing the cutting and scoring lines for this center easel birthday piggy card. The red lines indicate the cut lines. The blue dashed lines indicate the scoring lines.

center easel fun fold card template graphic; Birthday Piggies, birthday, center easel card, fun fold, card, Fitting Florets DSP


I hope you enjoyed today's Birthday Piggies center easel fun fold card. If you need supplies to make this birthday card, please, shop my online store HERE. ### insert link to shop here bit.ly/Craftwithbethshop ###


#### insert two cards together photo here - alt text: center easel card, birthday, fun fold, Birthday Piggies, Fitting Florets DSP  ####


If you have any questions about today's project, please, don't hesitate to ask me.

Thanks for stopping by!
Beth

Tuesday, November 1, 2022

The Winner of the Second Sunday Sketches #42nd is...

Donna Foreman! Congratulations, Donna! Donna is the winner of the 42nd Second Sunday Sketches card sketch challenge! Your prize, a mystery embellishment pack from my retired product cache and 3 handmade cards, will be in the mail on November 2nd, 2022.

Second Sunday Sketches #42 card entry Christmas card with church, evergreen trees, and snowflakes, silent night holy night is the written across the bottom

Donna's Christmas card is fabulous! I love how she used the church and trees image as the focal point. and then echoed the snow in her designer series paper and snowflake die cut embellishments! Just beautiful!

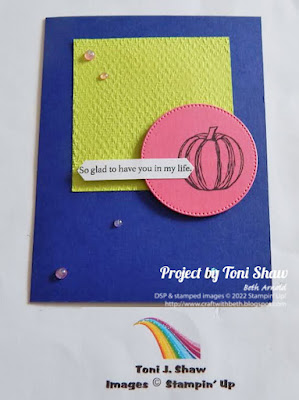
Check out the other entries for the 42nd Second Sunday Sketch card challenge. I love how Toni embossed the square with a textured embossing folder. Her color palette is bright and fun! Pat used the tree punch and the plaid designer series paper for her Christmas card. The use of the gold foil oval die cut and gold ink to echo the gold foil in the designer series paper is brilliant! 


Second Sunday Sketches #42 card entry Christmas card with pine tree punch in the center surrounded by a gold foil oval die cut and plaid patterned paper

Second Sunday Sketches #42 card entry friendship card thanksgiving card with a green square in the center, a circle die cut with a pumpkin stamped on it in the lower right corner, the greeting says so glad to have you in my life

Well done everyone! Thank you so much for participating in October's sketch challenge! I can't wait to see what you create for November's sketch!


Want More Second Sunday Sketches? 

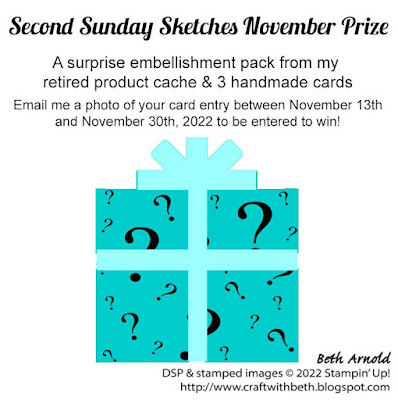
The next Second Sunday Sketches card challenge starts on November 13th. The prize will be a mystery embellishment package from my retired product cache and 3 handmade cards from me.

Second Sunday Sketches November 2022 Prize Graphic

Share Second Sunday Sketches with a Friend

Be sure to join in on the fun and share with a friend! If you enter the Second Sunday Sketches challenge, you can get a bonus surprise prize by sharing this challenge with a friend (for US residents only)! Here's how to get a bonus surprise prize. Limit two bonus surprise prizes per person per month.
  1. Enter into November's Second Sunday Sketches challenge
  2. Share November's Second Sunday Sketches challenge with a friend
  3. Have your friend submit their November's challenge card entry. Email me that your friend has submitted their card entry. Submit your complete mailing address and the name of the friend that you shared with. I will confirm their entry and then send you a bonus surprise prize 1-3 business days after I draw November's winner.


Happy Stamping!
Beth

P.S. Ever wonder how I draw for the Second Sunday Sketches winner? I use an app called Tiny Decisions. I input all of the names of the participants onto the wheel and spin it. The name that the wheel stops on is the winner.

Happy November! Elegant Present Christmas Card

Happy November! I just sent out my November newsletter to my mailing list. This month I shared how to make a Christmas card with a stack of Fitting Florets designer series paper presents.


Christmas card with mistletoe patterned paper with the words Merry Christmas in the center on a rectangle of white paper with a stack of presents to the left; Christmas, card, Brightest Glow, Fitting Florets DSP

I shared how I paper pieced the presents using a die. I also shared a tips, including what kitchen item I keep on my craft room desk at all times.


Fitting Florets Graphic Banner


The Fitting Florets Early Release is also available starting today, November 1st, 2022. This is a stunning stamp set and die set with beautiful floral swags and images. The early release product collection has limited time designer series paper, gold swirls embellishments, and a Christmas themed greeting stamp set Framed and Festive. Check out my blog post HERE or visit my online store HERE for more information too.

I have a new Host Code for November. It is 44QG6D4Q. Please, use the Host Code when placing orders for November 1st-30th, 2022 for orders under $150 USD before tax and shipping. If your order is more than $150 USD, please, do not use the Host Code.

My November newsletter is available all month to new subscribers. If you sign up for my email list during November, you will also receive a copy of my November newsletter with the instructions, supply list, and measurements for this paper pieced Christmas card. 

Sign up for my mailing list today HERE or in the bright blue box in the upper right corner of my blog. I can't wait to welcome you as a subscriber!

Beth

Fitting Florets Early Release is NOW available!

Fitting Florets Graphic Banner

 
It’s finally here! The Fitting Florets Early Release Product Offering is available starting today! Fitting Florets is a stamp set and die set that is being released early from the 2023 January-June Mini Catalog To make this early release even sweeter there is some limited time only designer series paper, Christmas stamp set, and embellishments as well!

Fitting Florets product offering square graphic


The Fitting Florets Early Release Product offering can be ordered as an entire collection or a la carte.

#163129 Fitting Florets Collection includes

  • #162407 Framed Florets Bundle
  • #161815 Framed Florets Photopolymer Stamp Set*
  • #160623 Framed Florets Dies
  • #160888 Framed & Festive Cling Stamp Set*
  • #161814 Fitting Florets Designer Series Paper
  • #161822 Gold Adhesive-Backed Swirls
  • *Available in English and French

The Fitting Florets are also offered a la carte.

  • #162407 Framed Florets Bundle
  • #161815 Framed Florets Photopolymer Stamp Set*
  • #160623 Framed Florets Dies
  • #160888 Framed & Festive Cling Stamp Set*
  • #161814 Fitting Florets Designer Series Paper
  • #161822 Gold Adhesive-Backed Swirls
  • *Available in English and French


You know I am not an automatic jumper in on early releases, but let me just say that this Fitting Florets early release offering is absolutely gorgeous! When I saw the samples during the World Card Making Day Virtual Event, I knew I had to order it. And, yes, I did order the entire Fitting Florets product offering and an extra pack of the designer series paper. 

I have created a few projects that I have shared in my newsletter and more are coming soon! Be sure to check tomorrow's blog post for an adorable birthday card!

Promotion Details

  • Demonstrator PreOrder Period
    • Phone: October 31st, 2022 at 6:59 p.m. (MT)
    • Online: October 31st, 2022 at 11:59 p.m. (MT)
  • Customer Sales Period
    • November 1st, 2022 - January 4th, 2023
  • Starting November 1st 2022, you can order items from the Fitting Florets Collection. All items in the collection can be ordered separately. No limits apply during the customer sales period. 
  • The following exclusive products are only available while supplies last:
    • Framed & Festive Cling Stamp Set (item 160888)*
    • Fitting Florets Designer Series Paper (item 161814)
    • Gold Adhesive-Backed Swirls (item 161822)
    • *Available in English and French
  • The following will be available for purchase in the Mini Catalog starting January 2023:
    • Framed Florets Bundle (item 162407)
    • Framed Florets Photopolymer Stamp Set (item 161815)*
    • Framed Florets Dies (item 160623)
    • *Available in English and French
  • Items available during this promotion can be added to demonstrator, customer, workshop, and online orders.
  • Qualifying orders are eligible for Stampin’ Rewards. Remember, the Fitting Florets Collection (item 163129) cannot be purchased at 50% off as part of the Stampin’ Rewards program.
  • Fitting Florets items can be added to a Starter Kit.
  • Customer Sales Deadlines
    • Phone: 4 January 2023, 6:59 p.m. (MT)
    • Online: 4 January 2023, 11:59 p.m. (MT)


Keep in mind that the Fitting Florets Designer Series Paper, Frame and Festive Stamp Set, and the Gold Adhesive-Backed Swirls are only while supplies last during the early release period (November 1st, 2022 - January 4th, 2023). The Fitting Florets stamps and dies will carry over into the 2023 January-June Mini Catalog.

Fitting Florets customer flyer graphic thumbnail


  • Download the customer sales flyer HERE or click on the flyer graphic above.
  • See the Fitting Florets Early Release product offering in my online store HERE.


If you have any questions about the Fitting Florets Early Release product offering, please, don't hesitate to ask me.

Thanks for stopping by!
Beth
There is still time to get the last 8 weeks!

12 weeks of Christmas logo graphic

You've already missed the first 4 weeks of my 12 Weeks of Christmas email series & you’ve missed some fantastic holiday projects. But you can still get the last 8 weeks if you sign up for my mailing list now HERE.

I look forward to welcoming you to my email list!

Beth

Friday, October 28, 2022

Christmas Wreath Pocket Gift Card Holder

Being a demonstrator, to me, means being part of an incredible stamping community. Part of my stamping community is my demonstrator team. They are an amazing group of ladies that I am so happy to be a part of! We talk throughout the week with each other, craft together, have in-person & online get togethers, go shopping together, have luncheons, play games, have bingo nights, and more.

We also have team meetings once a month on Zoom where we share projects and do challenges. Not all of my team members are local, and we all have different work hours, so it make sense to have our regular team meetings online.

pocket gift card holder with a wreath die cut in the center and the words Merry Christmas in the center of the wreath, Cottage Wreath, Christmas, Gift Card Holder, Pocket Card, 3D, Boughs of Holly DSP


During our October team meeting I shared a pocket gift card holder. The shape of this holder may be familiar, and I have made this style of pocket card before. However, the measurements for this gift card holder are my own.

pocket gift card holder with a wreath die cut in the center and the words Merry Christmas in the center of the wreath and the insert to the right with a gift card attached, Cottage Wreath, Christmas, Gift Card Holder, Pocket Card, 3D, Boughs of Holly DSP


I demonstrated how to make the pocket and how to make the insert. On the back of the insert is a piece of Basic White cardstock stamped with leaves, leaving plenty of room to write a special Christmas message.

pocket gift card holder with a wreath die cut in the center and the words Merry Christmas in the center of the wreath and the insert to the right, Cottage Wreath, Christmas, Gift Card Holder, Pocket Card, 3D, Boughs of Holly DSP


I named our team Purrfect Stampers because my husband and I have two adorable, amazing cats. We love and spoil our cats with toys, treats, blankets, and more! They are very loved! The name comes from a play on the words purr like the sound a cat makes and perfect. It is not a claim just a play on words. All of my team members also love animals.

Starter Kit Plus demonstrator joining special square graphic


Have you ever thought of becoming a Stampin' Up! demonstrator? There are still a few more days to take advantage of Stampin' Up!'s joining special - Starter Kit Plus!

New team members will get even MORE FREE products in their customizable Starter Kit. Between October 4th-31st, 2022, those who sign up can get $155 USD worth of eligible products for only $99 USD (plus local tax) + free business supplies + free shipping + all the fun being a part of Stampin’ Up! 

Sign up HERE or contact me today for more information. 

For more promotion details, please, see my blog post HERE or Stampin' Up! HERE.

I would love to welcome you to the Purrfect Stampers Team!

Please, note that these are just some of the things that my demonstrator team does. It is not necessarily indicative of any other or all demonstrator teams. This post doesn't make any claims and is anecdotal only to share what the Purrfect Stampers Team does.

Thanks for stopping by!
Beth

Wednesday, October 26, 2022

Quick and Easy Rustic Harvest Aromatherapy Air Freshener

During one of my demonstrator team get togethers we made different spa and home decor recipes, including a body butter, an oatmeal and chamomile facial, and this autumnal scented air freshener.

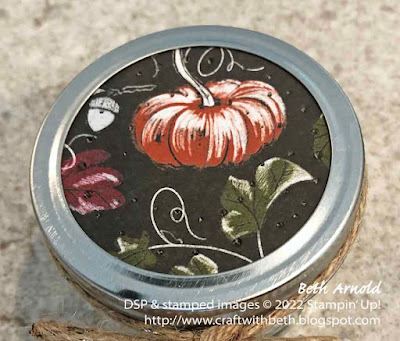
aromatherapy air freshener in a glass pint canning jar decorated with fall patterned paper, Rustic Harvest DSP, home decor, aromatherapy, air freshener
 

It was a big hit! First we traced the outside of the bottom of the jar ring (the part with the threads) with a pencil onto a piece of Rustic Harvest Designer Series Paper. We cut out the circle with paper snips and inserted the circle into the jar ring.

Then we filled the glass canning pint jars half full with Epsom salts and dried lavender flowers. We added the essential oils and stirred it well to combine. The essential oils are optional. The lavender flowers smell amazing on their own too. Gently crush them in your hands before adding them to the Epsom salts.

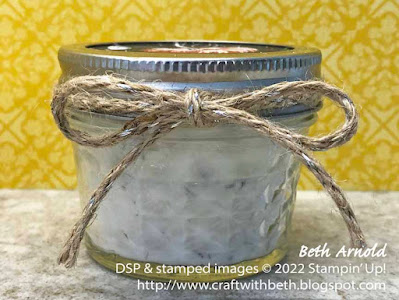
side view of the aromatherapy air freshener in a glass pint canning jar decorated with fall patterned paper showing the lavender flowers and epsom salts, Rustic Harvest DSP, home decor, aromatherapy, air fresheners


Next we added Epsom salts and lavender flower buds to fill the rest of the jar, added a few more drops of essential oil, and stirred well to combine. Adding the Epsom salts and lavender in two parts makes it a lot less messy. The first time I made these air fresheners I made a mess with the Epsom salts all over my kitchen island.

Finally, we put the lid on and added some holes to the designer series paper with the Take Your Pick Tool to allow the scent to fill the room.

top of an aromatherapy air freshener in a glass pint canning jar decorated with fall patterned paper, Rustic Harvest DSP, home decor, aromatherapy, air freshener
 

Please, note that this air freshener is intended to be placed in an area away from children and pets. This blog post is not intended to treat or diagnose anything, and is not advice of any kind. This blog post is anecdotal only of the steps we took to make this air freshener.

I put this air freshener in the powder bathroom in my house. The door stays closed almost all of the time, so the cats don't have access to it unsupervised.

Below are the measurements and supply list to recreate this fall scented air freshener. If you need supplies to recreate this home decor project, please, shop my online store HERE.


Measurements

  • Designer Series Paper Lid: 3-3/4" x 3-3/4" (Rustic Harvest Designer Series Paper (DSP))


Supply List

Paper
#159633 Rustic Harvest Designer Series Paper (DSP)


Embellishments
#159662 Silver-Threaded Twine


Tools
#103579 Paper Snips
#130148 Grid Paper
#152392 Paper Trimmer
#144107 Take Your Pick Tool
Glass Canning Jar with Lid Ring
Epsom Salts
Essential Oils (optional)
Dried Lavender Flowers
Fork


I could have added more decoration, but I didn't want the decorations to get wet or get soap on them. If this air freshener were for another room, I would definitely add more decorations like the banner stamp and die from the Hello Harvest Bundle. 

How would you decorate your air freshener? Leave me a comment below telling me what embellishments you would add.

I hope you enjoyed today's Rustic Harvest aromatherapy air freshener. If you need supplies to make this autumnal air freshener, please, shop my online store HERE.

If you have any questions about today's project, please, don't hesitate to ask me.

Thanks for stopping by!
Beth

Friday, October 21, 2022

Trio of Witch Hats Pumpkin Candy Wrapper

Today's project is a chocolate treat wrapper decorated with a trio of witch hats from the Bewitching stamp set and the Witch Hat Builder Punch. I make a lot of boxes and bags for treats that I thought a wrapper would be a fun way to package a treat!

chocolate pumpkin candy wrapped with a horizonal band of paper decorated with three witches hats in the center; halloween, treat holder, Bewitching, Best Witches, 3D, witch hat builder punch


Halloween is one of my favorite holidays. Halloween also has the best candy! I cannot go to the grocery store during the fall or any month with a holiday in it and not buy seasonal candy. In the grocery store that I most often go to the candy is in the center of the store, and you cannot go to the cash registers without passing buy it. So, of course, I have to look for the new candy!

This particular chocolate pumpkin candy is available during other times of the year, especially at Easter. I love the strawberry cream eggs that this brand makes! I was pleasantly surprised to see this chocolate pumpkin filled with caramel and marshmallow in the grocery store.

Below are the measurements and supply list to recreate this frightfully delicious candy wrapper. If you need supplies to recreate this project, please, shop my online store HERE.


Measurements

  • Belly Band: 2" x 8-1/2" (Parakeet Party Cardstock); trim excess cardstock as needed
  • Witch Hats (stamp all 3): 2-1/2" x 8-1/2" (Basic White Cardstock)
  • Greeting: 1" x 2" (Basic White Cardstock)


Supply List

Stamps
#159855 Bewitching Stamp Set (also available with the Witch Hat Builder Punch as a bundle with item #159857 Bewitching Bundle)
#159860 Best Witches Stamp Set

Paper
#159259 Parakeet Party Cardstock
#159276 Basic White Cardstock

Ink
#47099 Gorgeous Grape Ink Pad
#159208 Parakeet Party Ink Pad
#132708 Memento Tuxedo Black Ink Pad

Embellishments
#104430 Dimensionals

Tools
#159856 Witch Hat Builder Punch
#110755 Multipurpose Liquid Glue
#102300 Bone Folder
#103579 Paper Snips
#130148 Grid Paper
#152392 Paper Trimmer
#126200 Stampin' Scrub
#153648 Stampin' Mist Cleaner
#118485 Clear Block D
#118489 Clear Block G


close up of a chocolate pumpkin candy wrapped with a horizonal band of bright green paper decorated with three witches hats in the center; halloween, treat holder, Bewitching, Best Witches, 3D, witch hat builder punch


This candy wrapper comes together relatively quickly with little paper. You can cut 5 belly bands from one piece of 8-1/2" x 11" cardstock and 4 greeting strips from the inch left at the bottom, which makes it perfect for making multiples of for a party, a get together, coworkers, neighbors, community members, and more!

You can also customize the basic shape of this candy wrapper to fit any holiday or occasion. I can imagine making more of these for Thanksgiving to put one at each person's place setting! How would you customize this candy wrapper? Tell me in the comments below!

I hope you enjoyed today's Bewitching treat wrapper. If you need supplies to make this sweet treat wrapper, please, shop my online store HERE.

If you have any questions about today's project, please, don't hesitate to ask me.

Thanks for stopping by!
Beth

Thursday, October 20, 2022

Scrappy Designer Series Paper Christmas Card

Each Tuesday I send out my stamping newsletter to my email list. On October 25th, I will be sharing a Christmas card featuring a scraps of designer series paper. I am a saver of my designer series paper scraps. The patterned papers are so beautiful that it is difficult to toss all of the scraps. Next week's newsletter card shows you how to use scraps that you can't bear to toss but don't know what to do with.

Christmas card with vertical strips of Christmas patterned paper, the center greeting says Have a holly jolly Christmas; Christmas Season, Christmas to Remember, Painted Christmas Designer Series Paper, Christmas, card


This Painted Christmas DSP Christmas card is only available to my email list subscribers. If you are already on my email list, you will automatically receive the project supply list, measurements, and instructions for this card.

If you are not on my email list and would like to receive the project supply list, measurements, and instructions for this Christmas card, please, sign up for my email list by October 24th, 2022.

Sign up for my emailing list today HERE or in the bright blue sign up box in the upper right corner of my blog. I can't wait to welcome you as a subscriber!

Beth

Wednesday, October 19, 2022

The Clearance Rack has been Refreshed! Woohoo!

clearance rack banner graphic
 

The Clearance Rack has been refreshed with retired favorites! Hooray! There are several designer series paper packs, embellishments, punches, and more! 


Blackberry Beauty Designer Series Paper Graphic

If you missed the Blackberry Beauty Designer Series Paper last year, it is back and on the clearance rack right now while supplies last!

Check out the updated Clearance Rack in my online store HERE today!

Happy shopping!

Beth

Love at First Bite Halloween Treat Holder

Today's Halloween treat box features a peanut butter cup so big that even Count Dracula might not be able to bite through it!

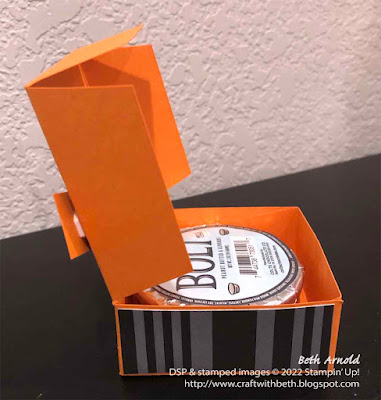
orange box decorated with black and gray striped paper around the side and an image of costomed trick-or-treaters underneath the moon and some bats; halloween, treat holder, Scary Cut, 3D, box


I found this enormous peanut butter cup at my favorite local sandwich shop - the one with the yellow and white striped bags. This sandwich shop sources a lot of locally made and small business food products. This peanut butter cup comes from a company in Nashville, TN. They always have something new and interesting to try!

opened view of the orange box decorated with black and gray striped paper around the side and an image of costomed trick-or-treaters underneath the moon and some bats showing a large peanut butter cup inside of the box; halloween, treat holder, Scary Cut, 3D, box


I created this box to hold the peanut butter cup as a Halloween treat for my husband. Peanut butter cups are one of his top favorite types of candy. You could also put other types of treats or small gifts in this box.

The style of this box is similar to a pizza-style box. The peanut butter cup sits inside of the bottom part and the back of the box has a hinged lid. I measured the diameter and the height of the peanut butter cup to determine the dimensions of the box. Then I added a little more to accommodate the fold lines.

side view of the opened orange box decorated with black and gray striped paper around the side and an image of costumed trick-or-treaters underneath the moon and some bats; Halloween, treat holder, Scary Cut, 3D, box


Below are the measurements and supply list to recreate this fa-boo-lous Halloween treat box. If you need supplies to recreate this treat box, please, shop my online store HERE.

Measurements

  • Box Base: 8-7/8" x 5"; scored on the short side at 1-1/8" & 3-7/8" and scored on the long side at 1-1/8", 3-7/8", 5", & 7-3/4" (see template below for cutting and scoring guide) (Pumpkin Pie Cardstock)
  • Side Panels (cut 4): 1" x 2-5/8" (Black and White Designs Designer Series Paper)
  • Top Panel #1: 2-1/2" x 2-1/2" (Black and White Designs Designer Series Paper)
  • Top Panel #2: 2-1/4" x 2-1/4" (Basic White Cardstock)
  • Greeting: 1-3/4" x 2" (Pumpkin Pie Cardstock) - then trim with paper snips to fit the greeting


Supply List

Stamps
#159850 Scary Cute Stamp Set

Paper
#105117 Pumpkin Pie Cardstock
#159276 Basic White Cardstock
#159861 Black and White Designs Designer Series Paper

Ink
#132708 Memento Tuxedo Black Ink Pad

Embellishments
#104430 Dimensionals
#141897 Clear Wink of Stella

Tools
#122334 Simply Scoring Scoring Tool
#110755 Multipurpose Liquid Glue
#102300 Bone Folder
#103579 Paper Snips
#130148 Grid Paper
#152392 Paper Trimmer
#126200 Stampin' Scrub
#153648 Stampin' Mist Cleaner
#118487 Clear Block A
#118490 Clear Block H


I created a template showing the cutting and scoring lines for this Halloween treat box. The red lines indicate the cut lines. The blue dashed lines indicate the scoring lines. Be sure to angle cut or notch the side tabs as indicated, so that the box closes smoothly and neatly.

Halloween treat holder box template graphic; halloween, treat holder, Scary Cut, 3D, box

I hope you enjoyed today's Scary Cute peanut butter cup treat holder box. If you need supplies to make this Halloween treat box, please, shop my online store HERE.


If you have any questions about today's project, please, don't hesitate to ask me.

Thanks for stopping by!
Beth
Thursday, October 13, 2022

Heat Embossed Abigail Rose Birthday Card

Each Tuesday I send out my stamping newsletter to my email list. On October 18th, I will be sharing this birthday card featuring a gold heat embossed greeting from the Go to Greetings stamp set on a background of the Abigail Rose Designer Series Paper.


birthday card with flowered patterned paper in vanilla and dark brown with a gold embossing greeting stamped on vanilla paper towards the bottom of the card front decorated with 3 small brass butterflies; Cottage Rose, Abigail Rose Designer Series Paper, birthday, card

This Abigail Rose birthday card is only available to my email list subscribers. If you are already on my email list, you will automatically receive the project supply list, measurements, and instructions for this card.

If you are not on my email list and would like to receive the project supply list, measurements, and instructions for this birthday card, please, sign up for my email list by October 17th, 2022.

Sign up for my emailing list today HERE or in the bright blue sign up box in the upper right corner of my blog. I can't wait to welcome you as a subscriber!

Beth

Sunday, October 9, 2022

Second Sunday Sketches #42 Starts Today

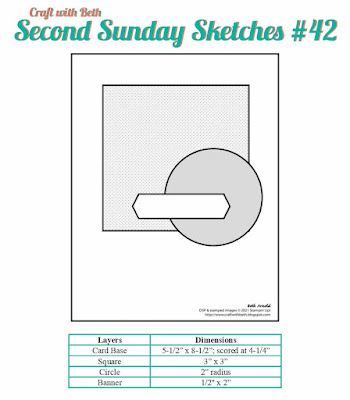
Craft with Beth Second Sunday Sketches graphic title graphic banner card sketch challenge with measurements

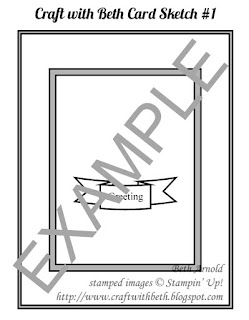
It is time for another Second Sunday Sketches challenge! If you are new to Second Sunday Sketches, please review the rules here or below. Each second Sunday of the month, I will post a card sketch. A sketch is graphic or drawing of how the elements of a card are arranged.

Craft with Beth: Stampin' Up! Second Sunday Sketches sketch card sketch challenge sample graphic


You will then use the sketch as a guide to create your own card. Your card must be a new creation and reflect the challenge guidelines. Your card must include the major elements of the card sketch, such as the number of layers and the general position of the embellishments and/or die cuts. You can rotate the sketch for a top-folding card or for a side-folding card.

You choose the occasion and the color palette as well as the stamp set(s) and the embellishments. I do ask that you use Stampin' Up! products (current or retired).

The measurements will also be included in the blog post for each Second Sunday Sketches sketch challenge. You can use the measurements as given or increase them or decrease them. For example, if a greeting is stamped on a 1" circle on the sketch, but the greeting you choose is 1-3/4", then increase the size of the circle to 1-3/4". You can also change the shape. Instead of a circle, you can use an oval, a square, a daisy punch, a monogram, etc.

The challenge will run from the second Sunday of the month until the last day of that month. 


Card Sketch

Below is October's card sketch.

Second Sunday Sketches card sketch challenge graphic #42 with measurements

Challenge Dates

October's challenge will run from October 9th, 2022 until October 31st, 2022 at 5pm EDT.

If you would like to participate in the Second Sunday Sketches sketch challenge, please create a card using the sketch above and email me a photo of your card by October 31st, 2022 at 5pm EDT with the subject line Second Sunday Sketches Entry.


Prize Drawing

The day after the last day of the month (November 1st), I will place all of the names of the participants in a proverbial hat and randomly draw a winner. The winner will receive a prize (US Residents only)! The prize each month will change and will be announced at the start of each challenge. October's Second Sunday Sketches sketch challenge prize is a surprise embellishment pack from my retired product cache and three hand-made cards from me.

October 2022 Second Sunday Sketches #42 card challenge sketch challenge prize graphic


Winner Announcement

If you are the winner, I will notify you by email. Please respond to my email with your complete mailing address, and I will mail you your prize! If the winner does not respond to my email within 7 days, I will draw another winner.

I will also post all of the entries on my blog (with your names attached to the photos) and the name of the winner.


Some Ideas on How to Make this Card Sketch Your Own

There are many ways to change this card to make it your own! You can rotate the card layout 90 degrees, change the square and circle to other shapes like a witch's hat or a bat, add a mat layer beneath the hearts, use stencils to add more texture to a mat layer, and more!


Share Second Sunday Sketches with a Friend

Be sure to join in on the fun and share with a friend! If you enter the Second Sunday Sketches challenge, you can get a bonus surprise prize by sharing this challenge with a friend (for US residents only)! Here's how to get a bonus surprise prize. Limit two bonus surprise prizes per person per month.
  1. Enter into this month's Second Sunday Sketches challenge
  2. Share this month's Second Sunday Sketches challenge with a friend (that hasn't participated before)
  3. Have your friend submit their this month's challenge card entry
  4. Email me that your friend has submitted their card entry. Submit your complete mailing address and the name of the friend that you shared with. I will confirm their entry and then send you a bonus surprise prize.


I am looking forward to seeing your personal take on the 42nd Second Sunday Sketches sketch challenge! If you have any questions about this card sketch challenge, please let me know! I am happy to assist!

Happy Stamping!
Beth

Thursday, October 6, 2022

Sneak Peek: Season of Hope and Light Christmas Card

Each Tuesday I send out my stamping newsletter to my email list. On October 11th, I will be sharing this Christmas banner card featuring the Brightest Glow stamp set and the Lights Aglow Specialty Designer Series Paper.
Brightest Christmas stamp set Christmas card Banner Pick a Punch Labels Aglow Dies


This Brightest Glow Christmas card is only available to my email list subscribers. If you are already on my email list, you will automatically receive the project supply list, measurements, and instructions for this card.

If you are not on my email list and would like to receive the project supply list, measurements, and instructions for this Christmas card, please, sign up for my email list by October 10th, 2022.

Sign up for my mailing list today HERE or in the bright blue sign up box in the upper right corner of my blog. I can't wait to welcome you as a subscriber!

Beth